In the search results, click "Windows Firewall".
Be careful not to click "Windows Firewall with Advanced Security".
On the left side of the "Windows Firewall" box, click "Turn Windows Firewall on or off".
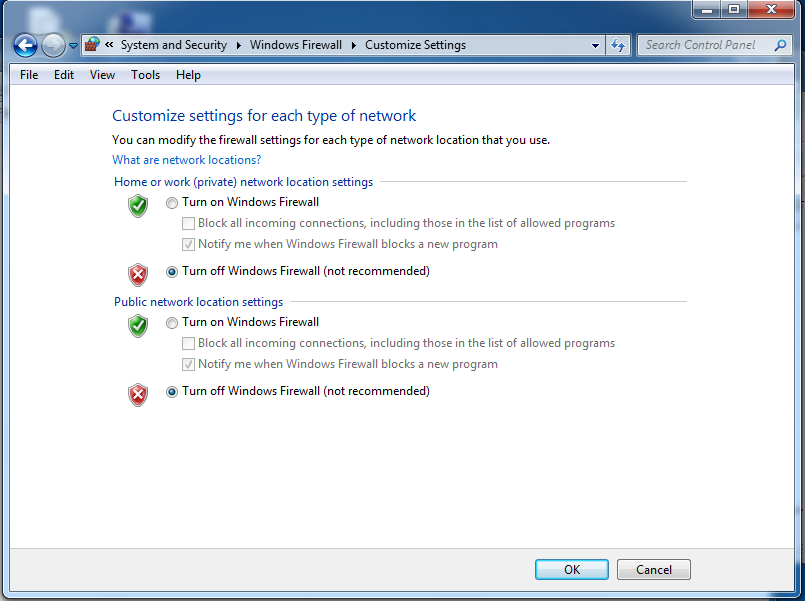
Click both "Turn off Windows Firewall (not recommended)" buttons, as shown below:
In the "Customize Settings" box, click the OK button.
In the search results, click "Windows Firewall".
Be careful not to click "Windows Firewall with Advanced Security".
On the left side of the "Windows Firewall" box, click "Turn Windows Firewall on or off".
Click the Off" button, as shown below:
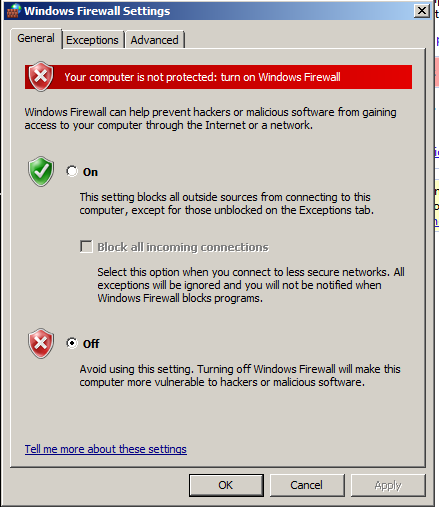
In the "Windows Firewall Settings" box, click the OK button.
Press the Enter key.
A Command Prompt window opens.
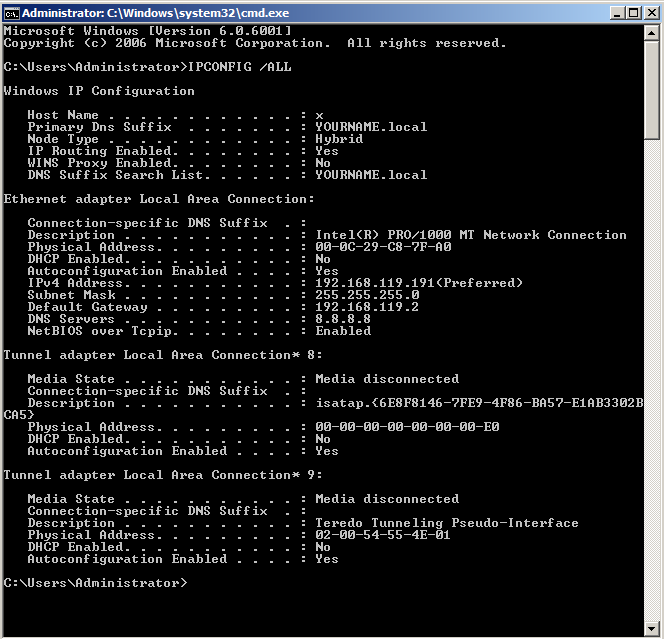
Execute this command:
IPCONFIG /ALL
Make a note of it.
PING 192.168.119.191
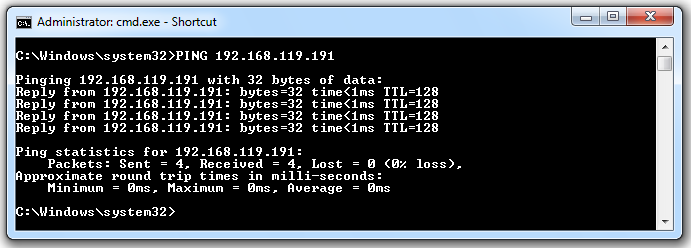
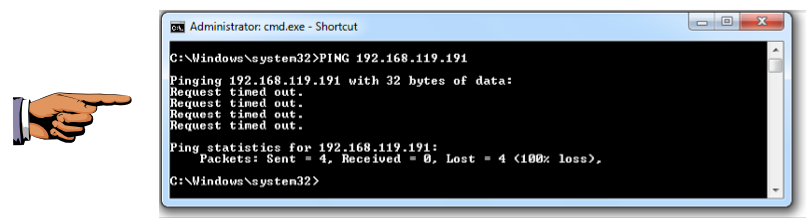
If you don't see replies, you need to troubleshoot your network before proceeding. Make sure all firewalls are off and that all virtual networks are set to "Bridged" mode.
In Wireshark, on the left side, highlight your real network adapter and click Start.
In Wireshark, at the top left, in the Filter bar, type in this text, and then press the Enter key:
icmp
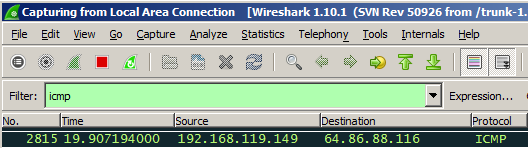
PING 192.168.119.191
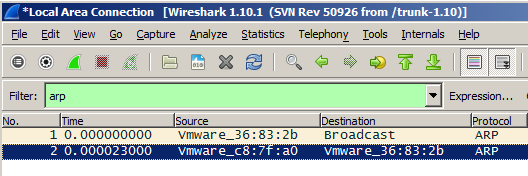
Scroll up if necessary, and find the two packets shown below, in this order.
So modern Windows computers use a firewall to block PING packets.
In the search results, click "Windows Firewall".
Be careful not to click "Windows Firewall with Advanced Security".
On the left side of the "Windows Firewall" box, click "Turn Windows Firewall on or off".
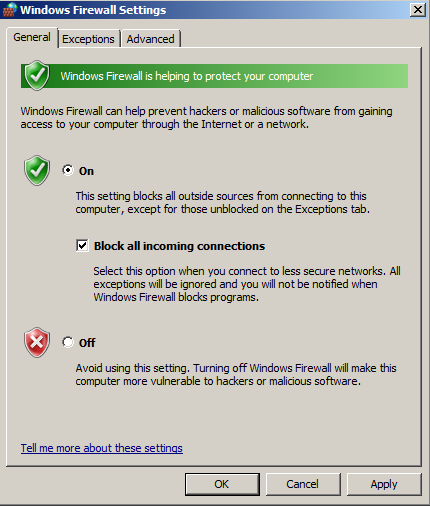
Click both the the On button and the "Block all incoming connections" button, as shown below:
In the "Windows Firewall Settings" box, click the OK button.
A box pops up, asking "Do you want to save...". Click "Continue without Saving".
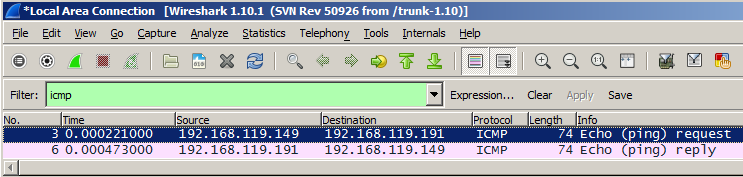
PING 192.168.119.191
Click on the host machine's taskbar to make it the recipient of keypresses.
On your keyboard, press the PrntScrn key.
Click Start, type in PAINT, and open Paint.
Press Ctrl+V to paste in the image of your desktop.
YOU MUST SUBMIT WHOLE-DESKTOP IMAGES TO GET FULL CREDIT.
Save the image with a filename of "Proj 17a from YOUR NAME".
Scroll up if necessary, and find the four "Echo (ping) Request" packets shown below.
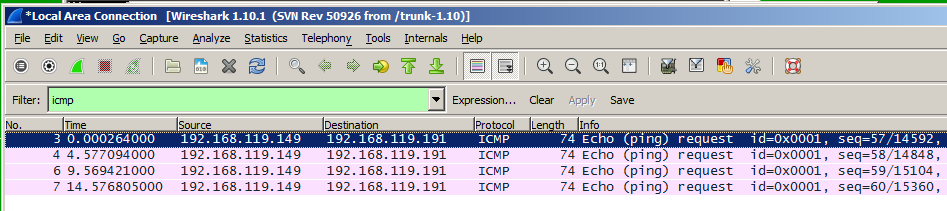
So although the Requests get in, there are no Replies.
If you were using a hardware firewall, it would block the requests entirely before they reached the TARGET. That is a safer procedure.
On the SCANNER machine, open a Web browser and go to this address:
http://samsclass.info/123/proj10/ca_setup.7z
The file downloads, usually into your Downloads folder. Open the folder containing the ca_setup.7z file. Right-click the ca_setup.7z file, and click 7-Zip, "Extract Here".
If you don't have 7-Zip, get it here:
7-Zip asks for a password. Use this password:
sam
Once the ca_setup.exe file is extracted, double-click it and install Cain with the default options. It will also install WinPcap.
arp
In Wireshark, click Capture, Start.
A box pops up, asking "Do you want to save...". Click "Continue without Saving".
In the search results, right-click Cain and click "Run as administrator". In the "User Account Control" box, click Yes.
In Cain, in the top center, click the Sniffer tab. From the Cain menu bar, click Configure.
A "Configuration Dialog" box pops up, as shown below. Verify that your real network interface is selected, and click the OK button.

In the Cain toolbar, click the second icon, which looks like a little green network card. A box pops up saying "WARNING !!! TCP Large/Giant Offloading is enabled...". Click the OK button.
The NIC icon should now look indented, indicating that the sniffer is active, as shown below.
In the Cain toolbar, click the + button.
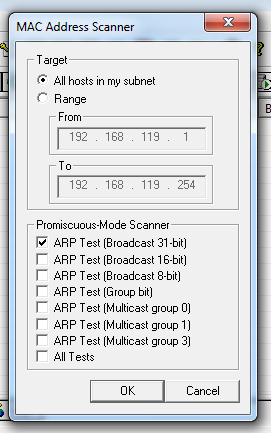
A "Mac Address Scanner" box pops up, as shown below.
Click the top "ARP Test" button, as shown below.
Click the OK button.
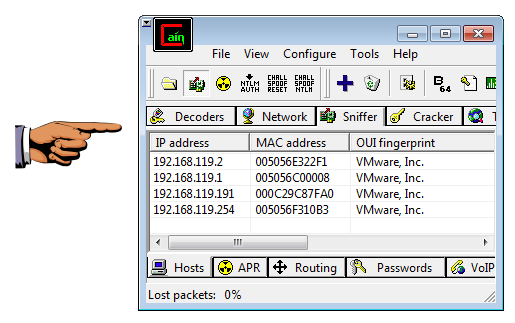
Cain completes the scan in a few seconds, and finds all the hosts on your network, as shown below.
Click on the host machine's taskbar to make it the recipient of keypresses.
On your keyboard, press the PrntScrn key.
Click Start, type in PAINT, and open Paint.
Press Ctrl+V to paste in the image of your desktop.
YOU MUST SUBMIT WHOLE-DESKTOP IMAGES TO GET FULL CREDIT.
Save the image with a filename of "Proj 17b from YOUR NAME".
Scroll through the packets. Cain just scans all the IP addresses in order.
Find the ARP request for your TARGET's IP address, and its reply, as shown below.

Click on the host machine's taskbar to make it the recipient of keypresses.
On your keyboard, press the PrntScrn key.
Click Start, type in PAINT, and open Paint.
Press Ctrl+V to paste in the image of your desktop.
YOU MUST SUBMIT WHOLE-DESKTOP IMAGES TO GET FULL CREDIT.
Save the image with a filename of "Proj 17c from YOUR NAME".
This is normal, because a machine that doesn't answer ARPs cannot make any network connections at all. And there's no reason to even have an IP address if you don't want any network connections.
If an attacker can get onto your LAN and use layer 2, they can layer 2 scans and attacks, which are very difficult to stop.
This is why networks require physical security, keeping attackers out of the building, and wireless networks need to be protected with WPA to keep attackers off the WLAN.
There is only one reason I know of to make a machine that rejects ARP packets--a network scanner. Such a machine can be configured with no IP address, and it scans only at layer 2. That is a very secure technique, because a scanner like that is invisible to layer 3 and layer 2 scans, and it cannot be taken over and controlled remotely because it has no IP address.
That procedure is explained here:
Last Modified: 10-23-13 2:18 pm