If necessary, go here to download Wireshark:
Before changing anything, verify that the computer you are using can get to the Internet.
On the top of each machine in S214 there is a label saying which network card should be connected to which port on which switch to get to the Internet.
Examine the current cable and see where it goes, so you can return it to the correct location after this project.
Unplug the cable from the switch on one computer and connect it to the other computer, so the two computers are connected together like this:
![]()
The computers can communicate with each other, but not with the Internet.
In the search results, click "Network and Sharing Center.
On the left side, click "Change adapter settings".
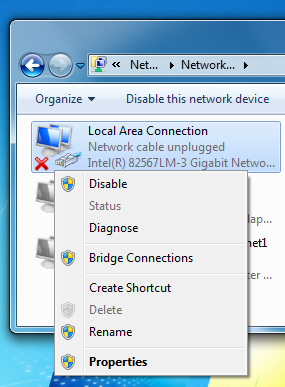
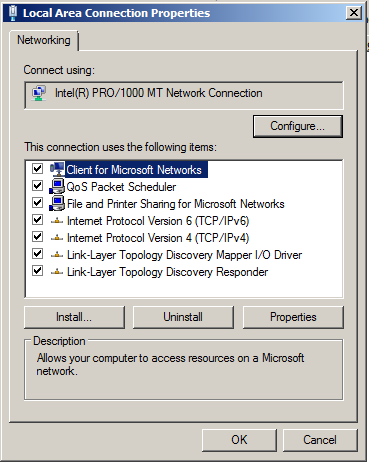
Right-click the "Local Area Connection" icon and click Properties.
There are several connections here--make sure you are using the "Intel(R) 82567LM-3 Gigabit" adapter, as shown below.
In the "Local Area Connection Properties" box, double-click "Internet Protocol Version 4 (TCP/IPv4)".
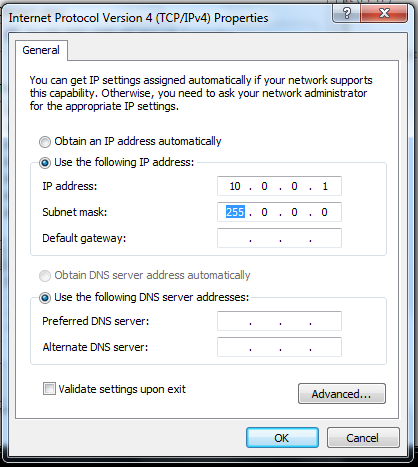
In the "Internet Protocol Version 4 (TCP/IPv4) Properties" box, click the "Use the following IP address" button.
Enter an address and subnet mask of:
Address: 10.0.0.1as shown below.
Subnet mask: 255.0.0.0
In the In the "Internet Protocol Version 4 (TCP/IPv4) Properties" box, click OK.
In the "Local Area Connection Properties" box, click OK.
Address: 10.0.0.2
Subnet mask: 255.0.0.0
Do this on both machines:
Click Start. Type CMDPress Enter.
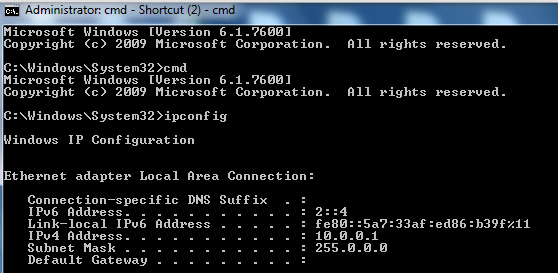
In the Command Prompt screen, type in IPCONFIG and press the Enter key.
Scroll back up to find the "Local Area Connection".
Your IP address apears, as shown below.
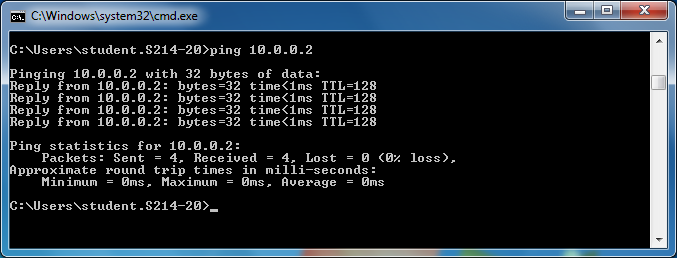
Then press Enter:
ping 10.0.0.2
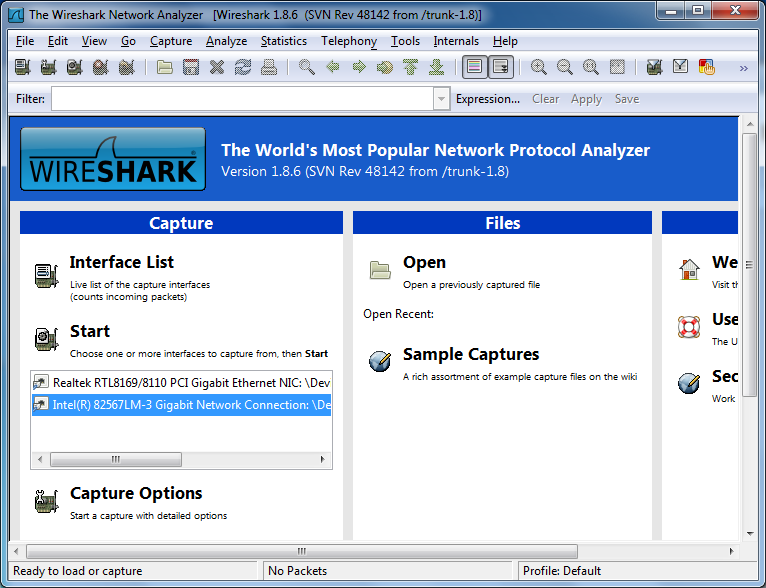
In Wireshark, in the "Capture" section, click "Intel(R) 82567LM-3 Gigabit", as shown below.
Click Start.
On the 10.0.0.1 machine, in the Command Prompt window, execute this command:
Then press Enter:
ping 10.0.0.2
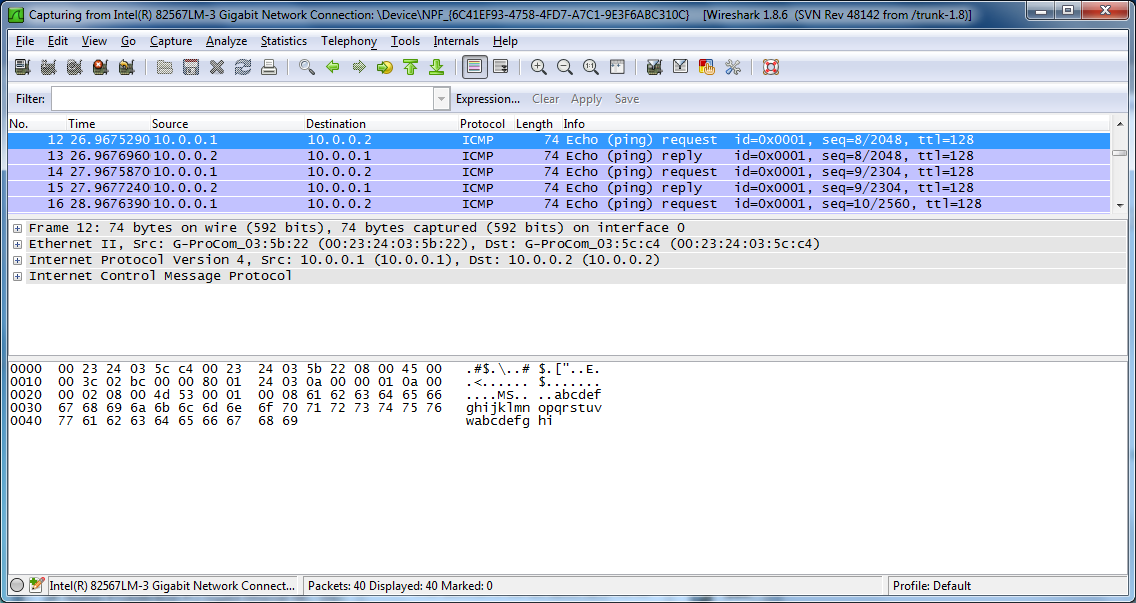
Expand the middle section, as shown below. You should see that the ping has a size of "74 bytes on wire".
Then press Enter:
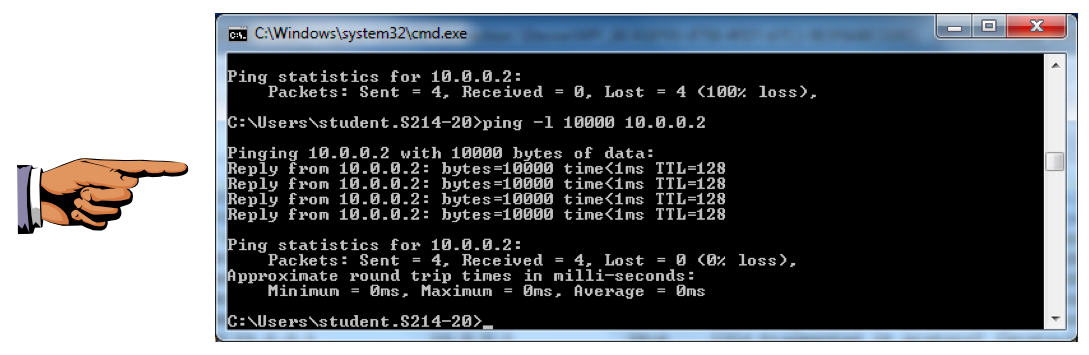
ping -l 10000 10.0.0.2
You should see replies, saying "bytes=10000", as shown below:
On your keyboard, press the PrntScrn key.
Click Start, type in PAINT, and open Paint.
Press Ctrl+V to paste in the image of your desktop.
YOU MUST SUBMIT WHOLE-DESKTOP IMAGES TO GET FULL CREDIT.
Save the image with a filename of "Proj 1xa from YOUR NAME".
In the middle pane of Wireshark, on the "Internet Protocol version 4" line, click the + sign.
Adjust the window so you can see the line at the bottom listing the fragments like this: "[7 IPv4 Fragments..", as shown below:

Close Wireshark. Don't save the packets.
Click Start, right-click Network, and click Properties.In "Network and Sharing Center", on the left side, click "Change adapter settings".
In the "Network Connections" window, right-click the "Local Area Connection" icon and click Properties.
In the "Local Area Connection" window, click the Configure button, as shown below:
In the "Intel(R) ... Properties" box, click the Advanced tab.
In the "Property" list, click "Jumbo Packet".
In the "Value" drop-down list box, select "9014 Bytes", as shown below:
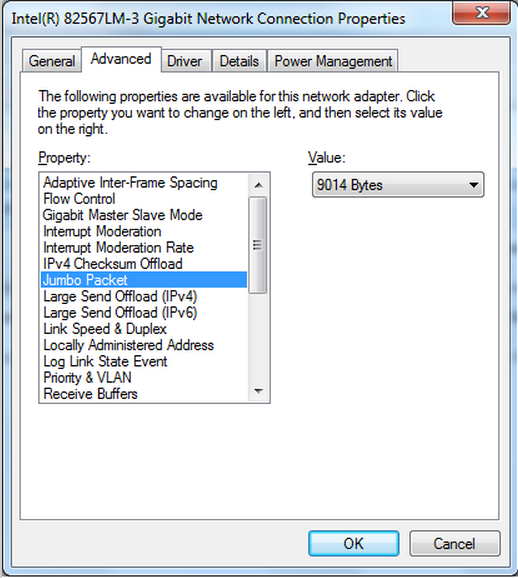
In the "Intel(R) ... Properties" box, click OK.
In Wireshark, in the "Capture" section, click "Intel(R) 82567LM-3 Gigabit".
Click Start.
Then press Enter:
ping -l 10000 192.168.1.133
You should see replies, saying "bytes=10000".
In the middle pane of Wireshark, on the "Internet Protocol version 4" line, click the + sign.
Adjust the window so you can see the line at the bottom listing the fragments like this: "[2 IPv4 Fragments (10008 bytes) ", as shown below:
![]()
This proves that you have jumbo frames working. Normal Ethernet cannot possibly move 10,000 bytes of data in just two frames.
On your keyboard, press the PrntScrn key.
Click Start, type in PAINT, and open Paint.
Press Ctrl+V to paste in the image of your desktop.
YOU MUST SUBMIT WHOLE-DESKTOP IMAGES TO GET FULL CREDIT.
Save the image with a filename of "Proj 1xb from YOUR NAME".
On each Computer, click Start. In the Search box, type NETWORK.
Open "Network and Sharing Center, click "Change adapter settings", right-click "Local Area Connection" and click Properties.
Click the Configure button.
On the Advanced tab, set "Jumbo Packet" to Disabled. Click OK.
Right-click "Local Area Connection" and click Properties.
Double-click "Internet Protocol Version 4 (TCP/IPv4)"
Click the "Obtain an IP address automatically" button.
Click OK. Click OK.
Open a Command Prompt and execute this command:
ping google.com
![]()
On your keyboard, press the PrntScrn key.
Click Start, type in PAINT, and open Paint.
Press Ctrl+V to paste in the image of your desktop.
YOU MUST SUBMIT WHOLE-DESKTOP IMAGES TO GET FULL CREDIT.
Save the image with a filename of "Proj 1xc from YOUR NAME".
On your keyboard, press the PrntScrn key.
Click Start, type in PAINT, and open Paint.
Press Ctrl+V to paste in the image of your desktop.
YOU MUST SUBMIT WHOLE-DESKTOP IMAGES TO GET FULL CREDIT.
Save the image with a filename of "Proj 1xd from YOUR NAME".
Email the images to cnit.106sam@gmail.com with a subject of "Project 1x from YOUR NAME".
Last modified: 11-19-13 5 pm