In the virtual machine, click Start, "Turn Off Computer", "Turn Off". Wait until the guest operating system shuts down.
On the right side, click "Edit virtual machine settings".
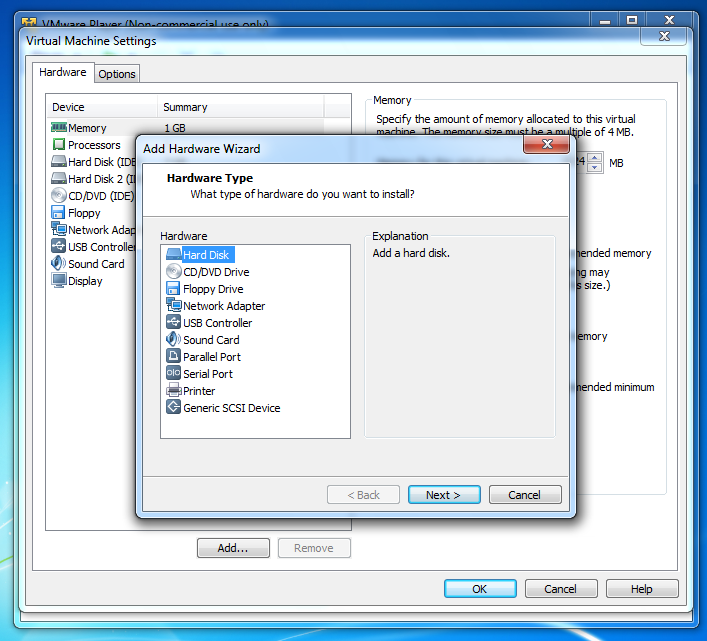
In the "Virtual Machine Settings" box, click the Add... button. If a "User Account Control" box pops up, click
In the "Add Hardware Wizard" box, accept the default selection of "Hard Disk" and click the Next button,
as shown below:
In the "Select a Disk" box, accept the default selection of "Create a New Virtual Disk" and click the Next button.
In the "Select a Disk Type" box, accept the default selection of "IDE (Recommended)" and click the Next button.
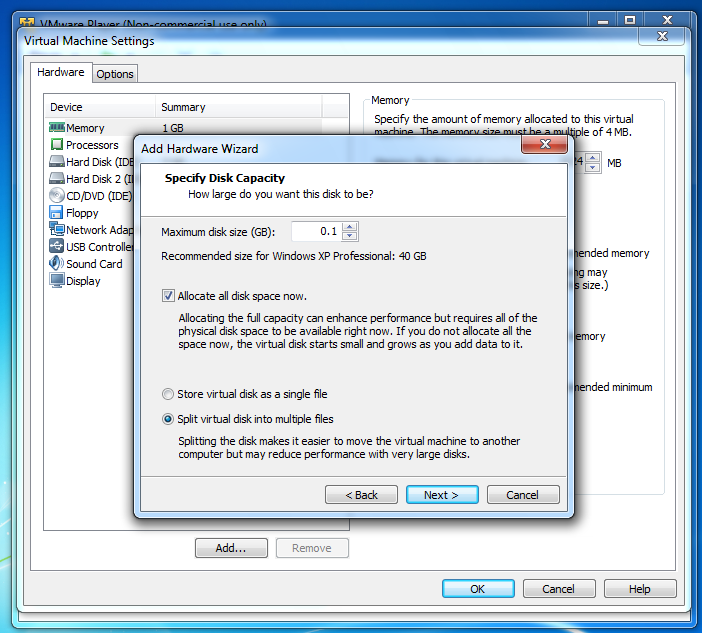
In the "Specify Disk Capacity" box, set the "Maximum disk size (GB)" to 0.1 and check the "Allocate all disk space now" as shown below. Click Next.
In the "Specify a Disk File" box, accept the default selection and click Finish.
In the "Virtual Machine Settings" box, click OK.
Scroll down and click the "Download page" link. Download and install the English version of HxD. Accept the default options.
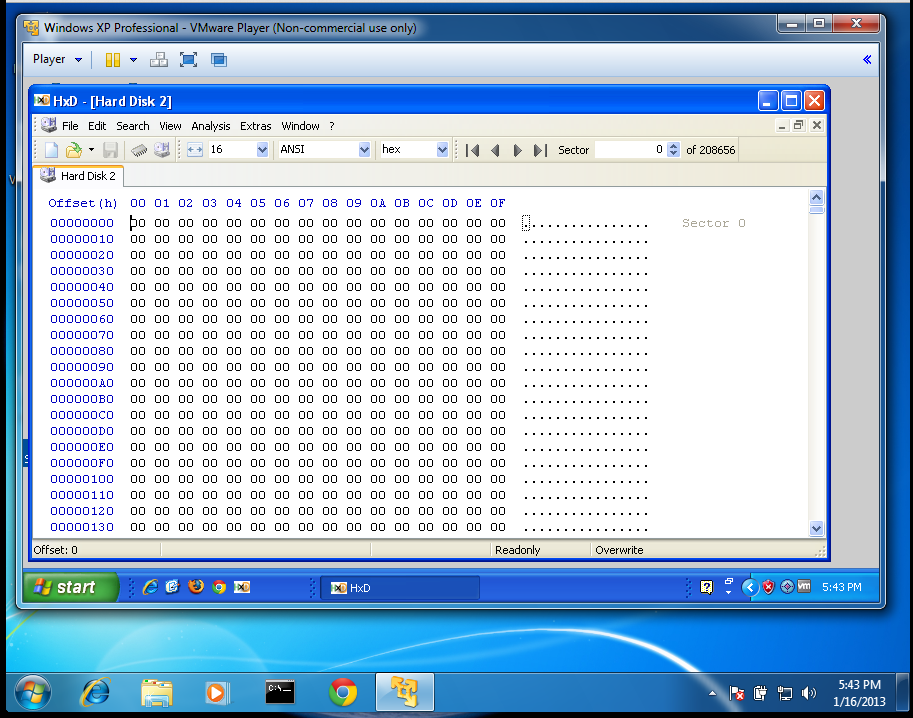
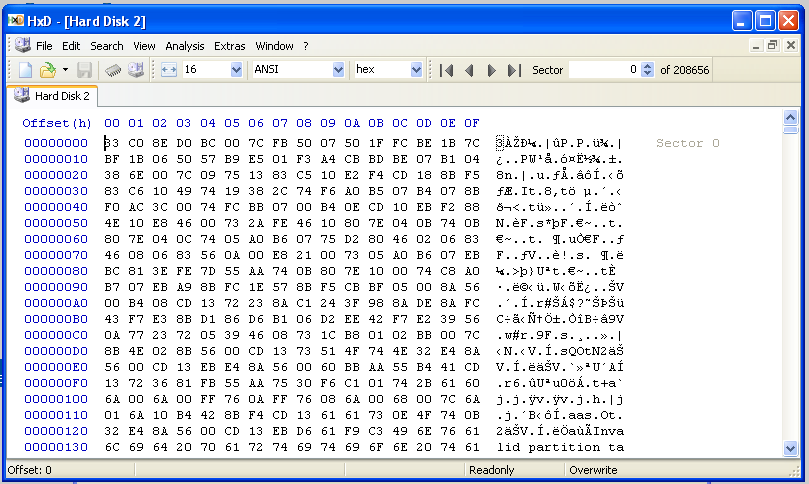
In HxD, click Extras, "Open disk...".
In the "Open disk" box, in the "Physical disks" section, click "Hard Disk 2", as shown below. Click OK.
HxD shows the contents of the disk, as shown below on this page.
Find these things:
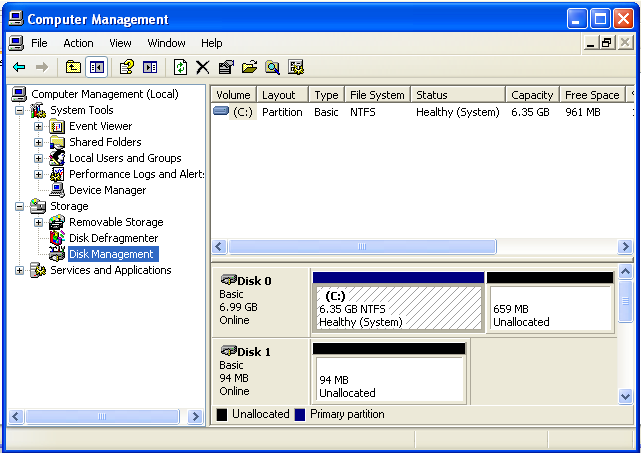
The disk should now appear in Disk Management as "Disk 1", containing approximately 100 MB of Unallocated space, as shown
below.
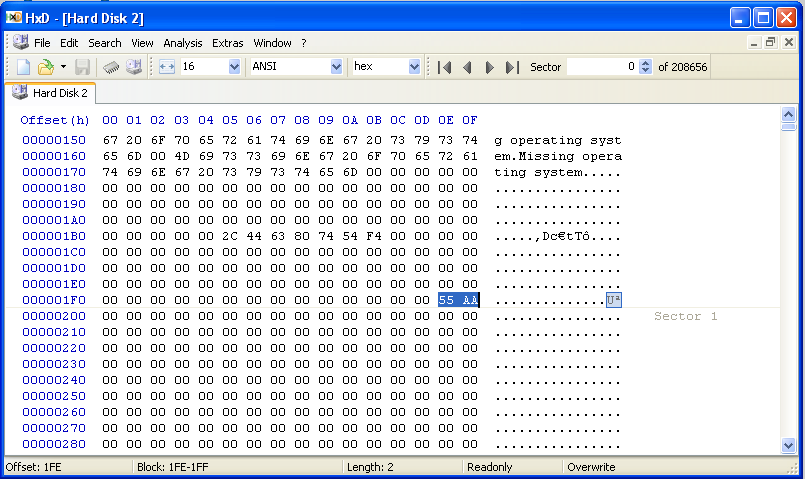
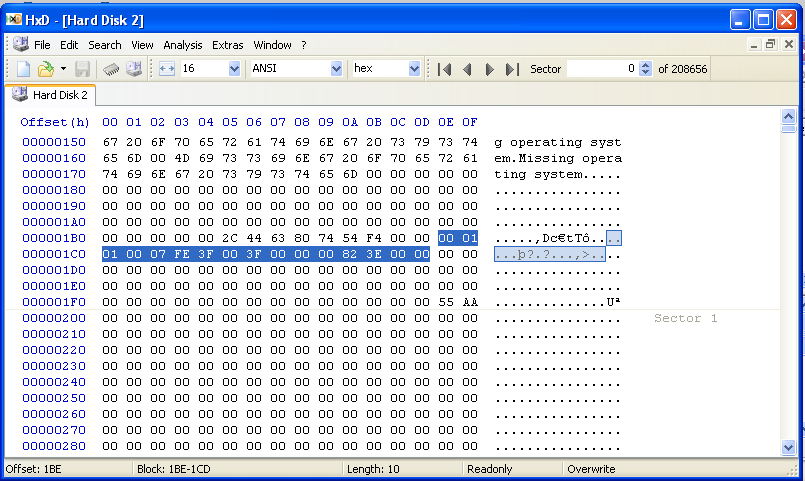
Scroll down to the end of the first sector, locations 1FE and 1FF, and note that the last two bytes are 55 and AA, as shown below. Bytes 200 and above still contain zeroes.
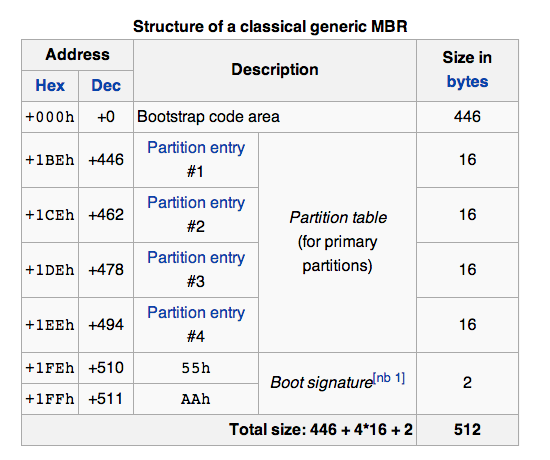
The chart below shows the main features of the MBR
(from
Wikipedia).
Find these features in your HxD window:
In the "Welcome to the New Partition Wizard" box, click Next.
In the "Select Partition Type" box, accept the default selection of "Primary partition" and click Next.
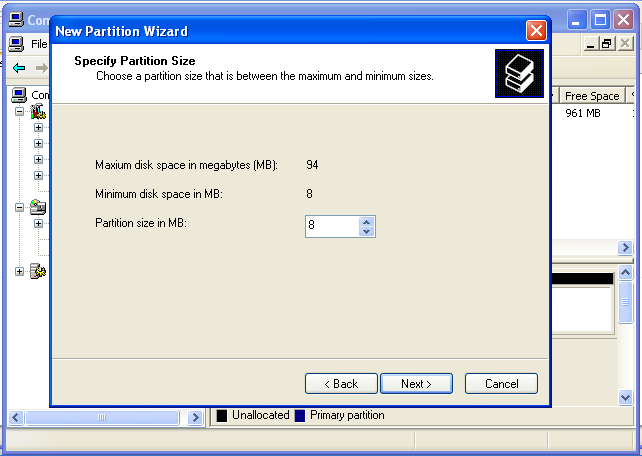
In the "Specify Partition Size" box, enter a Partition Size of 8 as shown below, and click Next.
In the "Assign Drive Letter or Path" box, accept the default selection of E and click Next.
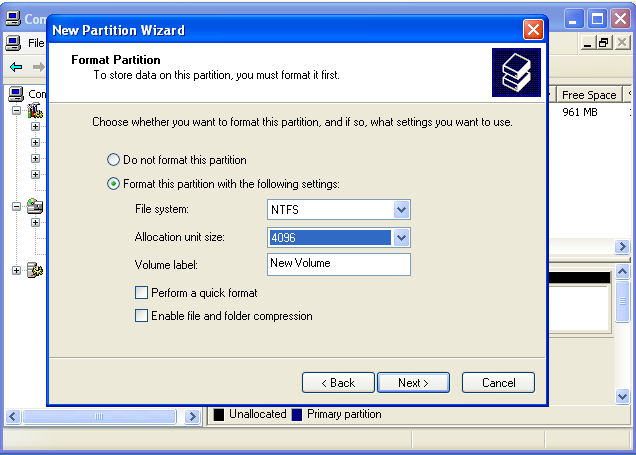
In the "Format Partition" box, set the "Allocation unit size" to 4096, as shown below, and click Next.
In the "Completing the New Partition Wizard" box, click Finish.
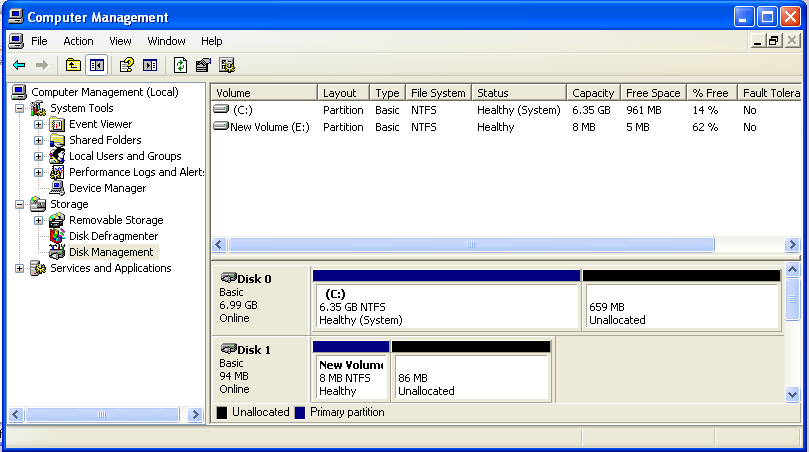
After a few seconds, Disk Manager should now show New Volume (E:) new volume with a size of 8 MB, as shown below.
Notice that the first record of the partition table
(from hex 01BE through 01CD)
now contains data, as highlighted in the image below on this page.
Click the "CNIT 121" link. Click the "Projects" link.
Under "Project 2", click the SPAM.zip link.
Save the file on your desktop.
Click the EGGS.zip link and save it on your desktop as well.
On your desktop, right-click the SPAM.zip file and click "Extract All...".
In the "Welcome to the Compressed (zipped) Folders Extraction Wizard" box, click Next.
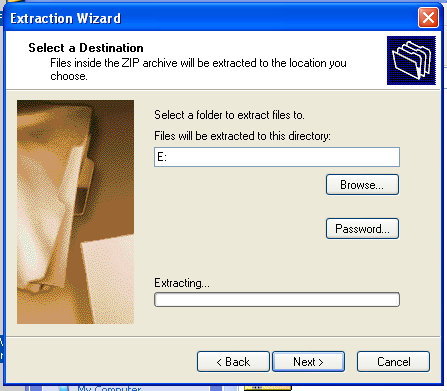
In the "Select a Destination" box, enter a directory of E:, as shown below. Click Next.
After a few seconds,
an error message pops up,
saying "There is not enough space on
the disk to extract the file". Click OK.
In the "Extraction Wizard" box, click Cancel.
From the virtual machine's desktop,
click Start, "My Computer".
Double-click "New Volume (E:)".
Double-click the SPAM folder to open it.
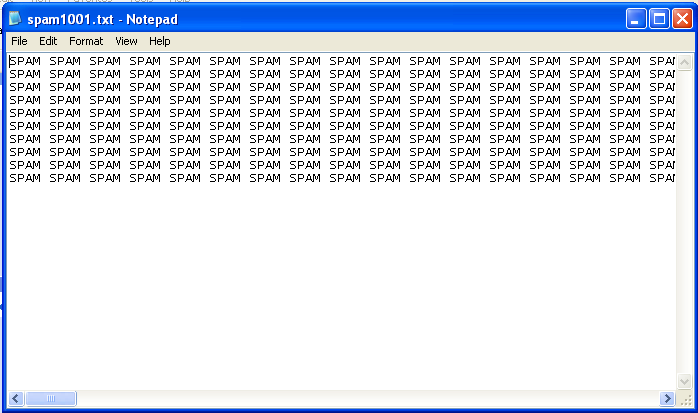
You see a lot of files named spam1001.txt, spam1002.txt, etc.
Double-click spam1001.txt.
As you can see, the file contains the word SPAM repeated many times, as shown below. Each "spam" file contains 10,000 characters.
Scroll down with the mouse until you find some SPAM.
Scroll back up carefully to the start of a block of SPAM. The exact location may vary. When I did it, the spam started at sector 671, as shown below on this page.
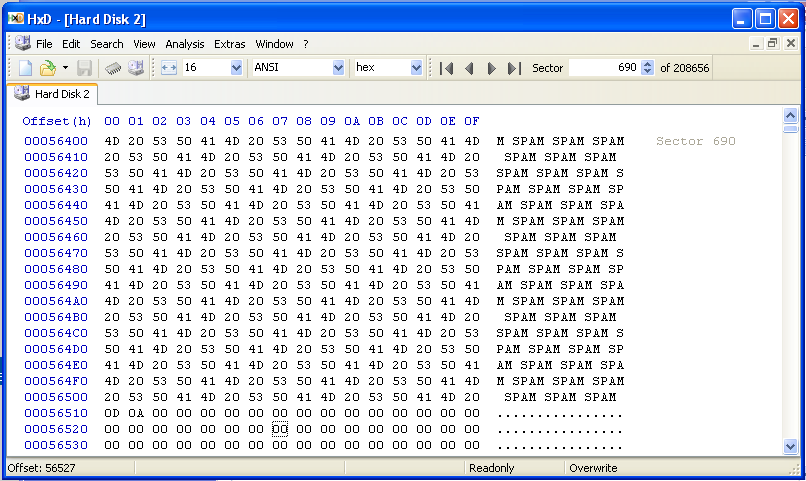
Tap the PageDown key on the keyboard until you reach the end of the SPAM text in this file. When I did it, the text ended in sector 714, as shown in the image below on this page.
The partition is formatted with 4096-byte clusters, each containing eight 512-byte sectors. The spam files contain 10,000 characters each, so they occupy three clusters, as shown below. Look at these clusters and verify that they contain the expected data. Your Sector numbers might be different, but you should see this pattern of data in 24 sequential sectors.
Double-click "New Volume (E:)".
Right-click the SPAM folder and click Delete.
In the "Confirm Folder Delete" box, click Yes.
Another "Confirm Folder Delete" box pops up, saying that these files will be "permanently deleted". Click Yes.
Scroll through the 24 sectors you examined previously, and verify that all the SPAM text is still there. Deleting the files did not erase any text data.
All it did was change records in the Master File Table.
Right-click "New Volume (E:)" and click Format....
In the "Format New Volume (E:)" box, make sure that the "Quick Format" box is cleared, and that the "Enable Compression" box is cleared, as below. Click Start.
A "Format New Volume (E:)" box pops up saying "WARNING: Formatting will erase ALL data on this disk". Click OK.
When the message "Format Complete" appears, click OK.
Scroll through the 24 sectors you examined previously, and verify that all the SPAM text is still there. Formatting the disk did not erase any text data either.
In the "Welcome to the Compressed (zipped) Folders Extraction Wizard" box, click Next.
In the "Select a Destination" box, enter a directory of E:. Click Next.
When the extraction completes, click Finish.
A "New Volume (E:)" window opens.
Double-click the EGGS folder to open it.
Double-click the EGGS folder to open it.
You see a lot of files named "Copy (2) of eggs1001.txt", etc. Double-click one of the files to open it.
As you can see, the file contains the word EGGS repeated many times, as shown below. There are a total of 1000 characters in each "eggs" file, much smaller than the "spam" files.
Scroll through the 24 sectors you examined previously, and find some EGGS data. If necessary, use the mouse to scroll, or the "Search" menu item, to find some EGGS text. Find the place where the EGGS data ends, as shown below.
Click the taskbar at the bottom of your host Windows 7 desktop, to make the host machine listen to the keyboard, instead of the virtual machine.
Press the PrintScrn key in the upper-right portion of the keyboard. That will copy the whole desktop to the clipboard.
YOU MUST SUBMIT A FULL-SCREEN IMAGE TO GET FULL CREDIT!
On the host machine, not the virtual machine, open Paint and paste in the image.
Save the image with the filename "Your Name Proj 2a". Use your real name, not the literal text "Your Name".
Make sure you understand the Terms for each type of data.
In the Windows XP virtual machine, close all windows, except the
HxD window.
Click Start, Run.
In the Run box, type CMD and press the Enter key.
In the Command Prompt window, type this command and then press the Enter key:
In the Command Prompt window, type this command and then press the Enter key:
All the SPAM and EGGS text is now gone.
Scroll to the top and observe that the whole disk is empty--even the MBR is gone.
Send it to: cnit.121@gmail.com with a subject line of
"Proj 2From Your Name", replacing "Your Name" with your own first and last name.
Send a Cc to yourself.
Last Modified: 5-22-13 4:23 pm
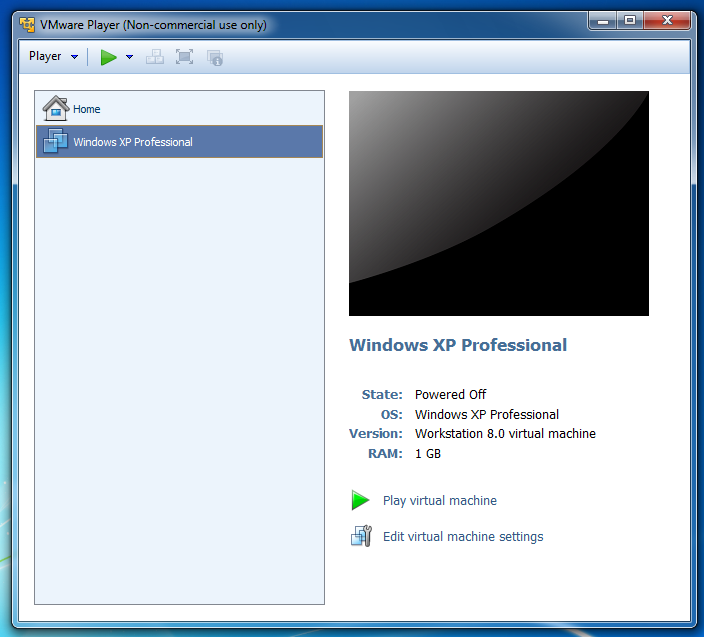
Starting Your Virtual Machine
In the VMware Player window, on the right side, click the
"Play virtual machine" link.
Downloading and Installing HxD
In your virtual machine, start a Web browser and go to
http://mh-nexus.de/en/hxd
Examining a New Disk
In your virtual machine, if HxD is not open, click Start,
"All Programs", "HxD Hex Editor", HxD.
Initializing the Disk
In your virtual machine, click Start. Point to "My Computer" and right-click. Click Manage.
In the left pane of "Computer Management", click "Disk Management".
The "Initialize and Convert Disk Wizard" pops up. Click Next, Next, Next, and Finish. This writes a Master Boot Record to the disk.
Viewing the Master Boot Record (MBR)
In HxD, click View, Refresh. Nonzero values should now be visible on the disk, as shown below.
Partitioning the Disk
In your virtual machine, in "Disk Management", right-click the "94 MB Unallocated" area of Disk 1 and click "New Partition".
Viewing the Partition Table
In HxD, click View, Refresh.
Filling the E: Partition with Spam
In your virtual machine, in a Web browser, go to
http://samsclass.info
Viewing the Stored SPAM Data
In HxD, click View, Refresh.
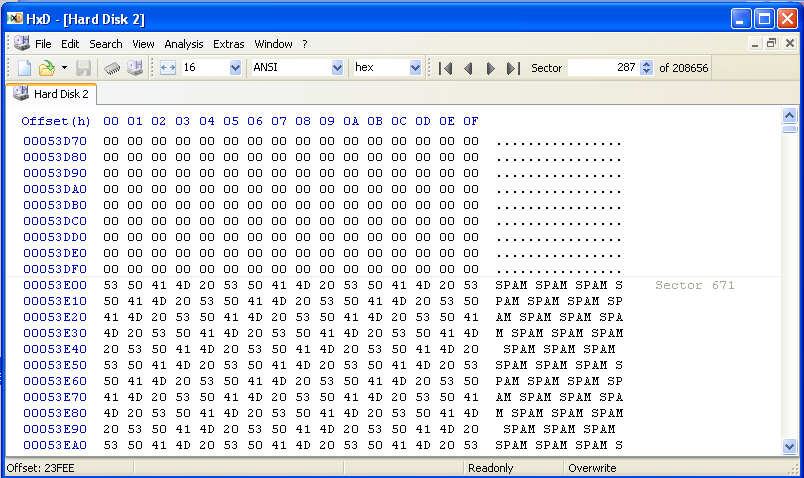
CLUSTER 1   CLUSTER 2   CLUSTER 3
--- ----    --- ----    --- ----
671 SPAM    679 SPAM    687 SPAM
672 SPAM    680 SPAM    688 SPAM
673 SPAM    681 SPAM    689 SPAM
674 SPAM    682 SPAM    690 SPAM + 0
675 SPAM    683 SPAM    691 0
776 SPAM    684 SPAM    692 0
777 SPAM    685 SPAM    693 0
778 SPAM    686 SPAM    694 0
Deleting the Files on the E: Drive
In your virtual machine, click Start,
"My Computer".
Viewing the SPAM Data
In HxD, click View, Refresh.
Formatting the E: Drive
In your virtual machine, click Start,
"My Computer".
Viewing the SPAM Data
In HxD, click View, Refresh.
Adding "EGGS" Files to the E: Partition
On your desktop, right-click the EGGS.zip file and click "Extract All".
Viewing the EGGS Data
In HxD, click View, Refresh.
Reflection
This single image shows three essential concepts:
Saving a Screen Image
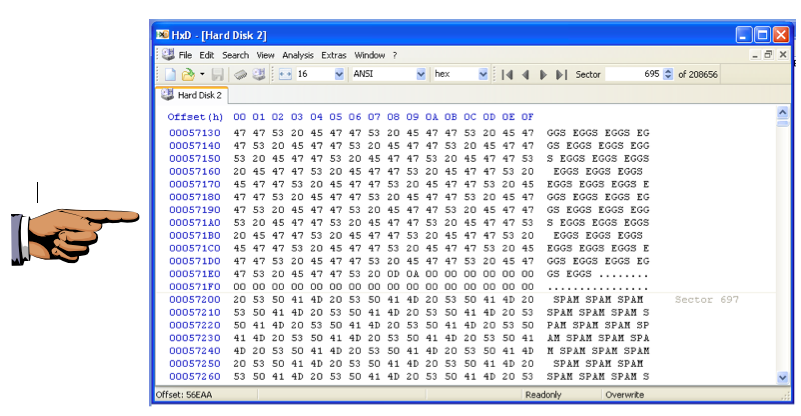
Make sure your screen shows the three essential items: the EGGS text, the Zeroes, and the SPAM text.
Observing the Sectors
Scroll through the sectors, and make sure they show the pattern shown in the chart below. Your Sector numbers may be different, but there should be three sequential sectors with these contents.
Sector     Contents     Technical Term
------     --------     -----------------------
 695       EGGS         Active data
 696       EGGS + 0     Active data + RAM Slack
 697       SPAM         File Slack
Zeroing the Disk
Now we will use a tool that can really erase the disk: DISKPART.
In the Command Prompt window, type this command and then press the Enter key:
DISKPART
You should see two disks, as shown below on this page. Disk 0 is the system disk containing Windows XP. Disk 1 is the 100 MB disk we want to erase.
LIST DISK
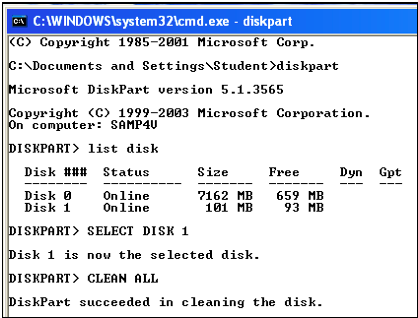
Verify that the message says "Disk 1 is now the selected disk." BE CAREFUL when using this tool--if you erase the wrong disk, it's GAME OVER.
In the Command Prompt window, type this command and then press the Enter key:
SELECT DISK 1
CLEAN ALL
Viewing the Zeroed Disk
In HxD, click View, Refresh.
Turning in your Project
Email the image to me as an attachment to an e-mail message.