Warning
About half the students that try have difficulty with this project because the VMs close instantly and they cannot capture the images. I have not been able to find any pattern--some machines do that and others do not. If it happens to you, you can either try using a different machine or capture a video of the action. You can then either turn in the video, or capture stills from the video.
Navigate to the folder your virtual machine is in.
Find the virtual machine file with a .vmx file extension. It will help to click Organize, "Folder and Search Options", click the View tab, and clear the "Hide file extensions..." box.
Open the .vmx file in Notepad and add this line to the end of it:
bios.bootdelay = 5000
When text appears in the virtual machine, click the mouse inside it and then press the F2 key.
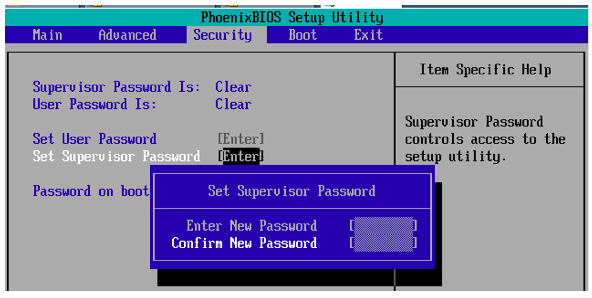
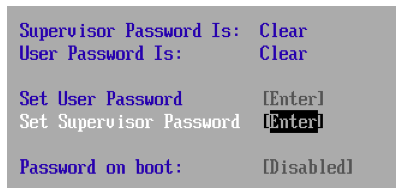
When the "PhoenixBIOS Setup Utility" screen appears, use the keyboard arrow keys to select the Security menu. Press Enter to "Set Supervisor Password".
Enter a BIOS password of 12345678 in both boxes, as shown below.
Use the Enter key to move from one box to the other.
After entering the password in both fields, press Enter.
A "Setup Notice" box appears saying "Changes have been saved.". Press Enter again.
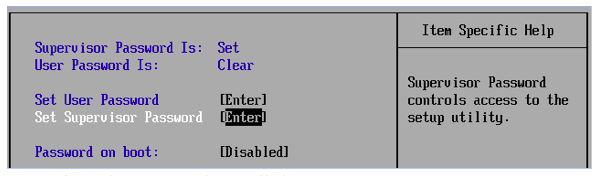
Your BIOS screen should now show that the "Supervisor Password" is "Set", as shown below.
Press F10 and then Enter to save changes.
When the VM restarts, from the VMware Player menu bar, click Player, Power, "Power Off"
A blue box asks you to "Enter Password". Enter something wrong, like X, and press Enter. Repeat the process three times.
A "System Disabled" box appears, as shown below, with a code number visible.

Save a full-desktop imavge with a filename of "Proj X3a from YOUR NAME".
In the "Phoenix (generic)" line, click the "Windows binary" link.
Save the file on your desktop.
On your desktop, right-click the pwgen-5dec.zip file and click "Extract All...". Click Extract.
If a warning box pops up, click Run.
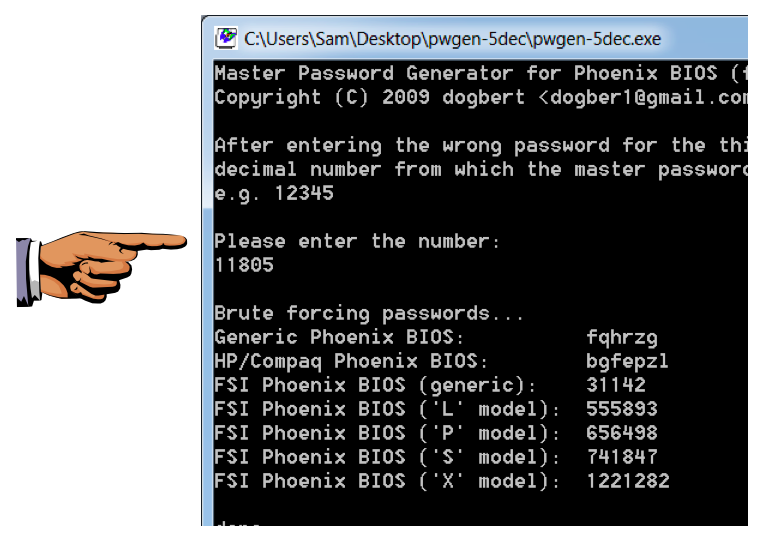
A command prompt window opens. Click in that box and enter the number from your "System Disabled" message.
It finds a series of passwords. Notice that the passwords you get are not the same ones I got, and don't include the password you entered--but they will probably still work.
Save a full-desktop imavge with a filename of "Proj X3b from YOUR NAME".
A blue box asks you to "Enter Password". Enter the password from the "Generic Phoenix BIOS" line in the keygen--when I did it, it was fqhrzg If the password works, you will see the BIOS open. If it fails, run the keygen again. Every time you run it, it finds different passwords, and they don't all work. But it worked for me two out of three times.
A blue box pops up. Press the down-arrow key to highlight Enabled and press Enter.
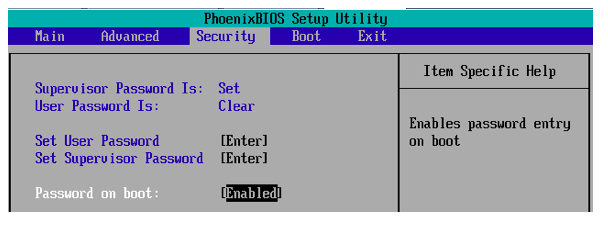
Your BIOS screen should now show that the "Password on boot" is "Enabled", as shown below.
Press F10 and then Enter to save changes.
A "System Disabled" box appears, as shown below, but this time the code number is 00000.

Save a full-desktop image with a filename of "Proj X3c from YOUR NAME".
Restart your virtual machine, click and press F2 to enter the BIOS.
A blue box asks you to "Enter Password". Enter the password from the "Generic Phoenix BIOS" line in the keygen. It won't work--obviously 00000 is not the real code. This keygen works for BIOS passwords, but not for boot passwords.
A blue box asks you to "Enter Password". Enter the password you chose originally: 12345678
Use the arrow keys to get to the Security page. Highlight "Password on Boot" and press Enter. Use the arrow keys to highlight Disabled and press Enter.
In the Security menu, set the "Password on boot" to Disabled.
Use the arrow keys to highlight "Set Supervisor Password" and press Enter.
In the blue "Set Supervisor Password" box, enter 12345678 in the first line. Press Enter four times.
Your BIOS screen should now show that both passwords are Clear, as shown below.
Press F10 and then Enter to save changes.
Email the images to cnit.121@gmail.com with a subject of "Project X3 from YOUR NAME".
Last modified: 5-13-14 12:46 pm