Project 2x for CNIT 122 - Multiple Honeypots with honeyd Part 2 (15 pts.)
What You Need
- A Linux machine, real or virtual.
I used BackTrack 5 R1 virtual machine.
- Any second machine with nmap.
I used a Windows 8 Developers Preview virtual machine.
Read the Tutorial
Read this tutorial to see how Travis Altman emulated
three devices:
http://travisaltman.com/honeypot-honeyd-tutorial-part-2-multiple-honeypots/
Selecting Devices
You can see a listing of all the devices available
with this command:
cat /usr/local/share/honeyd/nmap.prints | grep ^Finger | more
Find three interesting devices on this list to emulate. You can emulate anything you like except these devices:
- Microsoft Windows XP (any version)
- Avaya (any device)
- Solaris (any version)
You will need to make a config file appropriate to your devices.
The tutorial explains how, but does not tell you which ports to
open on the devices. When in doubt, open ports tcp 22 and tcp 80;
almost any device could reasonably have them open.
Once your devices are added to your config file, run honeyd.
On your other machine, scan the IP address range of the
honeypots. Three devices should be shown
in the left pane of the Zenmap window, as shown below:

Saving the Screen Image
Make sure you can see three devices
found in the left pane of then Zenmap window,
as shown above.
Save a screen capture
with a filename of "Proj 2xa from YOUR NAME".
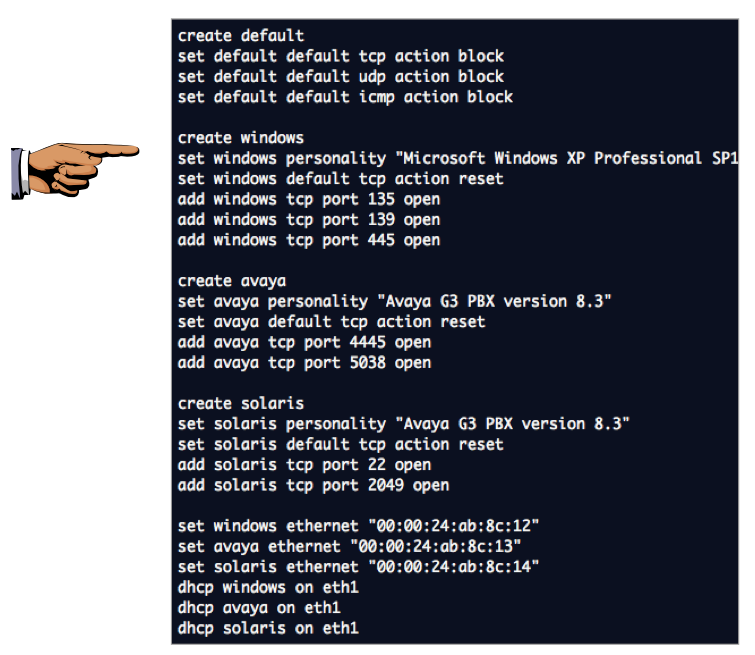
Viewing Your Config File
Open your config file in nano and capture
a screen image of it. It will look
similar to the image below, but it cannot
emulate any Windows XP, Avaya, or Solaris devices.
Saving the Screen Image
Make sure you can see three personalties set,
as shown above, but not
any Windows XP, Avaya, or Solaris devices.
Save a screen capture
with a filename of "Proj 2xb from YOUR NAME".
Turning In Your Project
Email the images to cnit.122sam@gmail.com with a subject of
"Project 2x from YOUR NAME".
Comment
This honeypot doesn't fool nmap at all, as far as I can tell.
It never detects the OS as matching the personality.
I don't know if honeyd is just too old, or if I am using it
improperly. I welcome suggestions and improvements.
Source
http://travisaltman.com/honeypot-honeyd-tutorial-part-2-multiple-honeypots/
Last modified 10-7-11 4 pm