
In this project you see how to steal passwords if they are sent unencrypted, and how HTTPS encryption protects your data.
Download and install the latest version of Wireshark. The installer will also install WinPCap.
From the Wireshark menu bar, click Capture, Interfaces.
Find the Interface with an increasing number of packets. That's the interface that connects to the Internet. Click the Options button in that interface's line.
In the Wireshark Capture Options box, click the Start button.
If you see a message saying "Save capture file before starting a new capture?", click "Continue Without Saving".
Click English
On the top right of the screen, click "Log In".
Enter a Username of joe and a Password of topsecretpassword as shown below.
Do NOT put in your real user name and password! As you will see, this Web page is not secure. After this lab, you might not want to use it anymore!
Click the "Log In" button. If you see a message asking whether to remember the password, click "Not Now". The password will be rejected. That's fine. The point of the project is to see how it was transmitted to Wikipedia.
In the Wireshark window, box, click Capture, Stop.
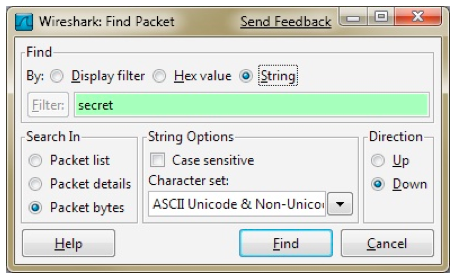
In the "Wireshark: Find Packet" box, click the String button. Enter a search string of secret, as shown below. Click Find.
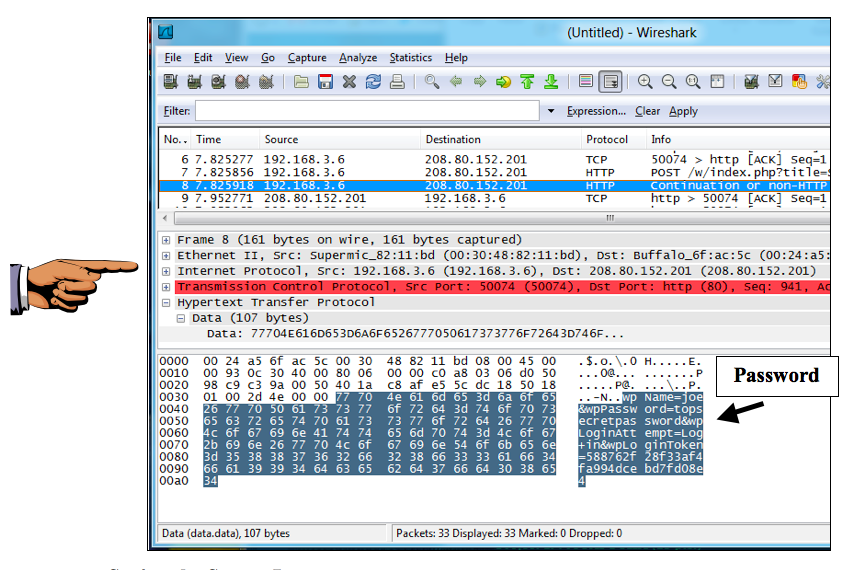
Wireshark finds the text. It highlights a packet with a Protocol of HTTP, as shown below on this page.
In the bottom pane of the Wireshark window the raw packet data is shown in hexadecimal on the left and in ASCII on the right. The password is visible on the right side, as shown in the figure below.
Press the PrintScrn key in the upper-right portion of the keyboard. That will copy the whole desktop to the clipboard.
Paste the image into Paint and save it with the filename "YOUR NAME Proj 3a", replacing "YOUR NAME" with your real name.
YOU MUST SUBMIT A FULL-SCREEN IMAGE FOR FULL CREDIT!
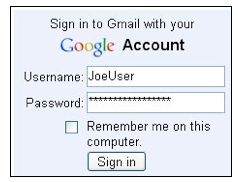
Enter the fake name JoeUser and password topsecretpassword, as shown below, but don't click the "Sign in" button yet.
In the Wireshark window, click Capture, Start. Click "Continue without Saving".
Quickly return to the Gmail window and click the "Sign in" button. Wait until Gmail shows you a message saying "The username or password you entered is incorrect".
In the Wireshark window, click Capture, Stop.
In the Wireshark window, click Edit, "Find Packet". In the By line, click the String button. Enter a string of pass and click the Find button. No match is found—the string pass does not appear in the packets at all.
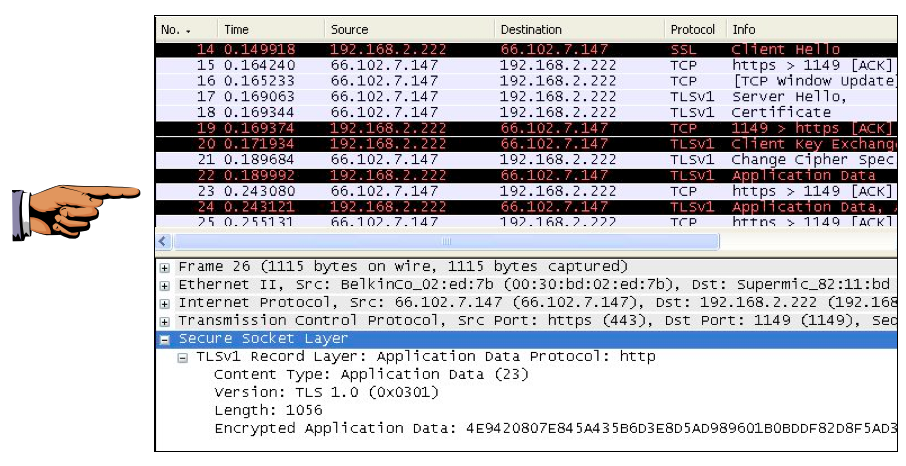
Look in the Info column and find Client Hello, then Server Hello, then Certificate, as shown below. Those exchanges are parts of the SSL Handshake that prepared an encrypted layer to send your username and password.
Look at the packets that appear below "Server Hello". Find a packet labeled "SSLv3 Application Data" or "TLSv1 Application Data", like packet 22 in the image below on this page, and click on it in the top pane to select it.
Details about the packet will appear in the middle pane. Click the +s sign to expand Secure Socket Layer.
Expand the layer inside (labeled "SSLv3 Record Layer" or "TLSv1 Record Layer"), so that the Encrypted Application Data is visible, as shown at the bottom of the image below on this page. Your user name and password are concealed in that encrypted data. Even though the packet sniffer can see the data go by, it cannot be read. This is how SSL protects you--all Web logons should use SSL.
Press the PrintScrn key in the upper-right portion of the keyboard. That will copy the whole desktop to the clipboard.
Paste the image into Paint and save it with the filename "YOUR NAME Proj 3b", replacing "YOUR NAME" with your real name.
YOU MUST SUBMIT A FULL-SCREEN IMAGE FOR FULL CREDIT!
Send a Cc to yourself.
Last Modified: 9:17 am 6-2-13