I think if you run the interface in promiscuous mode, this script will defend a whole network, answering every SYN no matter what IP address it is directed to.
In order to make this script practical, you will need to add code to stop responding to any IP address & port combination that you are actually using. Otherwise this script will DoS your own network.
On the Target Machine, in the Terminal window, execute the ifconfig command. Make a note of your IP address for later reference.
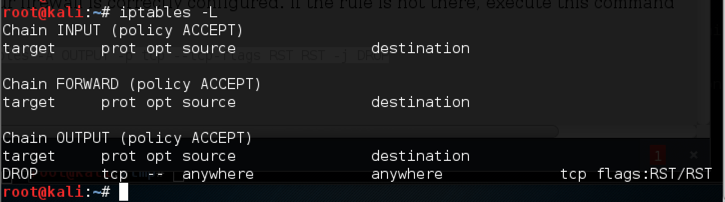
On the Target Machine, open a Terminal window. In the Terminal window, execute this command:
iptables -L
iptables -A OUTPUT -p tcp --tcp-flags RST RST -j DROP
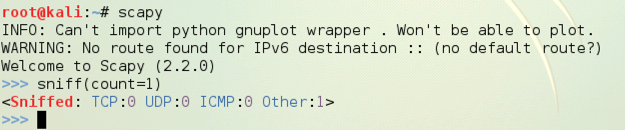
scapy

sniff(count=1)
If the colors are difficult to see, adjust them by clicking Edit, "Profile Preferences", Colors. I used "Black on light yellow".
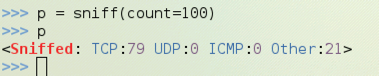
p = sniff(count=100)
p
On the Target Machine, in scapy, enter this command:
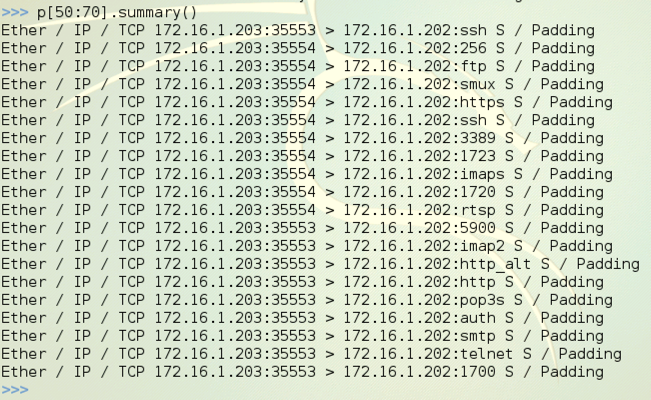
p[50:70].summary()
On the left side of each line the OSI model layer protocols are shown.
Layer 2: Every segment starts with Ether because we are using an Ethernet network interface, so no other layer 2 protocol can be received. And, of course, no one is sending anything else onto your LAN these days anyway.
Layer 3: Most of the packets are IP, but you may see some ARP packets as well.
Layer 4: Here you will see more variety, including TCP, UDP, and ICMP.
Find a TCP packet. In the figure below, the last packet shown, p[50], is a TCP packet. (The packets are numbered from 0 to 19.) Several packets before that one are also TCP packets.
Look at the right side of the line summarizing your TCP packet. If it's a SYN from Nmap, it will show "S / Padding". The S means it's a SYN packet. To proceed, you need to find a TCP SYN packet to examine.
If you don't have any TCP SYN packets, try looking at the next 20 packets with
p[20:40].summary()
If that fails, just repeat the capture process and run the Nmap scan again.
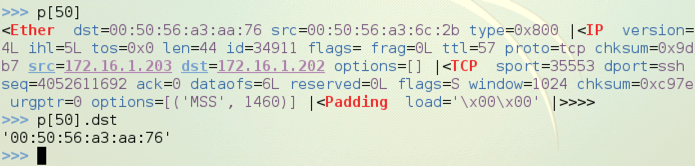
p[50]

p[50].dst
p[50] shows the whole frame, with all the layers,
as shown below on this page.
p[50].dst shows the layer 2 destination address, (a MAC address),
also shown below on this page.
You can separate the layers easily. Execute these commands, replacing [50] with the number of a TCP SYN packet that you captured:
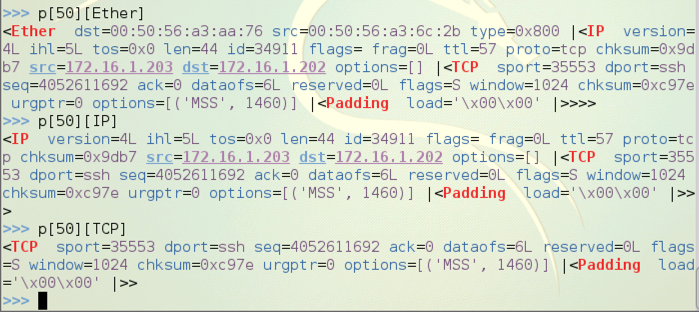
p[50][Ether]

p[50][IP]

p[50][TCP]
p[50][Ether] shows the layer 2 frame and its contents,
which include all higher layers,
as shown below on this page.
p[50][IP] shows the layer 3 packet and its contents,
which include all higher layers,
as shown below on this page.
p[50][TCP] shows the layer 4 segment,
as shown below on this page.
Now let's look at the values in the TCP segment.
Execute these commands, replacing [50] with the number of a TCP SYN packet that you captured:
p[50][TCP].sport

p[50][TCP].seq

p[50][TCP].flags

p[50][TCP].sprintf("%flags%")
p[50][TCP].sport shows the TCP destination port of the
captured packet,
as shown below on this page.
p[50][TCP].seq shows the TCP sequence number of the
captured packet,
as shown below on this page.
p[50][TCP].flags should show the flags, but they
show up as 2L, because the "flags" field has a non-printable data type.
p[50][TCP].sprintf("%flags%") prints the flags into a
string variable, which is now printable,
as shown below on this page. My packet was a SYN packet, so the value is 'S'.
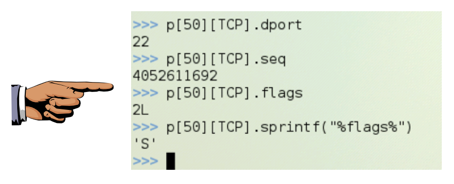
Make sure you can see the 'S' flag.
Save a screen image with the filename Proj 17a from Your Name.
In scapy, execute this command:
exit()
On the Target Machine, in a Terminal window, execute these commands:
cd

nano yesman.py
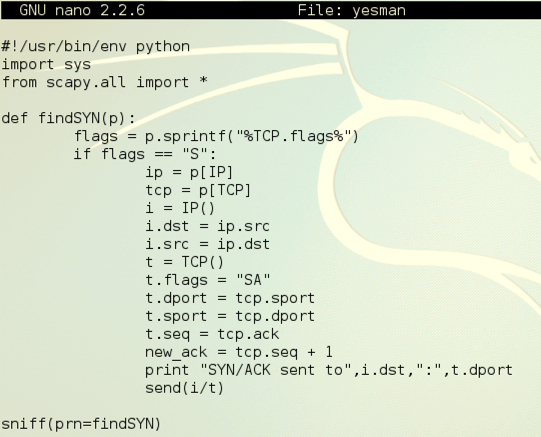
#!/usr/bin/env python
import sys
from scapy.all import *

def findSYN(p):
    flags = p.sprintf("%TCP.flags%")
    if flags == "S":        # Only respond to SYN Packets
            ip = p[IP]      # Received IP Packet
            tcp = p[TCP]    # Received TCP Segment
            i = IP()        # Outgoing IP Packet
            i.dst = ip.src
            i.src = ip.dst
            t = TCP()       # Outgoing TCP Segment
            t.flags = "SA"
            t.dport = tcp.sport
            t.sport = tcp.dport
            t.seq = tcp.ack
            new_ack = tcp.seq + 1
            print "SYN/ACK sent to ",i.dst,":",t.dport
            send(i/t)

sniff(prn=findSYN)
Here is an image of the script:
Save the file with Ctrl+X, Y, Enter.
The yesman.py file won't run until you give it Execute permission. To do that, on the Target Machine, in the Terminal window, execute this command:
chmod a+x yesman.py
./yesman.py
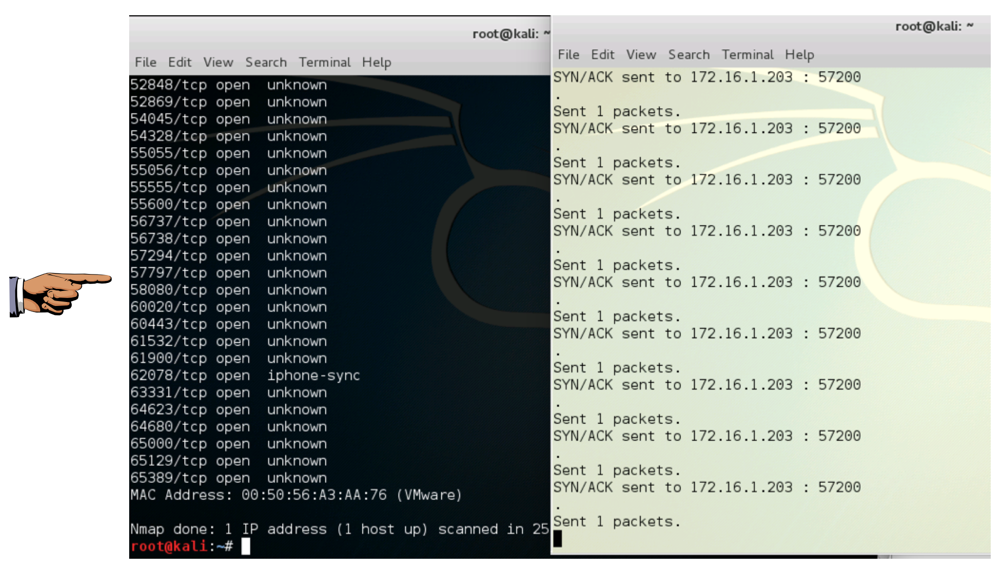
Save a screen image with the filename Proj 17b from Your Name.
Email the images to cnit.123@gmail.com with a Subject line of Proj 17 from Your Name.
http://trac.secdev.org/scapy/wiki/BuildAndDissect
http://trac.secdev.org/scapy/wiki/FtpPasswordSniffer