Overview
You need two images to work with -- a JPEG image and a GIF. The effects here work best if the JPEG is a detailed painting or photograph, and the GIF is a cartoon or line drawing.You can use images you created, or find new images on the Web. Save both images in a floppy disk or anywhere else you can find them. Make a note of the names of both images, their file sizes, and the URLs you got them from (if they are not your own property).
In my examples below, I will use the filenames ship.jpg and bird.gif for the original images. Your images may have any name you like. In this homework, you will make seven images by modifying those two images, and make a web page with all seven images on it.
This technique uses a free online graphics editing program which is funded by advertising. Some of that advertising is annoying, so expect to see some pop-up ads as you proceed. If you see any Security Warning windows asking you to install toolbars, click No.
JPEG Compression
- Open a browser and go to http://www.myimager.com/ .
- In the drop-down list titled File at the upper left of the My Imager window, select Open.
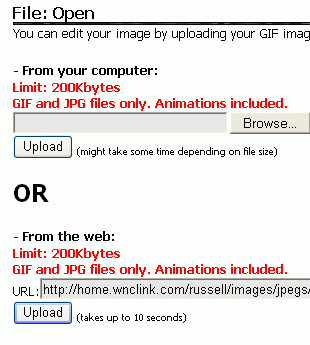
- A File: Open screen opens as shown to the right on this page.
Enter the URL of your original JPEG image, or use the Browse button to
upload it from your computer. Click the appropriate
Upload button.
- In the drop-down list titled Optimize at the top of the window,
in the JPG, JPEG: section, select Quality....
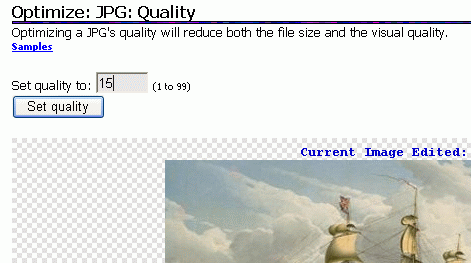
- An Optimize: JPG: Quality screen opens as shown to the right on this page.
Enter a quality of 15 and click the Set Quality button.
- A Optimize: JPG: Quality: Done screen opens as shown to the right on this page.
Note the original and reduced file sizes. If the file did not shrink to
half its original size, or smaller, repeat the steps above and enter a lower
quality value. Once you have a properly compressed image, point to it,
right-click, and select Save Image As... to save it. Use a
file name ending in _comp to indicate that this is a compressed file.

Shrinking an Image
- If necessary, open a browser and go to http://www.myimager.com/ .
- In the drop-down list titled File at the upper left of the My Imager window, select Open.
- In the File: Open window, enter the URL of your original JPEG image, or use the Browse button to
upload it from your computer. Click the appropriate Upload button.
- In the drop-down list titled Edit at the top of the window,
select Resize.
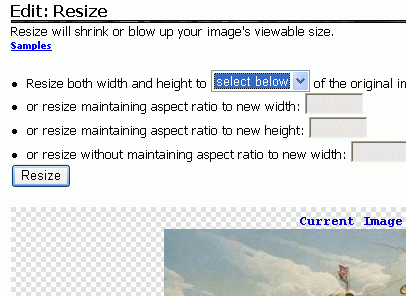
- An Edit: Resize screen opens as shown to the right on this page.
In the Resize both width and height to drop-down list, select
50% and click the Resize button.
- A reduced image should appear on the screen. Point to it,
right-click, and select Save Image As... to save it. Use a
file name ending in _half to indicate that this is a shrunken file.
Cropping an Image
- If necessary, open a browser and go to http://www.myimager.com/ .
- In the drop-down list titled File at the upper left of the My Imager window, select Open.
- In the File: Open window, enter the URL of your original JPEG image, or use the Browse button to
upload it from your computer. Click the appropriate Upload button.
- In the drop-down list titled Edit at the top of the window,
select Crop....
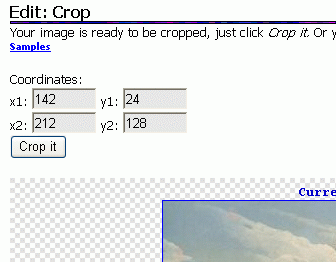
- An Edit: Crop screen opens. Click the upper-left corner of
the region you want to keep in the image, and then click the lower-right
corner of the desired region. When you see the Edit: Crop with
coordinate boxes, as shown to the right on this page, click the
Crop it button.
- An Edit: Crop: Done screen opens, with the cropped image.
Point to the cropped image, right-click, and select Save Image As... to save it. Use a
file name ending in _detail to indicate that this is a cropped image.
Transparent GIF
- If necessary, open a browser and go to http://www.myimager.com/ .
- In the drop-down list titled File at the upper left of the My Imager window, select Open.
- In the File: Open window, enter the URL of your original GIF image, or use the Browse button to
upload it from your computer. Click the appropriate Upload button.
- In the drop-down list titled Effects at the top of the window,
select Set Transparent....
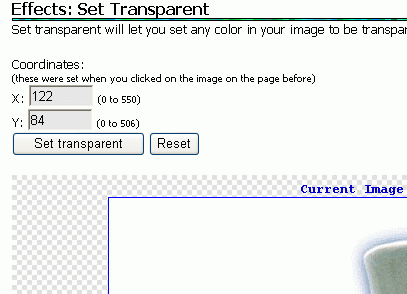
- An Effects: Transparent screen opens. Click on the image,
on a portion of it with the color you want to
make transparent. When you see the Effects: Set Transparent with
coordinate boxes, as shown to the right on this page, click the
Set Transparent button.
- An Effects: Set Transparent: Done screen opens, with the
transparent image. Point to the transparent image, right-click,
and select Save Image As... to save it. Use a
file name ending in _tr to indicate that this is a transparent image.
NOTE: Some GIFs on the Internet are already transparent. If you want to remove transparency information from an image, in the drop-down list titled Edit at the top of the window, select Convert to change it to a JPEG. Then select Edit, Convert again to change it back to a GIF. Now the image has lost its transparency.