Click Start, right-click Computer, and click Properties.
In the System box, on the left side, click "Advanced system settings".
In the "System Properties" box, click the "Computer Name" tab.
Click the Change... button.
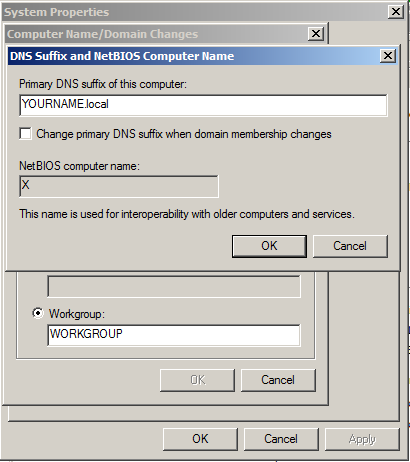
Click the More... button.
In the "Primary DNS suffix of this computer" box, type
YOURNAME.local
Click OK, OK, OK, Close.
Click "Restart Now".
When your server restarts, log in again.
It won't be able to resolve external domain names like google.com anymore, unless you change the DNS server from 127.0.0.1 to a real recursive resolver like 8.8.8.8.
From your Windows Server 2008 desktop, click Start, right-click Network, and click Properties.
In "Network and Sharing Center", in the left pane, click "Manage network connections".
Right-click "Local Area Connection" and click Properties.
Double-click "Internet Protocol Version 4 (TCP/IPv4)".
Set the DNS Server field to 8.8.8.8 as shown below, and click OK.
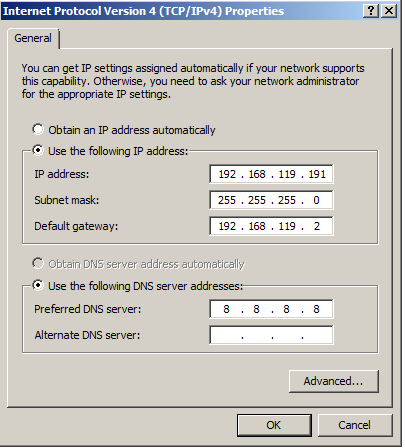
In the "Local Area Connection Properties" box, click OK.
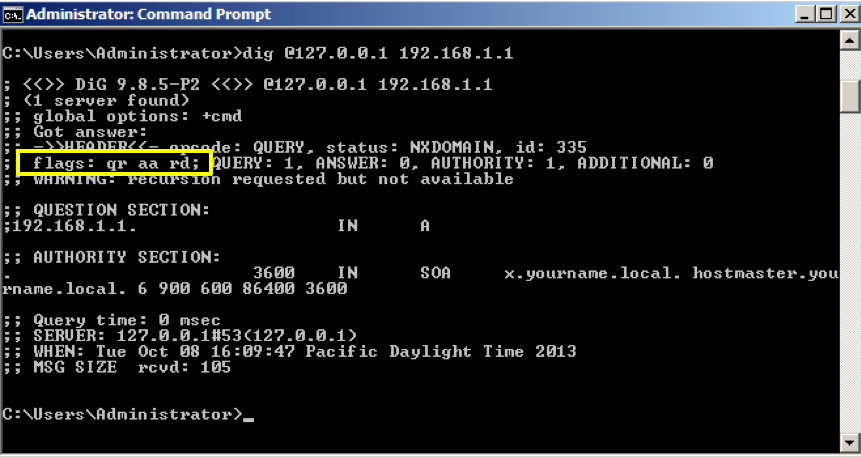
If it doesn't know where a server in its domain is, it should just reply "Not found". It can't go ask some other server--the authoritative server has the final word on the matter.
Click Start. Type DNS.
In the search results, click DNS.
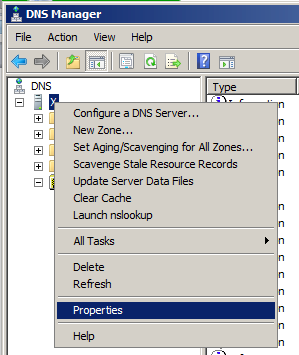
In "DNS Manager", on the left side, right-click your server and click Properties, as shown below.
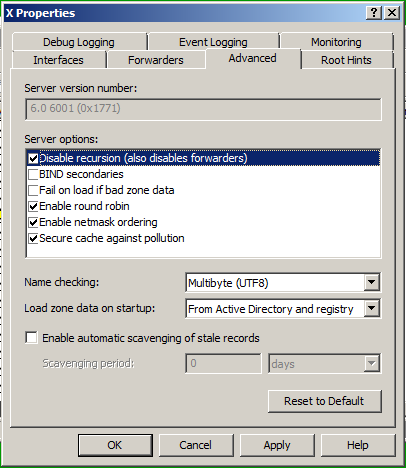
In the Properties box, click the Advanced tab.
Check the "Disable recursion (also disables forwarders)" box, as shown below.
Click OK.
To prevent this we need to create a forward lookup zone with the name "."
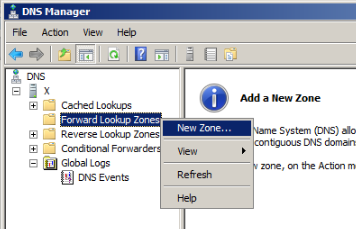
In DNS Manager, in the left pane, right-click "Forward Lookup Zones" and select "New Zone...", as shown below.
In the "Welcome to the New Zone Wizard" box, click Next.
In the "Zone Type" page, accept the default selection of "Primary zone" and click Next.
In the "Zone Name" page, enter a name of
.
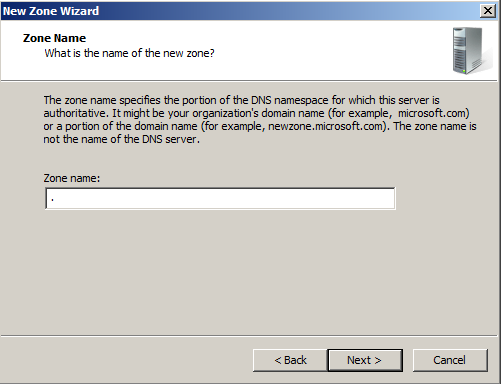
Click Next.
In the "Zone File" page, accept the default selection to create a new file named "root.dns" and click Next.
In the "Dynamic Update" page, accept the default selection of "Do not allow dynamic updates" and click Next.
Click Finish.
Now a root zone has been created, as shown below.
This server will return a NXDOMAIN (non existing domain) answer whenever a recursive query is made.

In the "Welcome to the New Zone Wizard" box, click Next.
In the "Zone Type" page, accept the default selection of "Primary zone" and click Next.
In the "Zone Name" page, enter a name of
YOURNAME.local
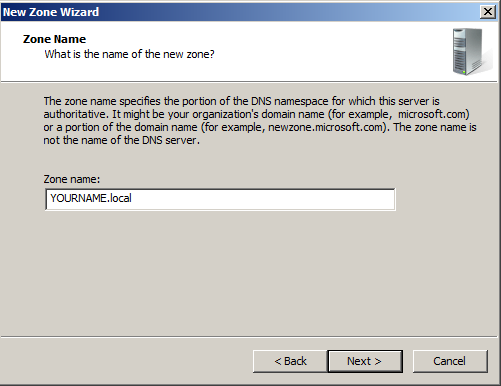
Click Next.
In the "Zone File" page, accept the default selection to create a new file named "YOURNAME.local.dns" and click Next.
In the "Dynamic Update" page, accept the default selection of "Do not allow dynamic updates" and click Next.
Click Finish.
In the "Welcome to the New Zone Wizard" box, click Next.
In the "Zone Type" page, accept the default selection of "Primary zone" and click Next.
In the "Reverse Lookup Zone Name" page, accept the default selection of "IPv4 Reverse Lookup Zone" and click Next.
In the "Reverse Lookup Zone Name" page, enter a Network ID of
192.168
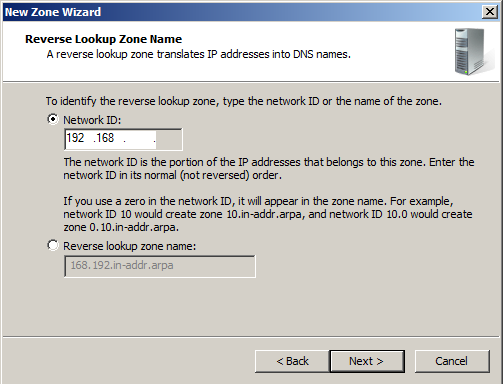
Click Next.
In the "Zone File" page, accept the default selection to create a new file named "168.192.in-1ddr.arpa.dns" and click Next.
In the "Dynamic Update" page, accept the default selection of "Do not allow dynamic updates" and click Next.
Click Finish.
You now have a reverse lookup zone for 168.192.in-addr.arpa, as shown below.

172.16

172.17

10
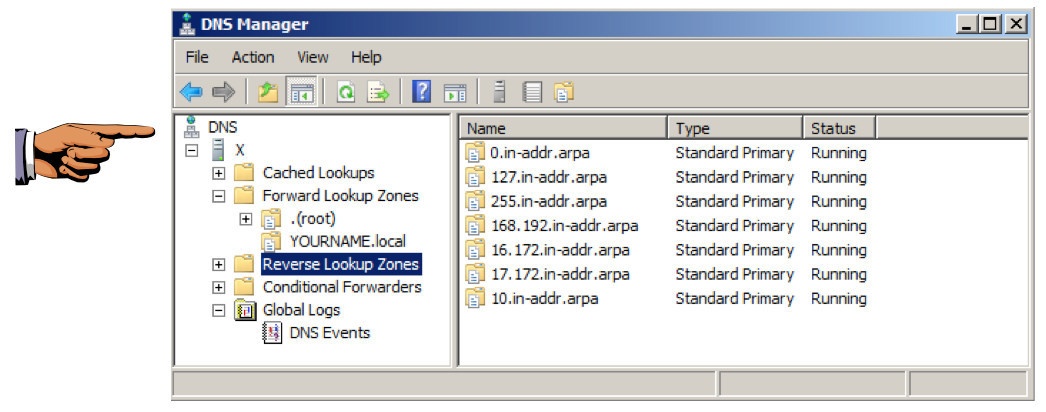
NOTE: To properly block the whole RFC 1918 space, you should configure zones for "172.18" through "172.31", and also for "169.254". I omitted them here to make the project shorter.
Click the taskbar at the bottom of your host computer's desktop, to make the host machine listen to the keyboard, instead of the virtual machine.
Press the PrintScrn key in the upper-right portion of the keyboard. That will copy the whole desktop to the clipboard.
YOU MUST SUBMIT A FULL-DESKTOP IMAGE FOR FULL CREDIT!
On the host machine, not the virtual machine, click Start.
Type mspaint into the Search box and press the Enter key.
Click in the untitled - Paint window, and press Ctrl+V on the keyboard. The desktop appears in the Paint window.
In the upper left corner of the "untitled - Paint" window, click the little blue square icon (it looks like a floppy disk, something people used to use long ago--you might never have seen one).
Save the image with the filename "YOUR NAME Proj 4xa", replacing "YOUR NAME" with your real name.
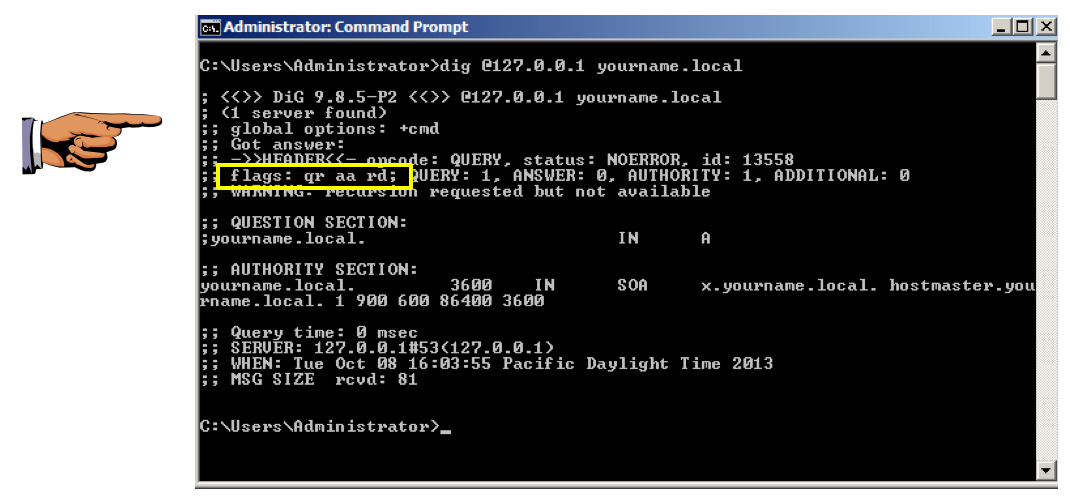
dig @127.0.0.1 yourname.local
This means that your serer is authoritative for the yourname.local domain.
Click the taskbar at the bottom of your host computer's desktop, to make the host machine listen to the keyboard, instead of the virtual machine.
Press the PrintScrn key in the upper-right portion of the keyboard. That will copy the whole desktop to the clipboard.
YOU MUST SUBMIT A FULL-DESKTOP IMAGE FOR FULL CREDIT!
Paste the image into Paint and save it with the filename "YOUR NAME Proj 4xb", replacing "YOUR NAME" with your real name. In a Command Prompt, execute the following command:
dig @127.0.0.1 192.168.1.1
Send a Cc to yourself.