How to Earn IPv6 Certifications (Windows Version)Why?IPv6 is coming, whether we like it or not. We all need to learn it, and the sooner we do that, the better. This page will guide you through getting the Hurricane Electric IPv6 Certifications, which demonstrate that you have learned both the theory and practice of using IPv6 on each of these systems:
These instructions take you to Administrator level, which is worth 25 CCSF points. The chart at the right on this page shows the current status of IPv4 depletion. In 2011, IPv4 addresses will be exhausted, which will force more and more companies to convert to IPv6. Knowledge of IPv6 will be a skill in high demand when that happens. |
Explorer:
I needed to install "HOME access version". At first try, I installed "basic version" and I kept having a UDP port blocking problem. Yet after downloading home access version, I could connect to the gogo6 server without any problems.
Ethusiast:
Windows 7 Starter does not support any ASP or servers associated with ASP. Besides your instructions, I needed to refer this following website to display my default ASP page on a web browser:
http://www.windows7home.net/how-to-install-iis-7-and-setup-asp-in-windows-7
Admin:
First of all, I was required to have a correct Java package, which was jdk1.3.1_20. Second, an environment variable, JAVA_HOME, had to point out the path to the Java program bin file such as "/jdk1.3.1_20/bin".
When I just clicked "run.dat" file, the command processor popped up momentarily and disappeared immediately. I checked my active ports by typing netstat then port 25 was not shown. Therefore I ran "run.dat" on command processor directly then I was able to see the error messages, which say a variable, JAVA_HOME is not set. To set the variable, I needed "Java Development Kit" called JDK. This was my reference:
http://james.apache.org/server/2.2.0/build_instructions.html
At the upper left of this page, click "Update Info". Change your password to something you can remember.
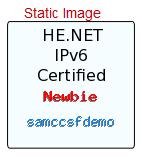
When you return to the main page, you should
see that your badge has changed to Newbie, as shown to the
right on this page. Click your badge to see your score: you now
have 25 Hurricane Electric points, which are worth 2.5 points in my classes.
Go to http://gogo6.com/. At the upper right of the page, click "Freenet6". On the next page, click Sign Up. Fill in the form to create an account. You will have to read your email and click a link to verify your account, and also fill out a profile form.
Go to http://gogo6.com/ and, at the top of the page, click "Freenet6". Your name should appear at the upper right of the page--Freenet has recorded your ID with a cookie. In the "Freenet Services" section, click the Download button.
The next page offers several versions to download. Download the "gogoCLIENT - Basic version" and install it with the default options.
Now you need to create a Freenet6 Tunnel account. In your browser, on the "Download" page, at the top, click the "Freenet6" link. scroll down to the "Freenet6" section and click the "Learn more" link, as shown below on this page.
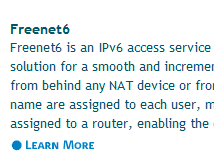
On the next page, scroll down to the "Getting started" section, and click the "here" link, as shown below on this page. Fill out the form to get a Freenet6 account.

When the gogoCLIENT is installed and running, click the "Advanced" tab, and select a "Tunnel Mode" of "IPv6-in-UDP-IPv4 Tunnel (NAT Traversal)" as shown below on this page. Click "Apply". This is the best choice because it works almost everywhere--even at Starbuck's. Unfortunately, it won't work on CCSF's wireless network at the moment, because it uses UDP Port 3653 which is blocked. So if you do this project on campus, you will need to connect with wired Ethernet, at least at present.

In the gogoCLIENT window, click the "Basic" tab. Change the "Server Address" to authenticated.freenet6.net
In the middle of the window, click the "Connect Using the Following Credentals" button. Enter your Freenet6 username and password. Click the "Connect" button. A box will pop up asking "Save changes before connecting?". Click Save.
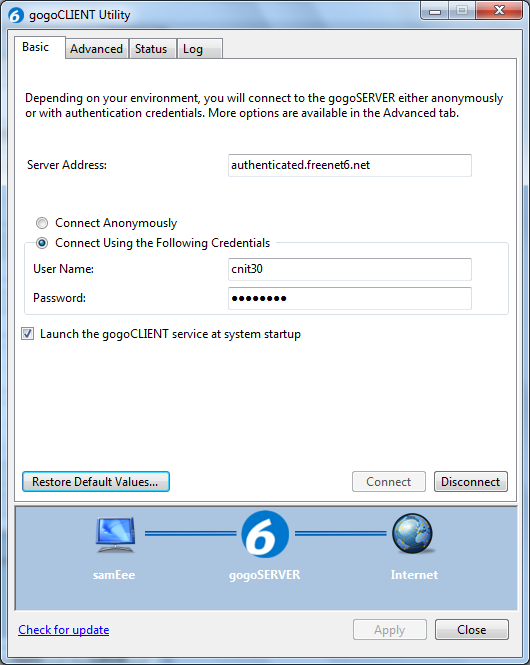
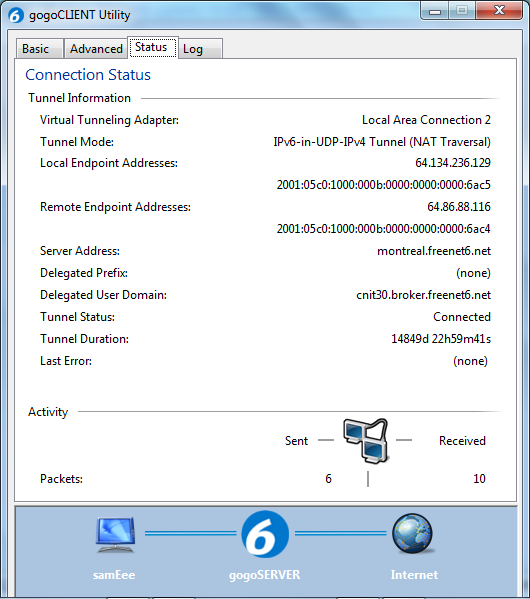
Click the "Status" tab. When it connects, you should see a long IPv6 "Local Endpoint Address", as shown below on this page. If you cannot connect, you may have to adjust your router or firewall to allow UDP port 3653.
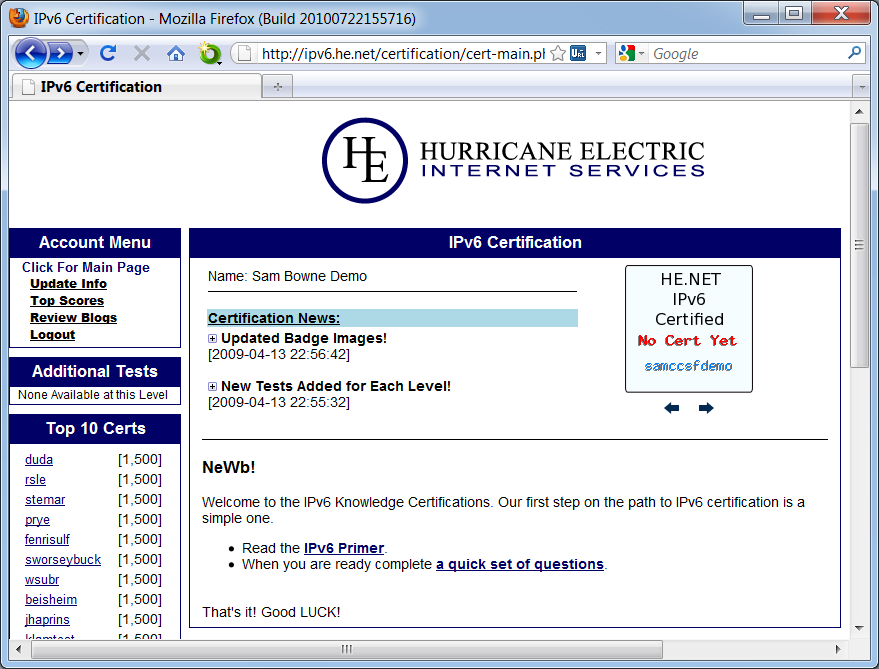
If it's not still open, go to http://ipv6.he.net/certification/ and log in.
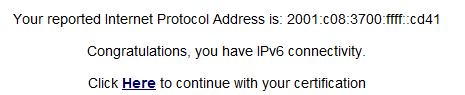 In the Explorer section, click the link in the "When you are ready..."
line. You should see a message saying "Congratulations, you have IPv6
connectivity", as shown to the right on this page. Click the "Here"
link to continue.
In the Explorer section, click the link in the "When you are ready..."
line. You should see a message saying "Congratulations, you have IPv6
connectivity", as shown to the right on this page. Click the "Here"
link to continue.
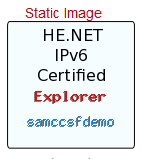 Your badge should now show Explorer, as shown to the
right on this page. Click your badge to see your score: you now
have 75 Hurricane Electric points, which are worth 7.5 points in my classes.
Your badge should now show Explorer, as shown to the
right on this page. Click your badge to see your score: you now
have 75 Hurricane Electric points, which are worth 7.5 points in my classes.
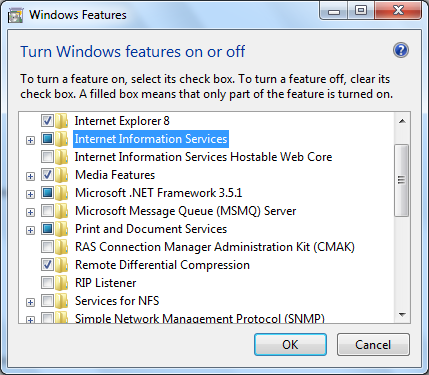
Click "Turn Windows features on or off". Click the "Internet Information Services" box, as shown below on this page. Click OK. Wait until IIS is installed.
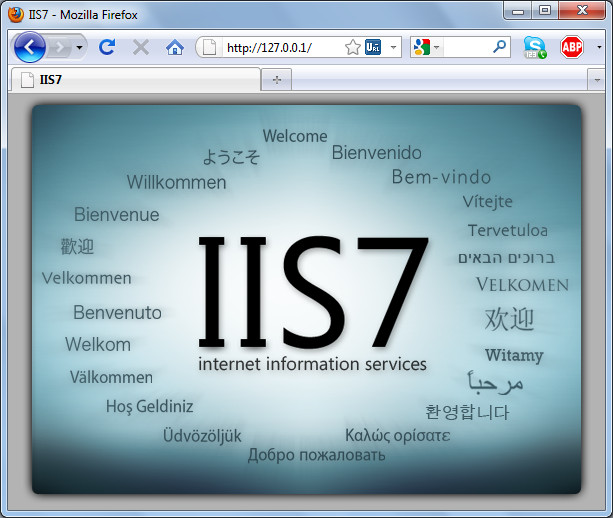
In Firefox, go to 127.0.0.1
You should see an IIS Welcome page, as shown below on this page. This shows that IIS is listening on port 80 of IPv4.
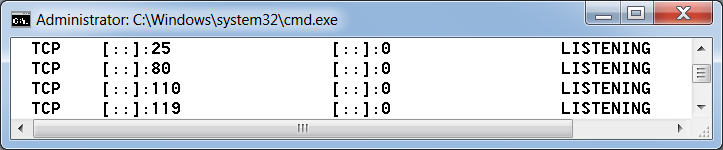
Open a Command Prompt and type in the NETSTAT -AN
command. Scroll back to see the TCP Listening ports.
You should see the IPv6 address [::] Listening, as shown
below on this page. This means that your Web server is serving pages
over every IPv6 address.

Go to godaddy.com. In the middle of the page, type your desired domain, and choose a top-level domain. I recommend using .info because I know there are top-level glue records for it. But as time passes, more and more top-level domains will have full IPv6 compatibility, so other choices will become OK. Click Go.

If the domain is available, buy it. You will need a credit card and $2.17 of real money to get a .info domain for one year. You will have to enter your real email address, and GoDaddy will offer you a lot of extra features like other domains, email accounts, Web hosting, etc. For IPv6 certification you don't need any of that. You can say No to it all and only pay a total of $2.17.
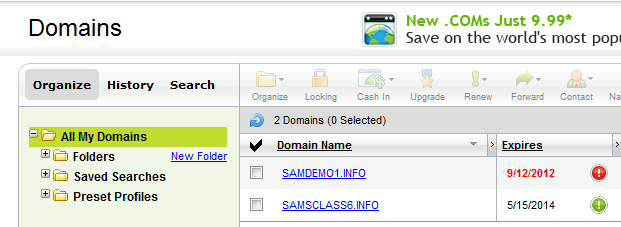
On the left side, hover the mouse over "All Products". Hover over "Domains". Wait a second for more options to appear. On the right side, click "Domain Management". On the left side, click "Domain Manager".
You should see a list of your domains, as shown below on this page. Click your domain name.
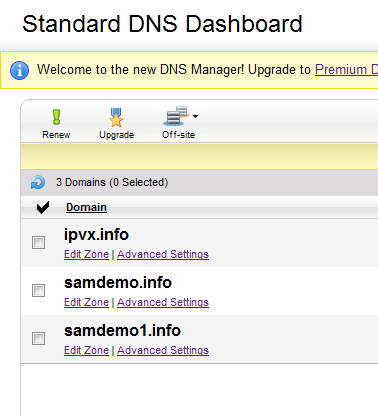
On the next page, in the "Domain Details" section, click "DNS Manager", as shown below:

In the "Standard DNS Dashboard", on the line for your domain, click "Edit Zone", as shown below:
On the next page, scroll down to the AAAA Record section and click the "Quick Add" button. Enter a "Host Name" of @. In the "Points to IPv6 Address" field, enter your Local Endpoint IPv6 address, as shown below on this page. I recommend using copy and paste from the Status tab of the gogoCLIENT utility. Click the "Save Zone File" button. Click OK.

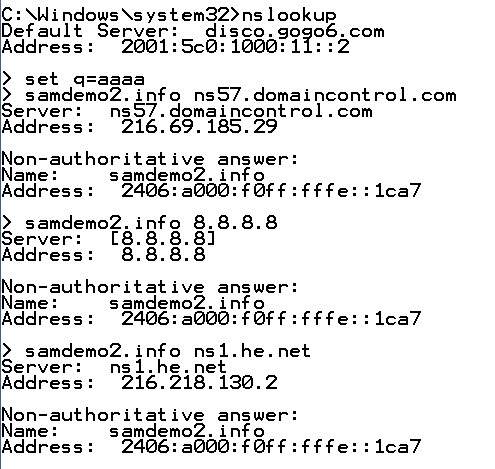
nslookup

set q=AAAA
In the Enthusiast section, type your domain name (the one you registered at GoDaddy) and click the "Get a User Code" link. Click the "here" link to continue with the test. Click the "Create URL" button.
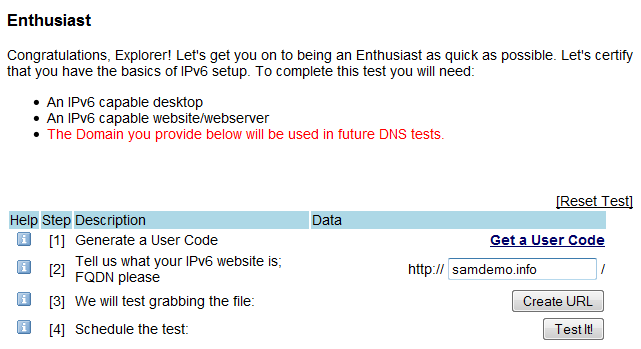
Now you should see a URL in line [3], something like this:
http://samsdemo.info/Se35fg48.txt
You need to create a file with that name. The filename does not include
http or your domain name--in the example above, the
correct filename is:
Se35fg48.txt
Yoh need to create that file in your Web server's home directory, which is C:\Inetpub\wwwroot. To do that, you need to give yourself permission to write in that folder.
Click Start, Computer. Open drive C:. Open the Inetpub folder. Right-click the wwwroot folder and click Properties. On the Security tab, click Edit. Click the Add button and add your account. Give yourself Full Control permission. Click OK. Click OK.
Double-click the wwwroot folder to open it. Right-click an empty portion of the folder's window and click New, Text document. Enter the name specified in the Hurricane Electric URL line and press Enter.
In the Hurricane Electric Web page, click the "Test It!" button.
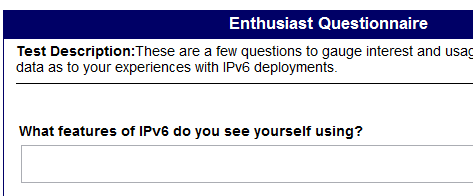
If you pass the test, you will see the "Enthusiast Questionnaire", as shown below on this page.
If you can't pass the test, try these debugging tips:
- Turn off your firewall.
- At a Command Prompt, type these commands:
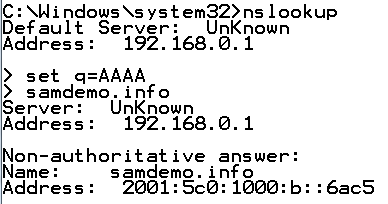
      NSLOOKUP

      set q=AAAA

      yourdomain.info 8.8.8.8
This fetches the AAAA record from Google's DNS server (8.8.8.8).
See if the AAAA record is correct. It can take up to an hour or more for DNS to update, so simply waiting a while might fix a DNS problem.
- Run Wireshark on your Web server, and try the Hurricane Electric test again. Look to see if the HTTP GET ever reaches you, and what response the Web server gives.
- Set up a different machine with a Gogo6 tunnel and try opening your web site with a browser from there.
- You could also open your Web site with a literal IPv6 address in the URL like this:
http://[2001:5c0:1000:b::6ac5]
Here's the Enthusiast test you need to fill out.
When you complete the questionnaire, click the "Here" link to return to the main page.
![]() Your badge should now show Enthusiast, as shown to the
right on this page. Click your badge to see your score: you now
have 150 Hurricane Electric points, which are worth 15 points in my classes.
Your badge should now show Enthusiast, as shown to the
right on this page. Click your badge to see your score: you now
have 150 Hurricane Electric points, which are worth 15 points in my classes.

On your desktop, right-click the openlogic-apache-james-2.3.1-all-bin-1.zip file and click "Extract All". Click Extract. Double-click the openlogic-apache-james-2.3.1-all-bin-1 folder to open it. Double-click the apache-james-2.3.1 folder to open it. Double-click the bin folder to open it. Double-click the run.bat file.
Note: If the window flashes briefly and vanishes, that usually means you don't have Java installed. Open a browser, go to java.com, and install it.
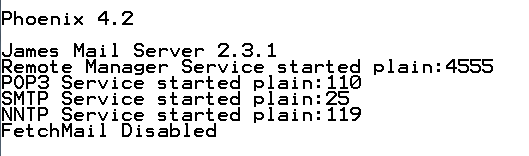
A Command Prompt window opens, and you see some messages, ending with the messages shown below on this page.
Open another Command Prompt window and
type in the NETSTAT -AN
command. Scroll back to see the TCP Listening ports.
You should see the IPv6 address [::] Listening on port
TCP 25, as shown below on this page. Your email server is ready!
Now you need to add a mail user account to James. To do that, in the Command Prompt window, type this command, followed by the Enter key:
telnet localhost 4555
Note: if you get a message saying "'telnet' is not recognized as an internal or external command, operable program or batch file.", that means Telnet is not installed.
To install Telnet, open Control Panel and click "Programs and Features". Click "Turn Windows features on or off". Check "Telnet Client", as shown to the right on this page. Click OK.
Log in with the use name root and a password of root. When you see the ""Welcome root. HELP for a list of commands" message type this command followed by the Enter key:
adduser admin password
Type this command followed by the Enter key:
quit
Nagivate to the openlogic-apache-james-2.3.1-all-bin-1\apache-james-2.3.1\apps\james\SAR-INF folder and open the config.xml file in Wordpad.
There are three changes you need to make in this file. First, in the servernames section, you need to add a line with your domain name, as shown below on this page.

Second, in the InBoxRepository section, you need to add a line with a path to a folder that exists, as shown below on this page. (This step may not be necessary.)

Third, in the dnsserver section, you need to add a a real DNS server. I used Google's free server at 8.8.8.8, as shown below on this page.
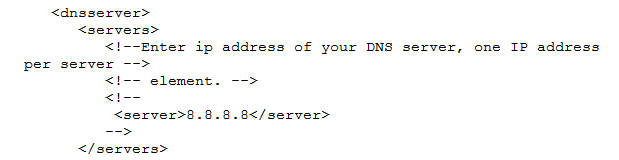
After making the changes, save the config.xml file and close Wordpad.
Then start James, as you did before: In the bin folder, double-click the run.bat file.
Scroll to the bottom of the page. In the "MX" section, there are two records GoDaddy put there, as shown below on this page. Hover over a record to make a red X appear on the right side, and cick the X to delete the record. Repeat the process to delete the other MX record. Click "Save Zone File". Click "OK".
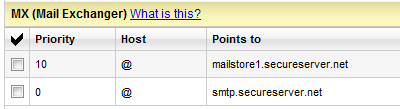
In the MX section, click the "Quick Add" button. Enter 10 in the leftmost field, which is Priority. Enter @ in both the other fields, as shown below on this page. Click "Save Zone File". Click "OK".

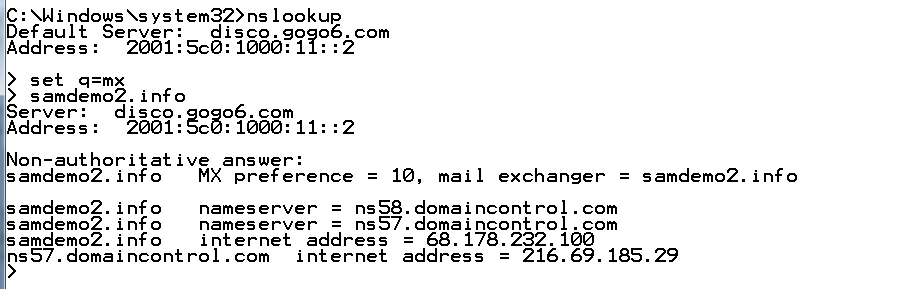
nslookup

set q=MX
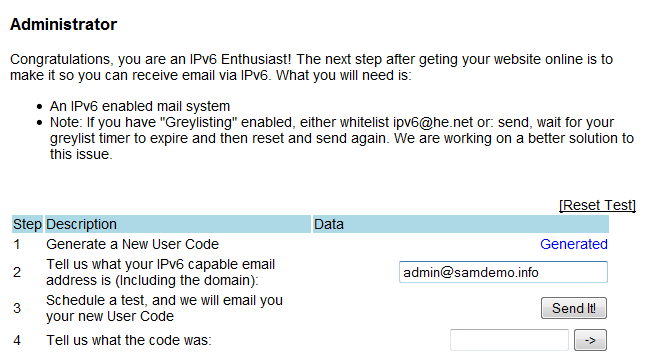
In the Administrator section, Click the "Generate It!" link. Enter the email address admin@yourdomain.info in the box below the "Generated" message, as shown below on this page. Use your own domain name. Click the "Send It!" button.
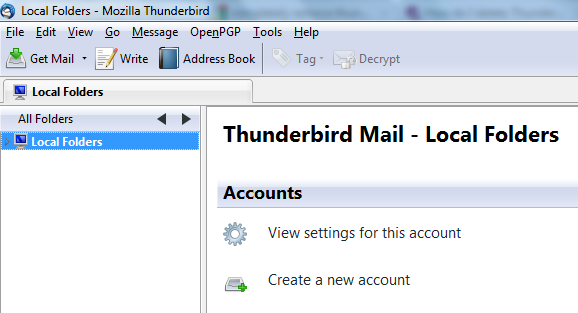
Install Thunderbird with the default settings. After inatallation, Thunderbird starts, as shown below on this page. Click "Create a New Account".
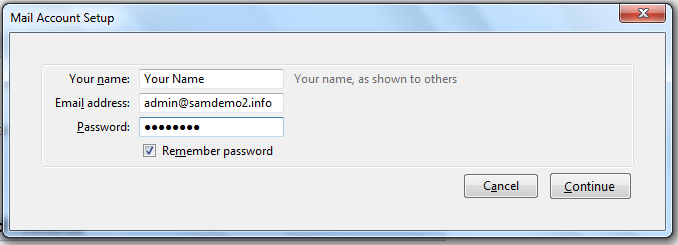
In the "Mail Account Setup" box, enter your name, your email address (admin@yourdomain.info), and the password you configured in James earlie, which is probably password. Click the Continue button.
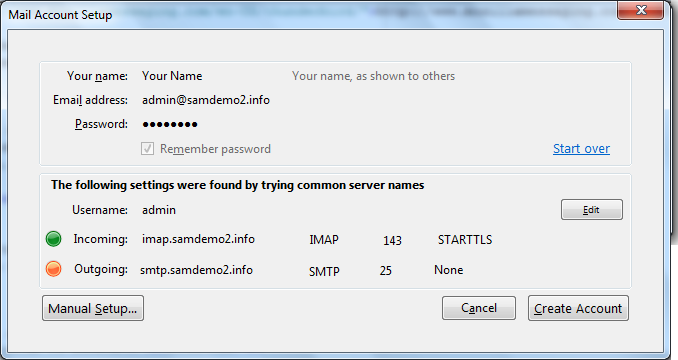
Thunderbird attempts to connect to your mail server. It won't be able to figure it out, and stops after a few seconds, as shown below on this page. On the right side, click the Edit button.
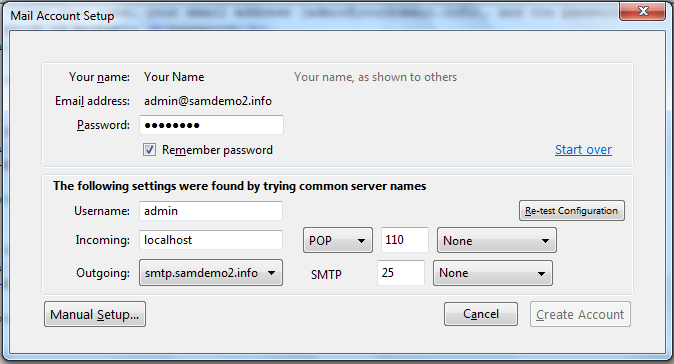
In the Incoming line, enter localhost as the server name, as shown below on this page. Select POP, 110, and None. Leave the Outgoing settings alone--you can't fix them here and they don't matter anyway for receiving mail. On the right side, click the "Re-test Configuration" button.
Click the "Create Account" button. A warning box pops up saying "localhost does not use encryption". Check the "I understand the risks" box. Click the "Create Account" button.
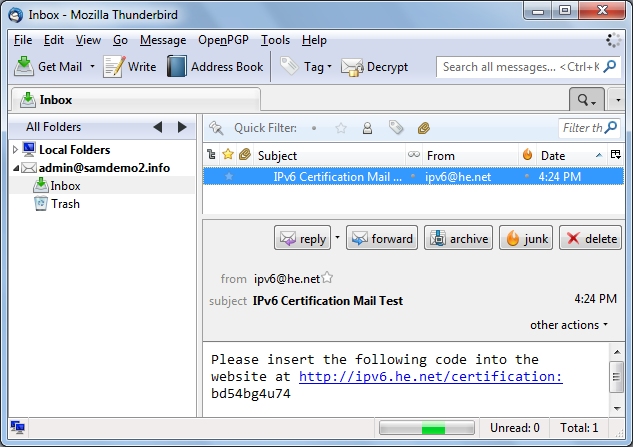
In Thunderbird, in the left pane, expand your account name and click Inbox. Click the "Get Mail" button. A message from ipv6.he.net should appear, as shown below on this page. Find the code in that email message.
In Firefox, in the http://ipv6.he.net/certification page, paste in the code from the email message. Click the -> button.
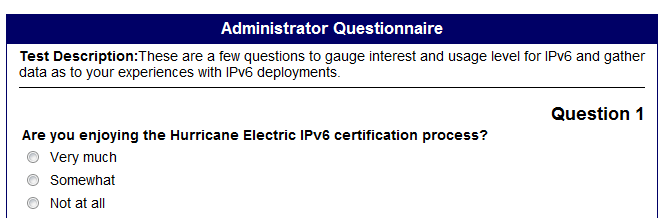
The "Administrator Questionnaire" opens, as shown below on this page. Fill it out.
You should now be an Administrator, with a badge like the one shown below on this page. Click the badge to see your score: it is now 245, worth 25 points in any of my CCSF classes.
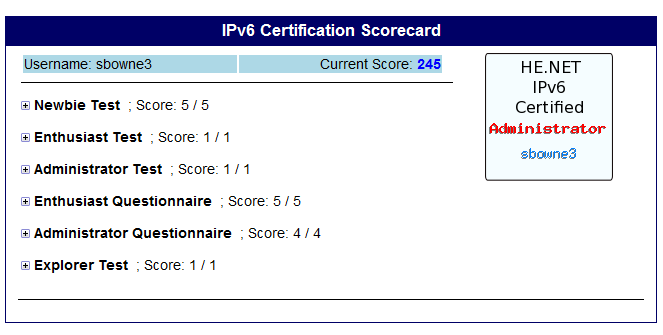
To claim your points, save a screen image showing your Administrator status and email it to cnit.60@gmail.com. Use a subject line of "IPv6 Cert Windows 1 from YOUR NAME".
Last modified 9-18-12 5 pm