http://samsclass.info/ipv6/60_F12.php#projects
The next sections are specific to the Mac and PC. Use the steps that match your machine.
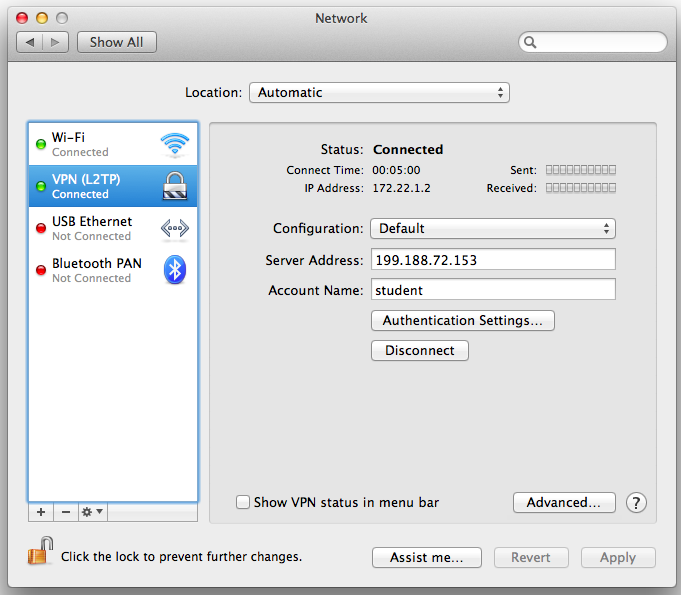
Your VPN connection should appear on the left with a green dot, and a status of "Connected", as shown below:
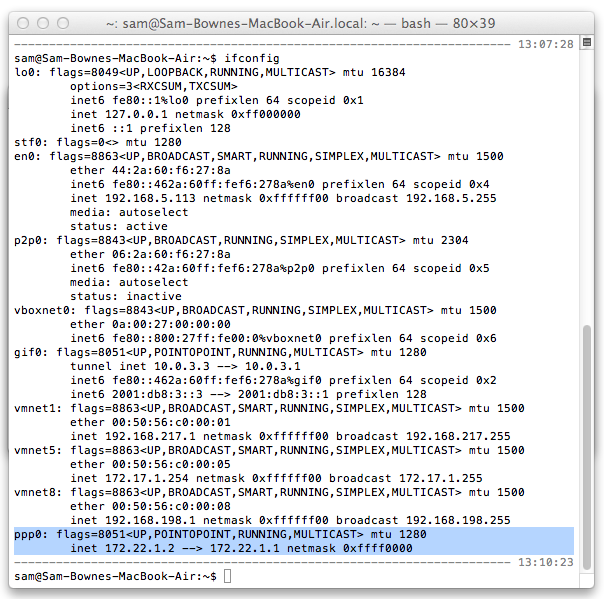
On your Mac, open a Terminal window and execute this command:
ifconfig
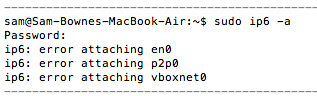
That's because IPv6 is not enabled on it.
To enable IPv6 on all interfaces, on your Mac, in a Terminal window, execute this command:
sudo ip6 -a
on your Mac, in a Terminal window, execute this command:
ifconfig ppp0
Since you are using a Mac, skip the Windows 7 section below, and go directly to the "Viewing your HE Tunnel Details" section.
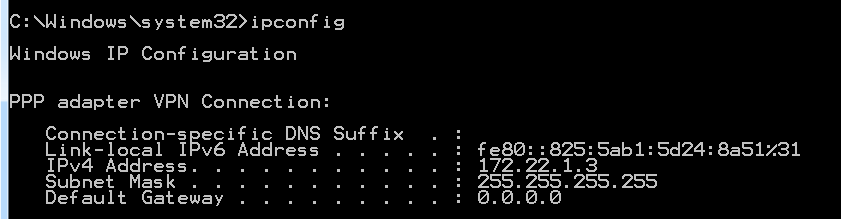
In an Administrator Command Prompt window, execute this command:
ipconfig
At the upper left, log in.
Your tunnel appears at the bottom of the screen, as shown below:
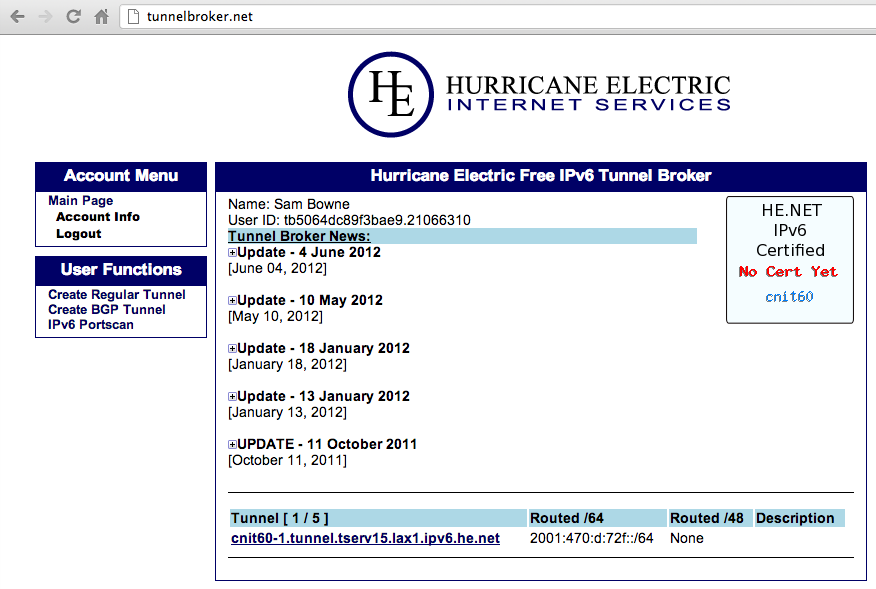
If you don't have a tunnel, go do the prevous project to make one.
Click the name of your tunnel.
The details of your tunnel appear, as shown below:
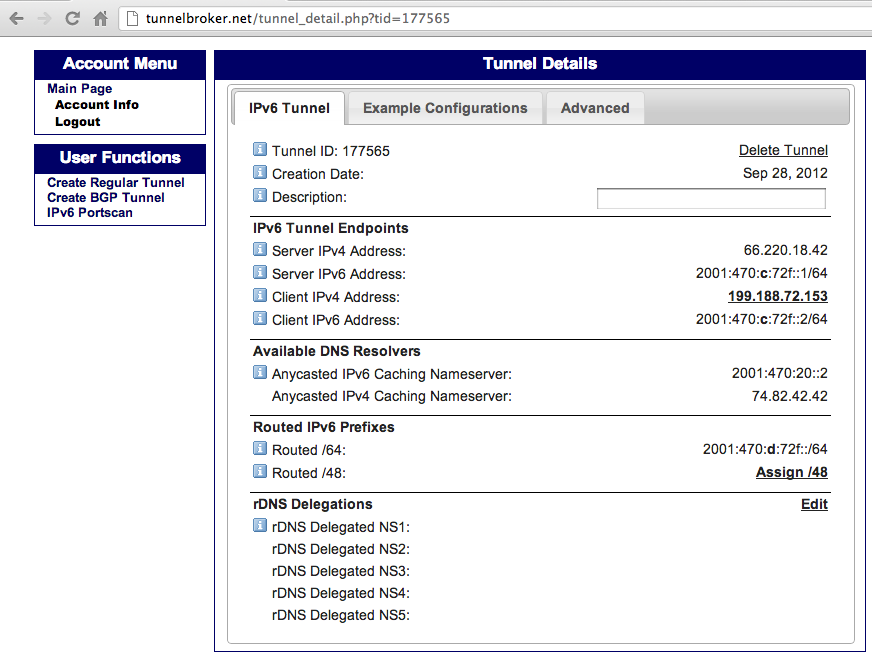
But the recommended procedure for assigning addresses is to start with a larger block and subnet it. We'll do that.
In the "Tunnel Details" screen, in the "Routed IPV6 Prefixes" section, click "Assign /48"
After a few seconds, your assigned /48 appears, as shown below:
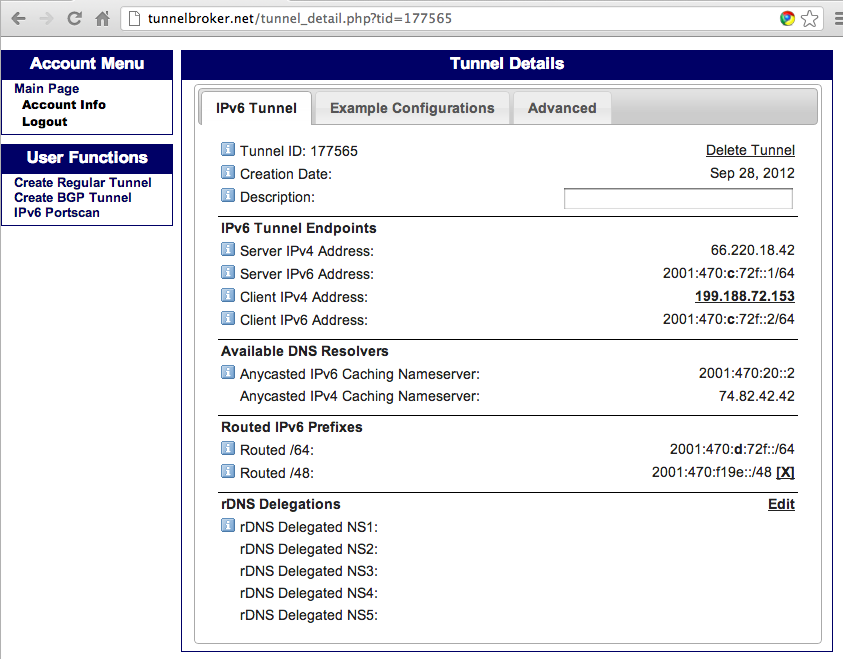
My routed /48 is:
2001:470:f19e::/48
2001:0470:f19e:0000:0000:0000:0000:0000
-------------- ---- -------------------
WAN Prefix     Sub         Host
The next field, labelled "Sub" in the diagram above, is yours to use, to divide the addresses into subnets to meet your business needs.
For example, if CCSF were to use these addresses, we might divide them this way:
2001:470:f19e:1:/64 -- Administration
2001:470:f19e:2:/64 -- VoIP Phones
2001:470:f19e:3:/64 -- Library
2001:470:f19e:4:/64 -- CNIT
etc.
Right now, we are only connecting one category of devices: VPN Clients.
2001:470:f19e:1:/64 -- VPN Clients
2001:470:f19e:1::1/64
sudo cp /etc/ppp/ipv6-up /etc/ppp/ipv6-up.bak

sudo nano /etc/ppp/ipv6-up
ifconfig ppp0 add 2001:470:f19e:1::1/64
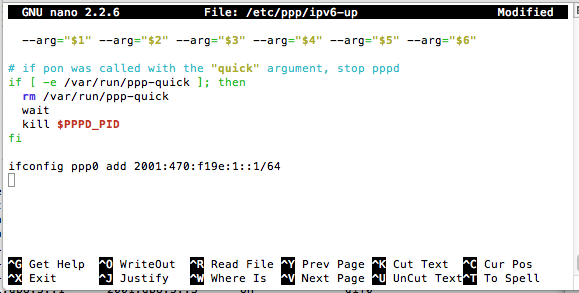
Save the file with Ctrl+X, Y, Enter.
On your client, disconnect and reconnect to the VPN.
On your Linux server, execute this command:
ifconfig ppp0
sudo nano /etc/sysctl.conf
# Uncomment the next line to enable packet forwarding for IPv6
#  Enabling this option disables Stateless Address Autoconfiguration
#  based on Router Advertisements for this host
#net.ipv6.conf.all.forwarding=1
# Uncomment the next line to enable packet forwarding for IPv6
#  Enabling this option disables Stateless Address Autoconfiguration
#  based on Router Advertisements for this host
net.ipv6.conf.all.forwarding=1
Save the file with Ctrl+X, Y, Enter.
To make the change take effect immediately, On your Linux server, execute this command:
sudo /sbin/sysctl -p
On your Linux server, execute this command:
sudo apt-get install radvd -y
sudo nano /etc/radvd.conf
interface ppp0
{
   AdvSendAdvert on;
   MaxRtrAdvInterval 10;

   prefix 2001:470:f19e:1::/64
   {
        AdvOnLink on;
        AdvAutonomous on;
   };
};
Note: This configuration only provides IPv6 service to the first client that connects.
If you plan to have more clients than that, you need to add more sections to this file. But each section will need to use a different IPv6 subnet.
sudo /etc/init.d/radvd start

If you get an error message instead, follow the advice it gives to correct the problem.
Please note that you cannot use "sudo /etc/init.d/radvd restart" to start radvd the first time, you must use "sudo /etc/init.d/radvd start".
tcpdump -c 1 -i eth0 -nvvvX dst ff02::1
Within ten seconds, you should see a packet captured, as shown below:
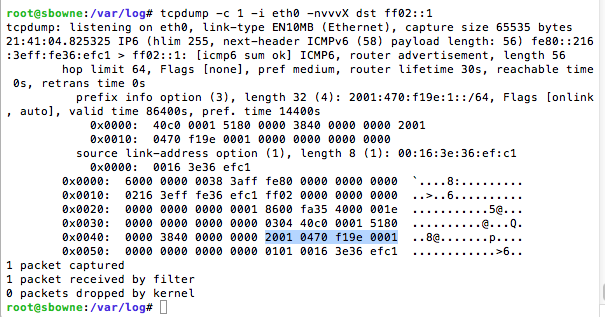
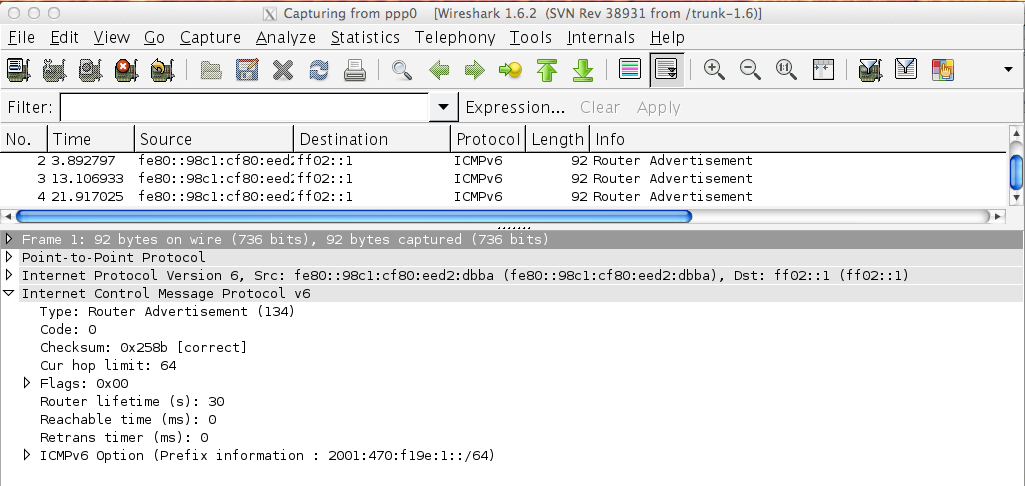
Notice that the payload of the packet contains the subnet prefix, as highlighted in the image above.
The Router Advertisements are being sent, and they contain the correct prefix.
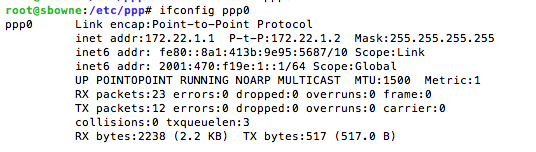
ifconfig ppp0

That's bad, because it cannot send Router Advertisements out an interface without a link-local IPv6 address.
To fix that problem, on your Linux server, execute this command:
sudo nano /etc/ppp/options
+ipv6 ipv6cp-use-ipaddr
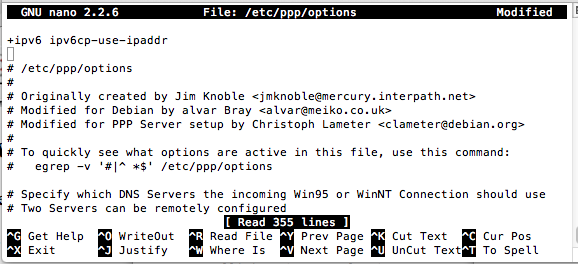
Save your changes with Ctrl+X, Y, Enter.
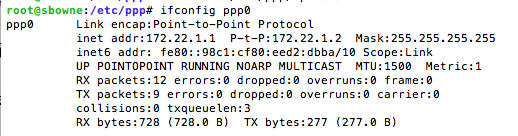
After this change, disconnect and reconnect the VPN interface on your client. On your Linux server, execute this command:
ifconfig ppp0
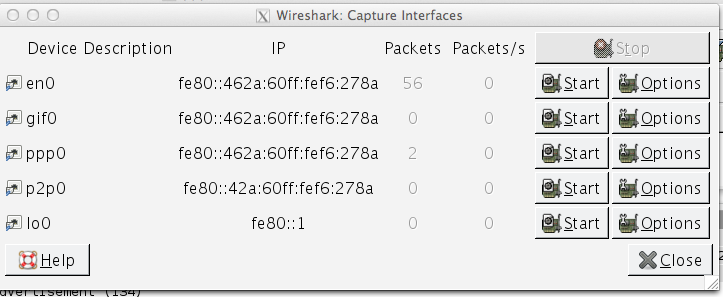
In Wireshark, click Capture, Interfaces.
Start a capture on the VPN interface, which is ppp0 on the Mac, as shown below:
Within ten seconds, you should see an Router Advertisement, with the correct Prefix Information, as shown below:
sudo sysctl -w net.inet6.ip6.accept_rtadv=1
On your Mac OS X client, in a Terminal window, execute this command:
ifconfig ppp0

Save a screen shot of this image with the filename
Proj L6a from Your Name
sudo route add -inet6 default 2001:470:f19e:1::1
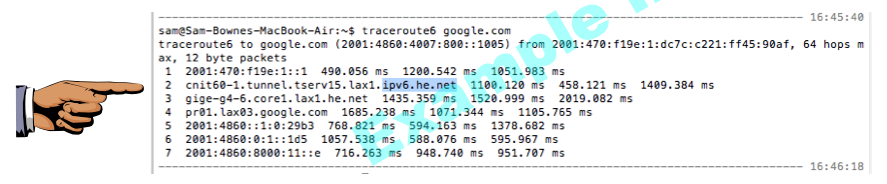
traceroute6 google.com
Save a screen shot of this image with the filename
Proj L6b from Your NameSince you are using a Mac, skip to the "Turning In your Project" section.
netsh interface teredo set state disable
This is required because only the first VPN connection will get IPv6 service, as explained previously.
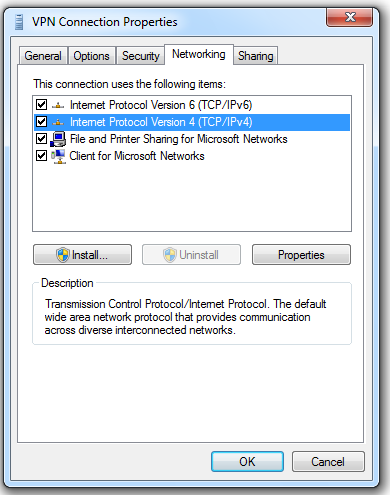
Right-click the "VPN Connection" icon and click Properties.
In the "VPN Connection Properties" sheet, click the Networking tab.
Click "Internet Protocol Version 4 (TCP/IPv4)", as shown below, and click Properties.
In the "Internet Protocol Version 4 (TCP/IPv4) Properties" sheet, click the Advanced button.
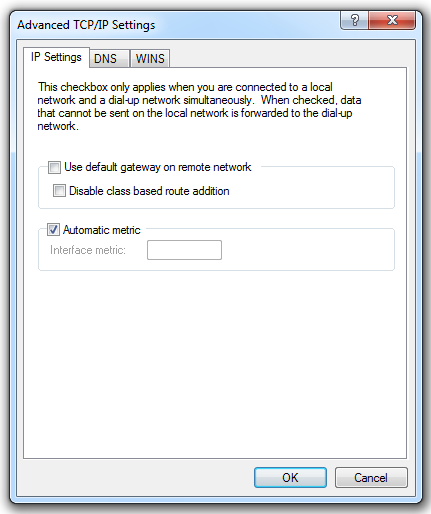
In the "Advanced TCP/IP Settings" box, clear the "Use default gateway on remote network" check box, as shown below:
In the "Advanced TCP/IP Settings" box, click the OK button.
In the "Internet Protocol Version 4 (TCP/IPv4) Properties" sheet, click the OK button.
In the "VPN Connection Properties" sheet, click the OK button.
Right-click the "VPN Connection" icon and click Connect. Enter your password and connect to the VPN.
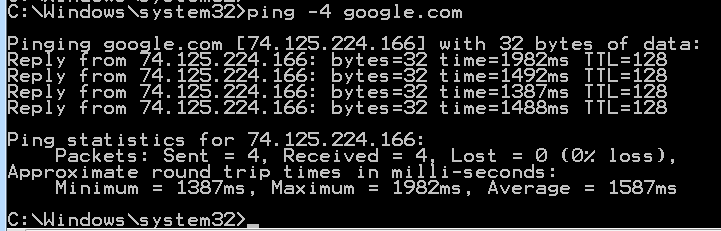
On your Windows 7 client machine, in an Administrator Command Prompt window, execute this command:
ping -4 google.com
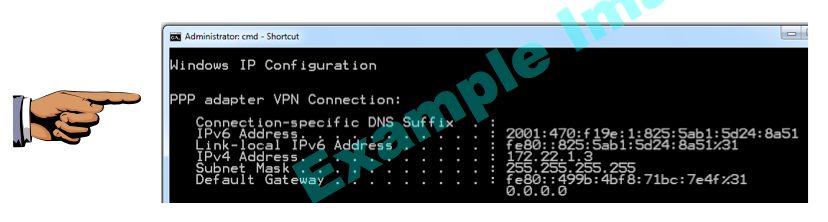
On your Windows 7 client machine, in an Administrator Command Prompt window, execute this command:
ipconfig
Save a screen shot of this image with the filename
Proj L6a from Your Name
netsh interface ipv6 add route ::/0 "VPN Connection" 2001:470:f19e:1::1
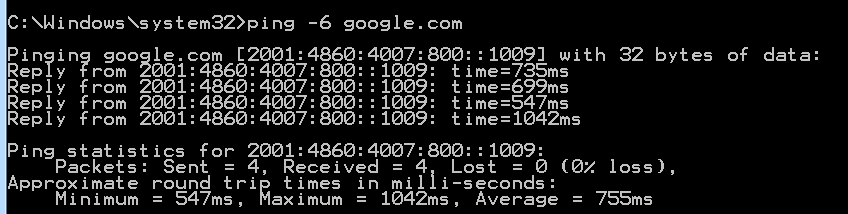
ping -6 google.com
tracert -6 google.com

Save a screen shot of this image with the filename
Proj L6b from Your Name
Proj L6 from Your Name
http://forums.digitalpoint.com/showthread.php?t=84966
https://discussions.apple.com/thread/4294034?start=0&tstart=0
http://ipv6int.net/systems/mac_os_x-ipv6.html
Last modified 5:45 pm 10-1-12